Bernette
Instruction Manual for Bernette Overlocker Models 334DS/334S
Bernette · Made for Bernina
electronic
1/2 5/8 1 inch 1.5 2.5 cm
Bernette® 334 for BERNINA®
Details of the machine
From the front
- Cloth plate
- Stitch plate
- Presser foot
- Needle clamp
- Sewing light
- Thread guide
- Left-hand needle thread tension dial (yellow)
- Presser foot pressure regulator
- Carrying handle
- Thread guide bar
- Upper looper thread tension dial (blue)
- Stitch length adjustment knob
- Differential feed adjustment knob *
- Handwheel
- Machine socket
- Power/light switch
- Looper cover
- Looper cover opening knob
- Lower looper thread tension dial (red)
- Right-hand needle thread tension dial (green)
- Seam guide markings
- Selection lever for overlocking or roll hemming
- Cutting width adjustment knob
- Foot control
- Waste collector
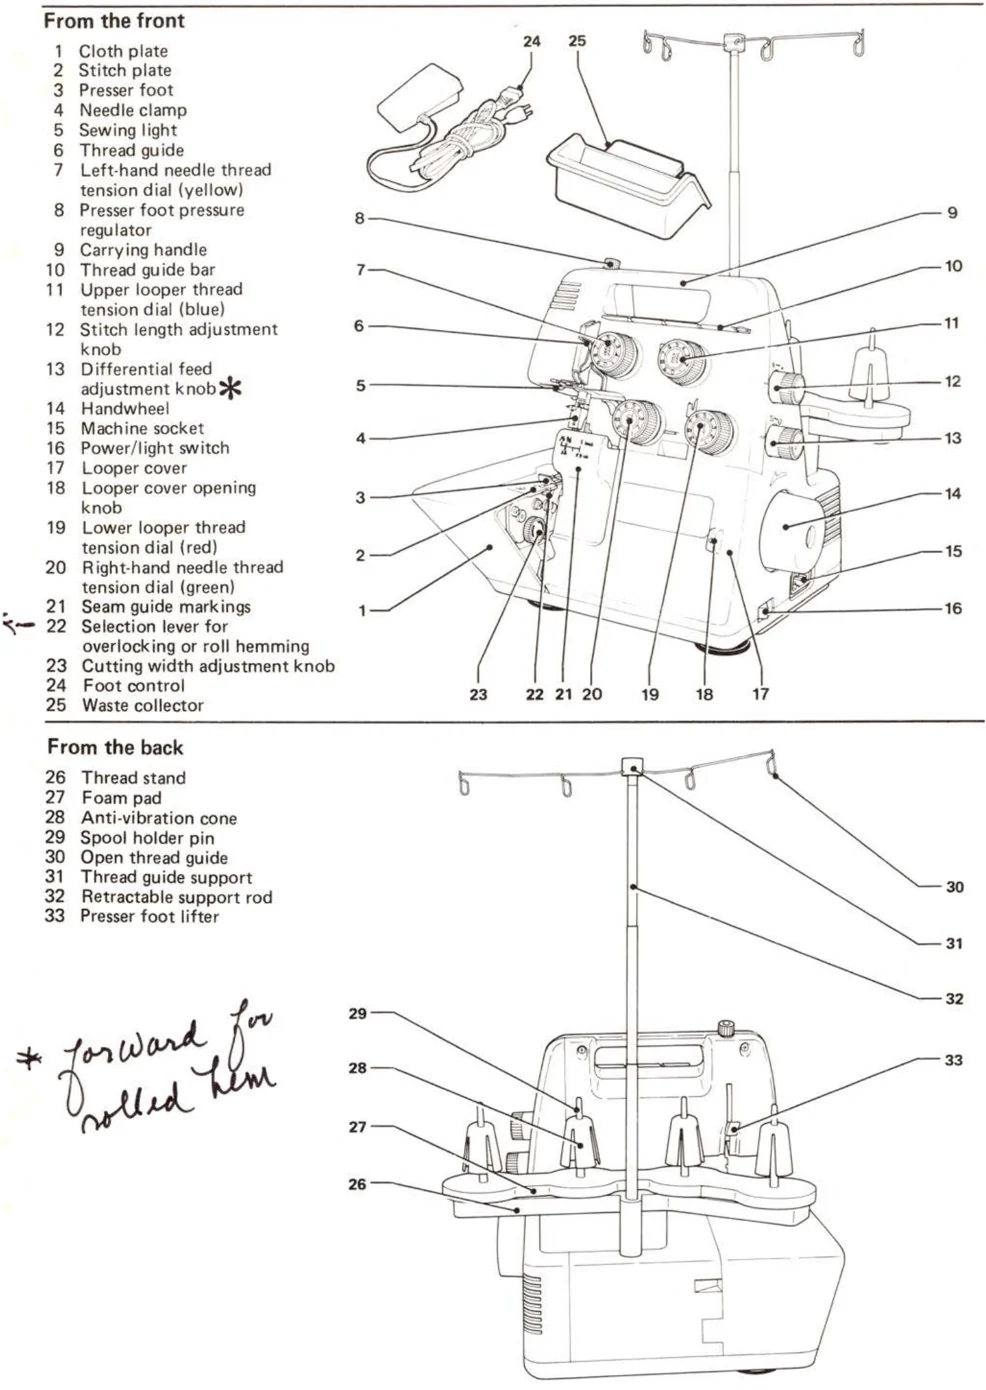
Forward for rolled hem
From the back
- Thread stand
- Foam pad
- Anti-vibration cone
- Spool holder pin
- Open thread guide
- Thread guide support
- Retractable support rod
- Presser foot lifter
Details of the machine
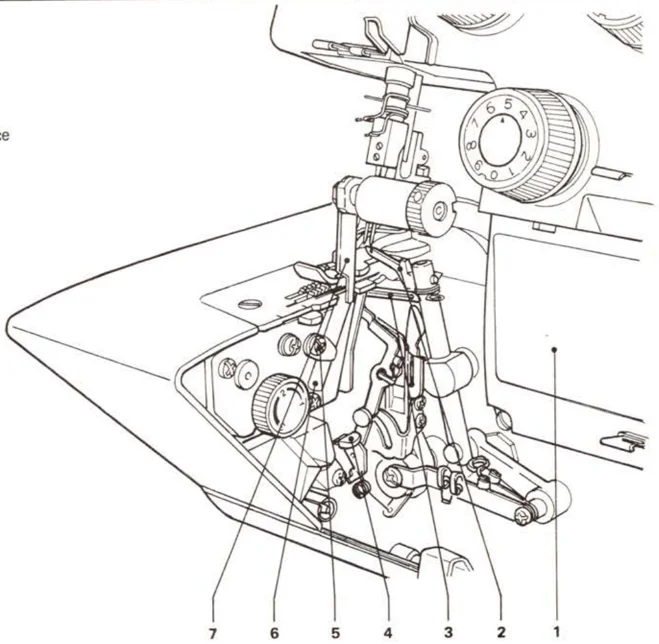
View with looper cover open
1 Threading illustration 2 Upper looper (blue) 3 Lower looper (red) 4 Lower looper threading device 5 Lower knife setscrew 6 Lower knife 7 Upper knife
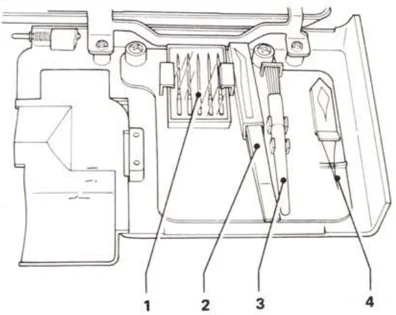
Accessories in looper cover
The most important accessories are neatly stored in the looper cover and always to hand. 1 Household needles 130/705 H 2 x 70, 3 x 80 2 Tweezers 3 Cleaning brush/needle inserter 4 Needle and looper threader
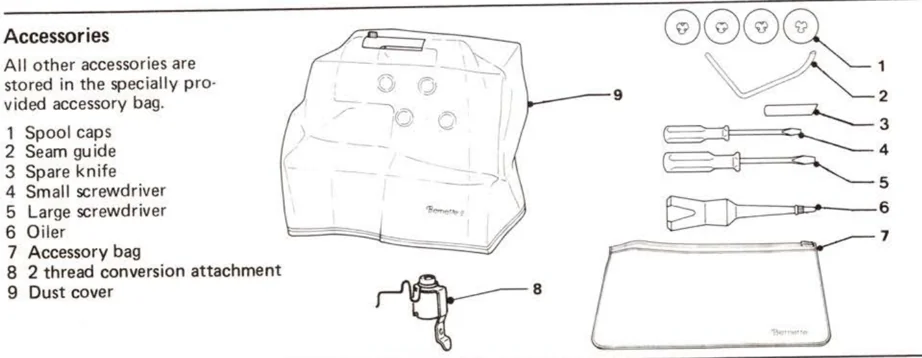
Accessories
All other accessories are stored in the specially provided accessory bag. 1 Spool caps 2 Seam guide 3 Spare knife 4 Small screwdriver 5 Large screwdriver 6 Oiler 7 Accessory bag 8 2 thread conversion attachment 9 Dust cover
Bernette
Dear Customer
Congratulations on your choice!
Your Bernette 334DS/334S is made to the highest standards. It will cut, sew and neaten for you in one smooth operation giving a professional look to anything you make.
The 4 thread Bernette is particularly suited to sewing knits or stretch fabrics. Let your wardrobe and home benefit from the Bernette’s superb sewing qualities. Our comprehensive Instruction Manual introduces you step by step to the joys of overlocking and also gives you some useful sewing tips.
We wish you many happy hours of overlocking pleasure.
FRITZ GEGAUFLTD. CH-8266 Steckborn, Switzerland

Important
Safety regulations
The following safety regulations must be observed without fail:
The moving needles, knives and loopers are potential sources of danger (injury to fingers). It is therefore important to pay attention to these parts.
Manipulations in the area of moving parts such as the needle, loopers and knives, for example when threading, changing the needle or the presser foot or raising the upper knife, should only be carried out when the machine is switched off (turn power switch to "O").
When carrying out maintenance such as cleaning and lubricating, changing the knife or the bulb, or when sewing is interrupted or completed, the machine must be disconnected from the electricity supply by unplugging the machine from the main socket.
All machine repairs, especially electrical repairs (such as changing the connection to the foot control unit) may only be carried out by one of our service agencies.
Safe sewing with Bernette.
Your safety is important to us which is why the Bernette overlocker is equipped with effective safety devices.
The finger guard on the presser foot as well as the guard on the looper cover protect your fingers.
Both needles are protected back and front with a double needle guard.
The danger of needle breakage is therefore reduced.
An additional protection for you and the machine!
The electricity supply to the machine can be interrupted quickly and easily with the conveniently placed power/light switch.
For increased safety, an additional micro-switch is integrated in the opening/closing systems of the looper cover and cloth plate. When either cover is opened, the motor is automatically cut out. The sewing light remains on for easy threading.
The motor is built in and sound-proofed. Threads or fabric scraps cannot get caught in the motor which means uninterrupted work, and thanks to the sound proofing, quiet running.
Four very effective suction feed guarantee perfect stability on any table (without cloth) and no vibration.
Contents
Details of the machine (inside front cover)
View with looper cover open, view from the front and back, accessories
Preparing the machine
- Attaching the foot control 2
- Electronic foot control
- Assembling the thread stand 3
- Waste collector
Using the machine
- Power/light switch 4
- Handwheel, Looper cover
- Cloth plate
- 2-step presser foot lifter 5
- Swing-out foot
- Inserting needles 6
- Raising upper knife
- Feed and stitch length
- Feed and fabric
Threading
- Preparation 7
- Threading instructions
- Needle threader
- Thread guide bar
- Thread tension
- Upper looper thread (blue) 8
- Lower looper thread (red) 9
- Right-hand needle thread (green) 10
- Left-hand needle thread (yellow) 11
- 3 and 2 thread overlock 12
- Trial sewing
- Thread cutter
Threading/Trial Sewing
Trial sewing/Thread tension
- Checking trial run 13
- Adjusting thread tension
Needle, thread and fabric
- Needle and machine 14
- Needle, thread, applications
- Needle and fabric
- Securing ends
(Needle, thread and fabric) Adjustments and settings
- Thread breakage while sewing 15
- Unpicking stitches
- Stitch length
- Cutting width
Adjustments and settings
- Differential feed * 16
Adjustments and settings/Practical sewing
- Gathering*, Presser foot pressure 17
- Roll hemming 18
- Sewing in tape, Seam guides
Practical sewing
- 4 thread overlock 20
- 3 thread overlock 20/21
- 2 thread overlock 20/21
Maintenance
- Replacing upper knife 22
- Replacing lower knife
- Replacing the bulb
- Cleaning and lubricating
Trouble shooting guide
- Problem, cause, solution 23
Index
Technical data (inside back cover)
Special accessories (back cover)
Please note:
Model 334S is not equipped with differential feed. All points relating exclusively to model 334 DS are marked with the symbol. *

Preparing the machine
Attaching the foot control
Plug foot control into machine socket and then into mains socket. The foot control regulates the sewing speed. The sewing speed can be adjusted by increasing or decreasing the pressure on the foot control.
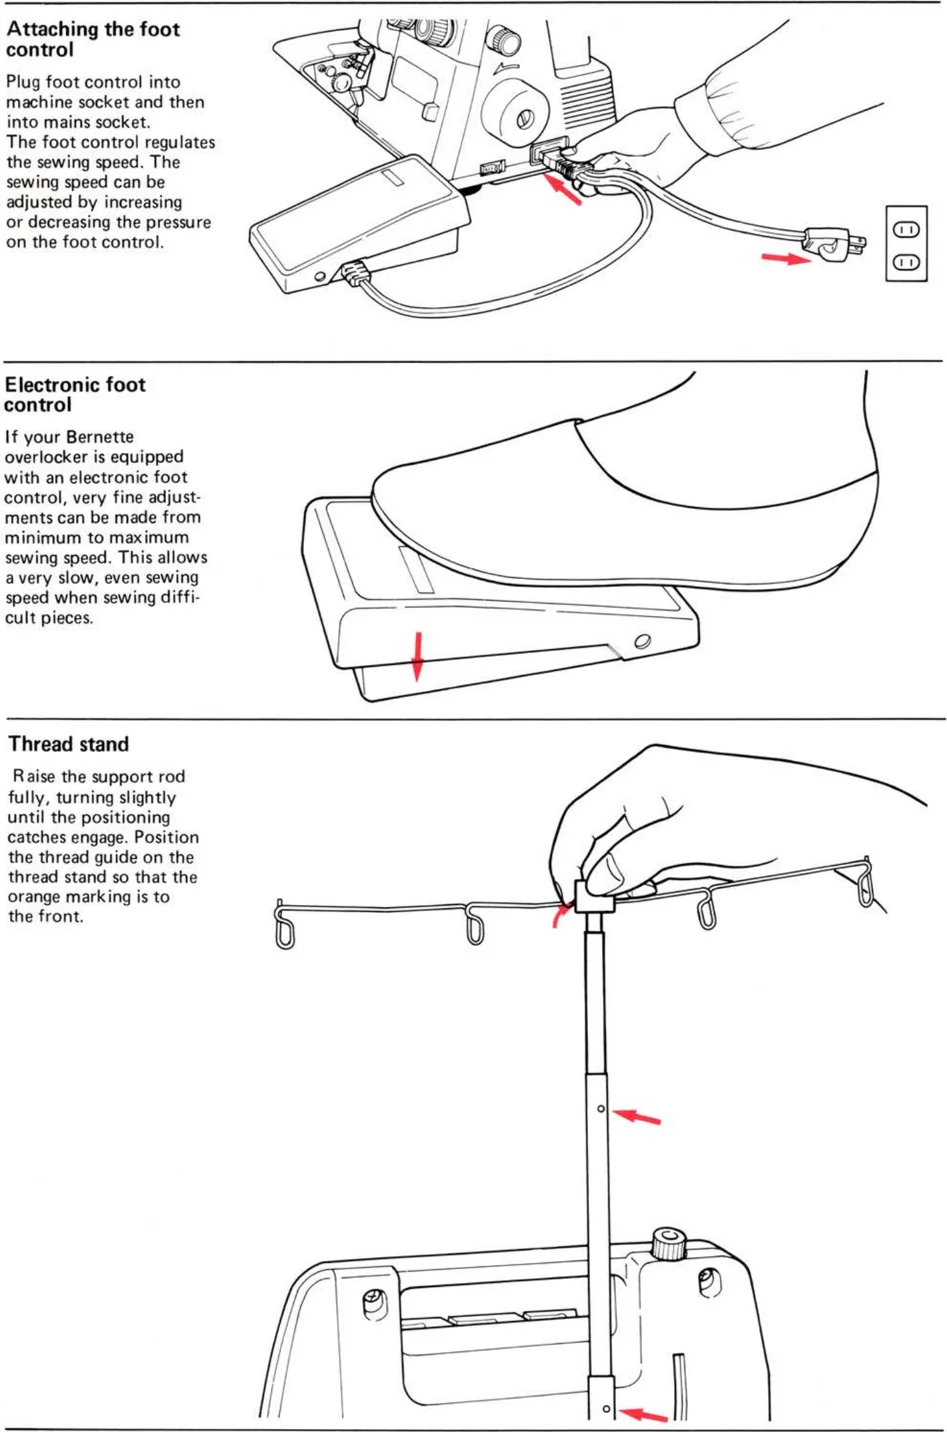
Electronic foot control
If your Bernette overlocker is equipped with an electronic foot control, very fine adjustments can be made from minimum to maximum sewing speed. This allows a very slow, even sewing speed when sewing difficult pieces.
Thread stand
Raise the support rod fully, turning slightly until the positioning catches engage. Position the thread guide on the thread stand so that the orange marking is to the front.
Preparing the machine
Thread cones/spools
Cones or domestic spools in all sizes can be used on the Bernette overlocker.
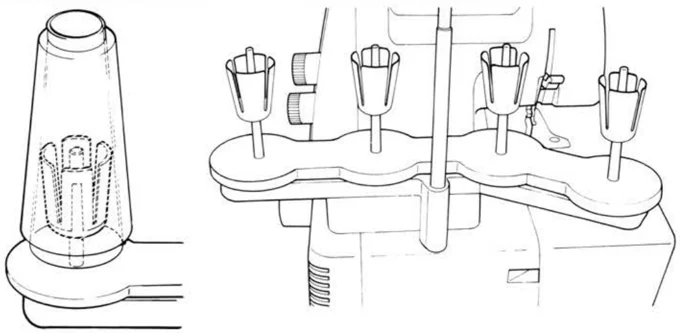
The anti-vibration cone should be used with the wider edge at the bottom on the spool holder pin when sewing with cones.
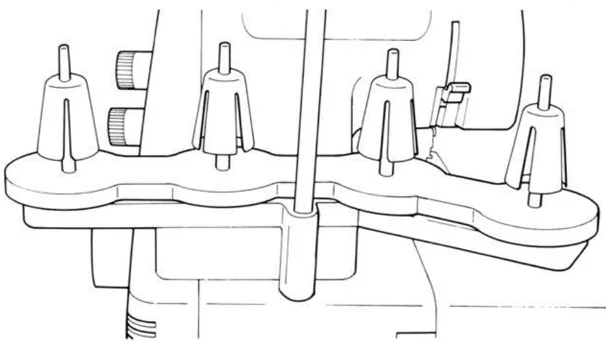
If large industrial spools are used, position the anti-vibration cone upside down on the spool holder pin, i.e. with the wider edge at the top .
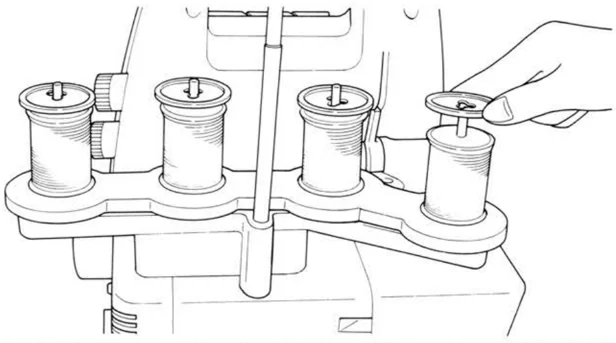
When using household spools, remove the anti-vibration cones. Place spools on spool holder pins and push the spool caps on with the rounded side downwards.
Waste collector
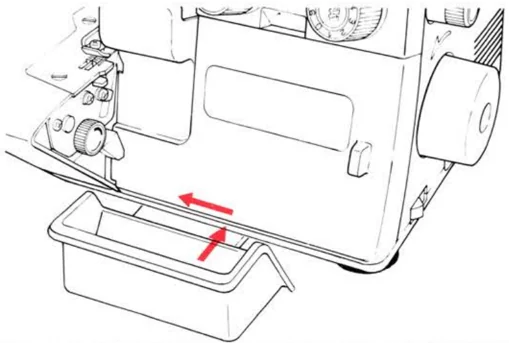
It catches the cut-off fabric as you sew, keeping your working area neat and tidy.
Place the waste collector between the machine and table and push to the left against the cloth plate.
Your machine is now ready for use.
3
Using the machine
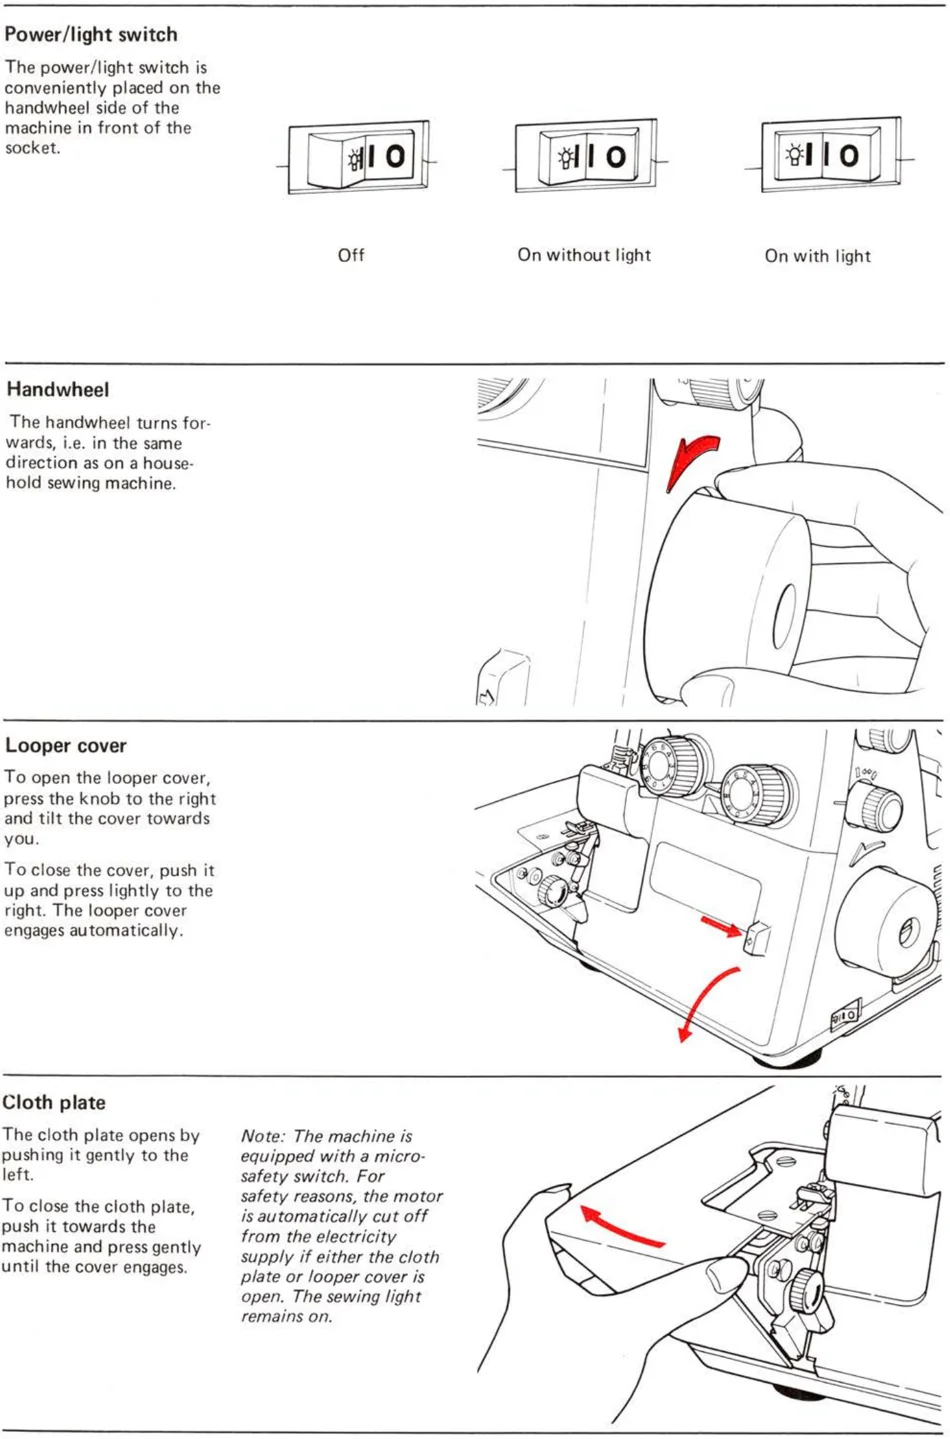
Power/light switch
The power/light switch is conveniently placed on the handwheel side of the machine in front of the socket.
Off On without light On with light
Handwheel
The handwheel turns for-wards, i.e. in the same direction as on a house-hold sewing machine.
Looper cover
To open the looper cover, press the knob to the right and tilt the cover towards you.
To close the cover, push it up and press lightly to the right. The looper cover engages automatically.
Cloth plate
The cloth plate opens by pushing it gently to the left.
To close the cloth plate, push it towards the machine and press gently until the cover engages.
Note: The machine is equipped with a micro-safety switch. For safety reasons, the motor is automatically cut off from the electricity supply if either the cloth plate or looper cover is open. The sewing light remains on.
4
Using the machine
Two-step presser foot lifter
It is positioned on the rear of the machine above the presser foot.
To raise the presser foot, lift the presser foot lever up until it engages (A).
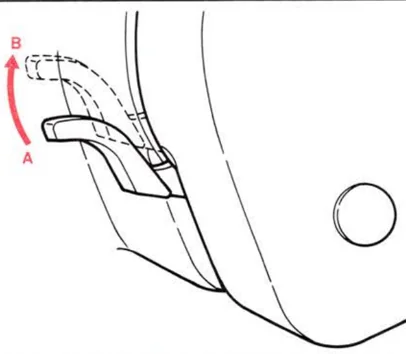
It can be raised again to maximum height and held in this position to provide more space between presser foot and stitch plate (B).
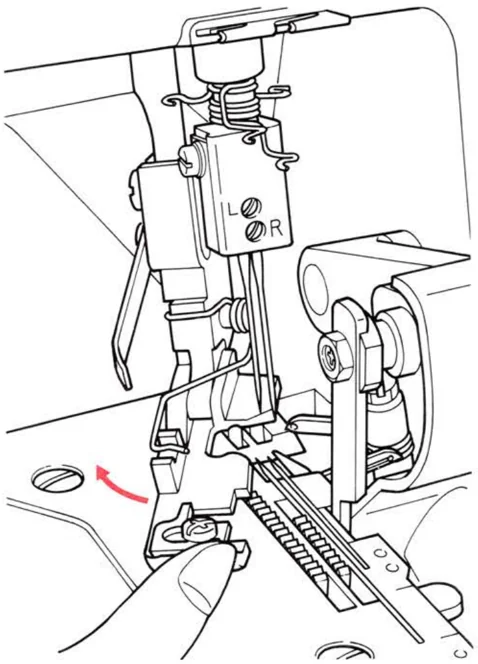
Swing-out presser foot
- Turn power switch to "0".
- Raise presser foot. Turn handwheel towards you until needles are fully raised.
Bernette's unique swing-out presser foot provides improved access to the looper and needle eyes and also makes changing the needles easier.
Note: When the presser foot is swung out, the machine motor does not operate. An added safety measure to prevent damage to the machine.
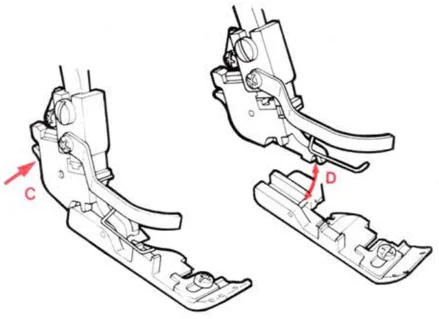
Changing the presser foot
- Turn power switch to "0".
- Raise the presser foot. Turn handwheel towards you until needles are fully raised.
Press the catch (C) to release the presser foot from the clamp. Remove the presser foot to the left.
To attach the presser foot, place it under the shaft. The groove in the shaft should line up exactly with the presser foot pin (D). Lower the shank and the presser foot will engage automatically.
5
Using the machine
Inserting the needles
Needles can be inserted quickly and easily with the practical brush-cum-needle inserter (A).
- Turn power switch to "0".
- Turn handwheel towards you until needles are fully raised.
- Raise the presser foot and swing out.
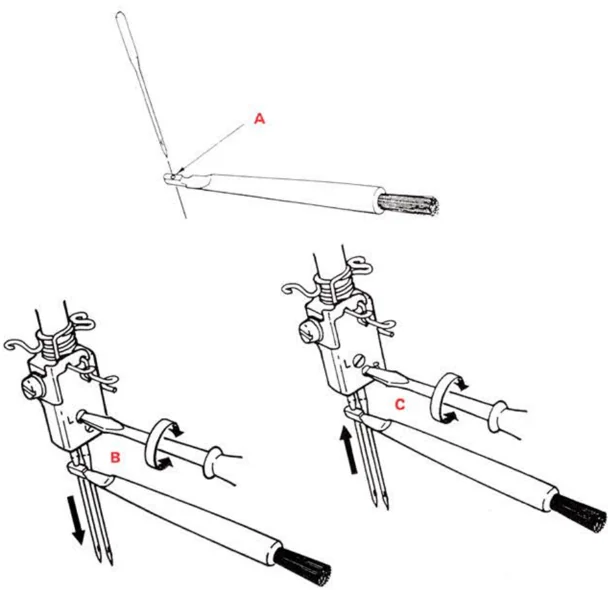
Using the small screwdriver, loosen the needle setscrews and remove the needles (B).
Place right-hand needle, flat sides towards the back, into the hole of the needle inserter and insert the needle as far as possible into the needle clamp.
Tighten the setscrew lightly and then insert the left-hand needle in the same way and tighten both setscrews (C).
Raising the upper knife
- Turn power switch to "0".
- Turn the handwheel towards you until needles are fully raised.
- Open looper cover.
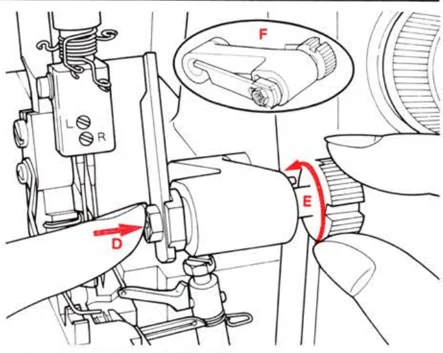
Press the upper knife holder (D) to the right. Turn the knob clockwise (E) until the knife is in the position illustrated (F).
Feed dog and stitch length
Each stitch equals one complete movement of the feed dog. The length of this movement depends on the stitch length selected. The average stitch length is between 2 and 3 mm. This is the setting used for most normal sewing work.
Feed dog and fabric feed
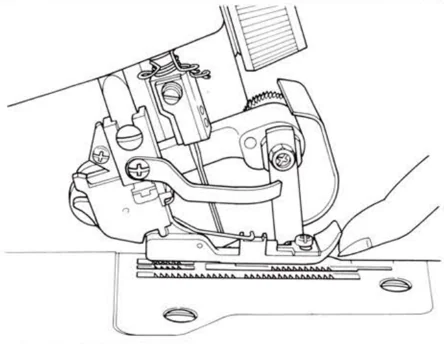
The feed dog is longer than the presser foot which means the fabric can be gripped in front of the foot without having to raise it. When sewing thick fabrics, especially knits, raise the front of the presser foot slightly with your thumb and position the fabric under the foot. Let go of the foot and the fabric will be taken up by the feed dog.
6
Threading
Preparation
- Turn power switch to "0".
- Support rod with thread guide must be fully raised.
- Open the looper cover and cloth plate.
- Turn the handwheel towards you until needles are fully raised.
- Raise the upper knife.
Threading instructions
Thread the machine carefully and in the correct sequence. This is important for perfect results. When threading for the first time, we suggest you use different coloured threads: blue, red, green and yellow. Then when you have made a trial run, it is very easy to see exactly how the stitch is formed.
The Bernette overlocker is equipped with invaluable aids to simplify threading:
- coloured threading illustration
- colour-coded thread path on the machine
- open thread guides
- accessories integrated in the looper cover.
Needle threader
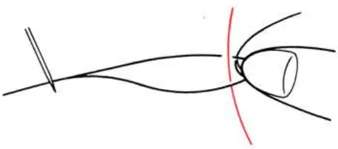
Insert thread into threader. Push the rigid end of the threader through the looper or needle eye and pull it completely through the eye.
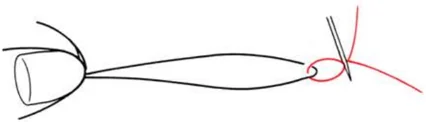
Thread guide bar
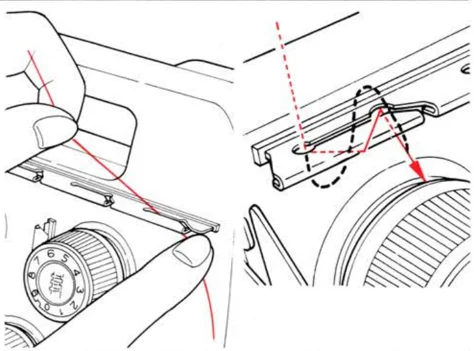
The guides on the thread guide bar are simple to thread. Slip the thread into the appropriate guide (note coloured markings) and pull it to the left end of the guide.
Take it up over the edge of the thread guide bar and thread it again into the same guide. The thread now forms an S-loop around the thread guide bar.
Thread tension
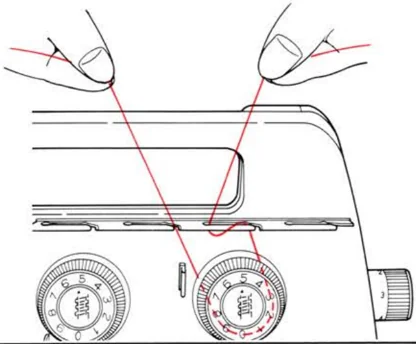
The thread must lie correctly between the tension discs for perfect stitch formation. Using the left hand, guide the thread around the tension dials and then pull it lightly to and fro with both hands. When a slight resistance is felt, the thread is lying correctly between the tension discs.
Threading
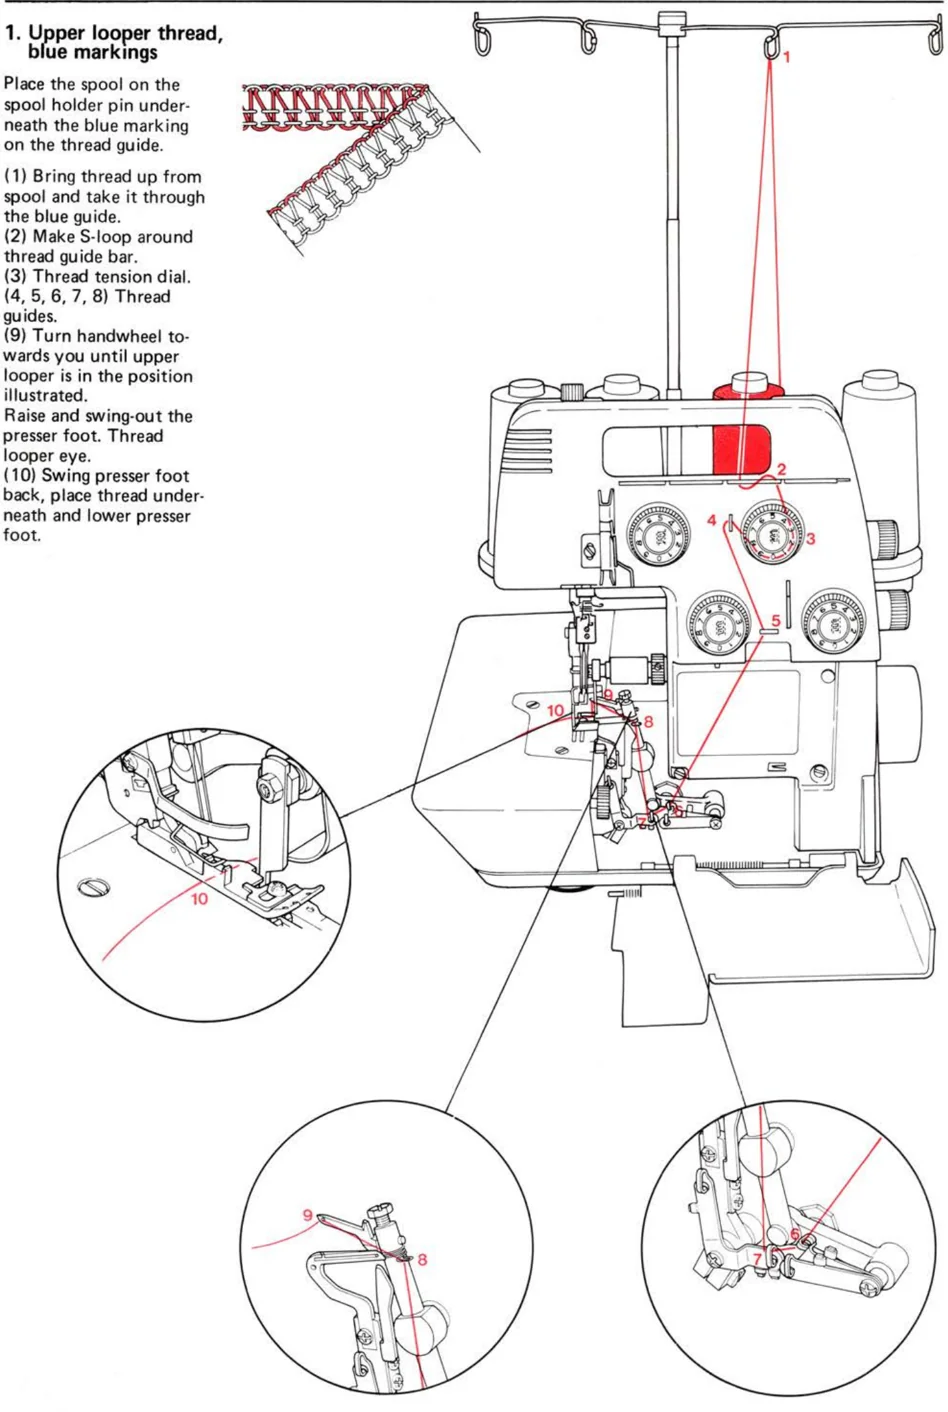
1. Upper looper thread, blue markings
Place the spool on the spool holder pin underneath the blue marking on the thread guide.
(1) Bring thread up from spool and take it through the blue guide. (2) Make S-loop around thread guide bar. (3) Thread tension dial. (4, 5, 6, 7, 8) Thread guides. (9) Turn handwheel towards you until upper looper is in the position illustrated. Raise and swing-out the presser foot. Thread looper eye. (10) Swing presser foot back, place thread underneath and lower presser foot.
8
Threading
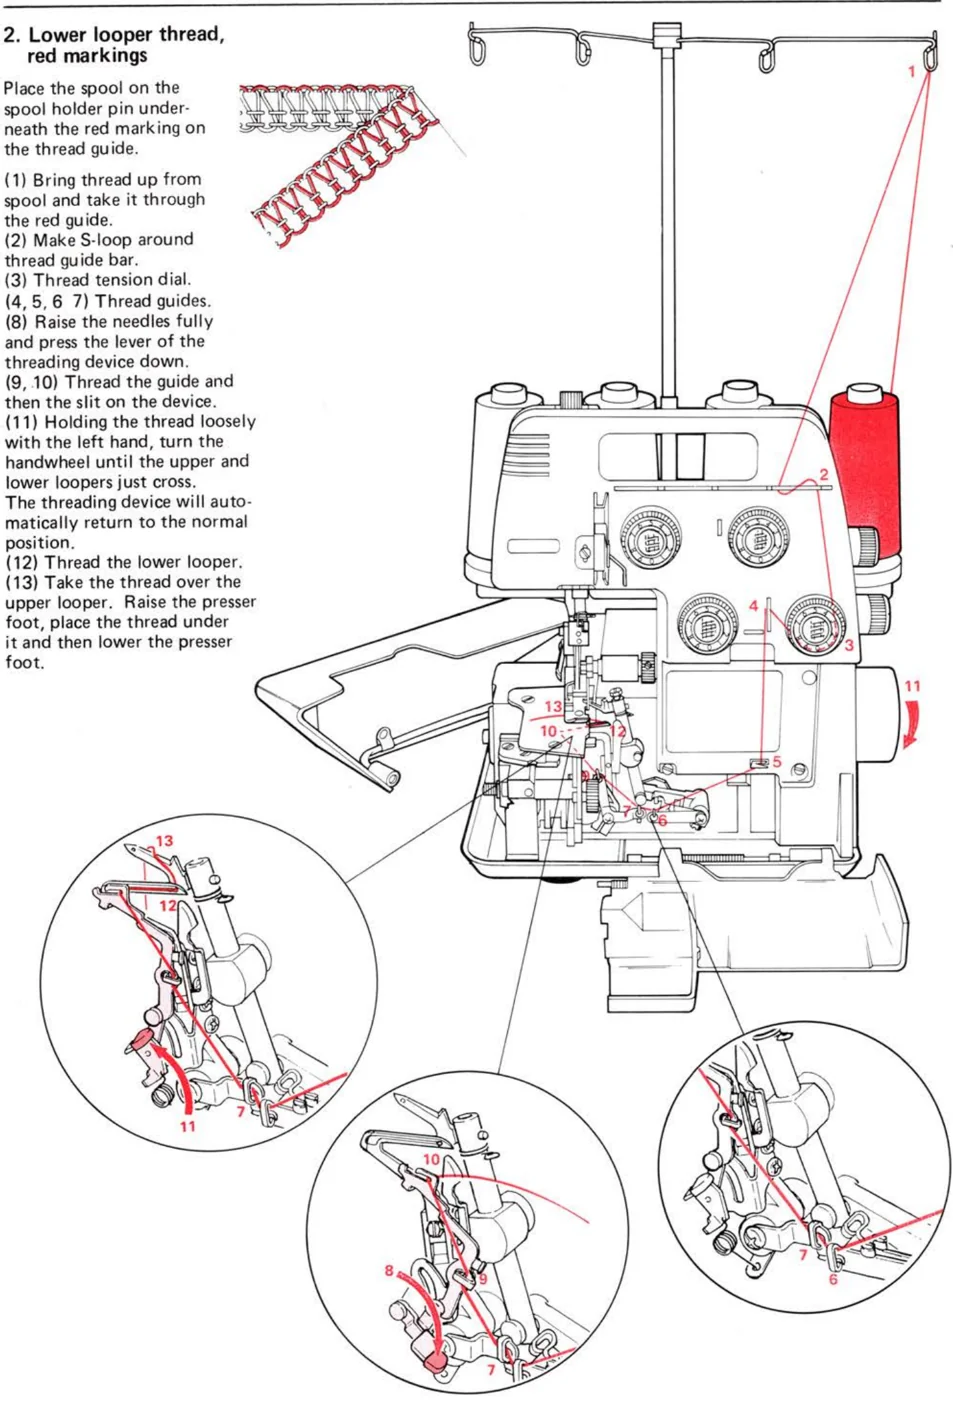
2. Lower looper thread, red markings
Place the spool on the spool holder pin underneath the red marking on the thread guide.
(1) Bring thread up from spool and take it through the red guide. (2) Make S-loop around thread guide bar. (3) Thread tension dial. (4, 5, 6 7) Thread guides. (8) Raise the needles fully and press the lever of the threading device down. (9, 10) Thread the guide and then the slit on the device. (11) Holding the thread loosely with the left hand, turn the handwheel until the upper and lower loopers just cross. The threading device will automatically return to the normal position. (12) Thread the lower looper. (13) Take the thread over the upper looper. Raise the presser foot, place the thread under it and then lower the presser foot.
9
Threading
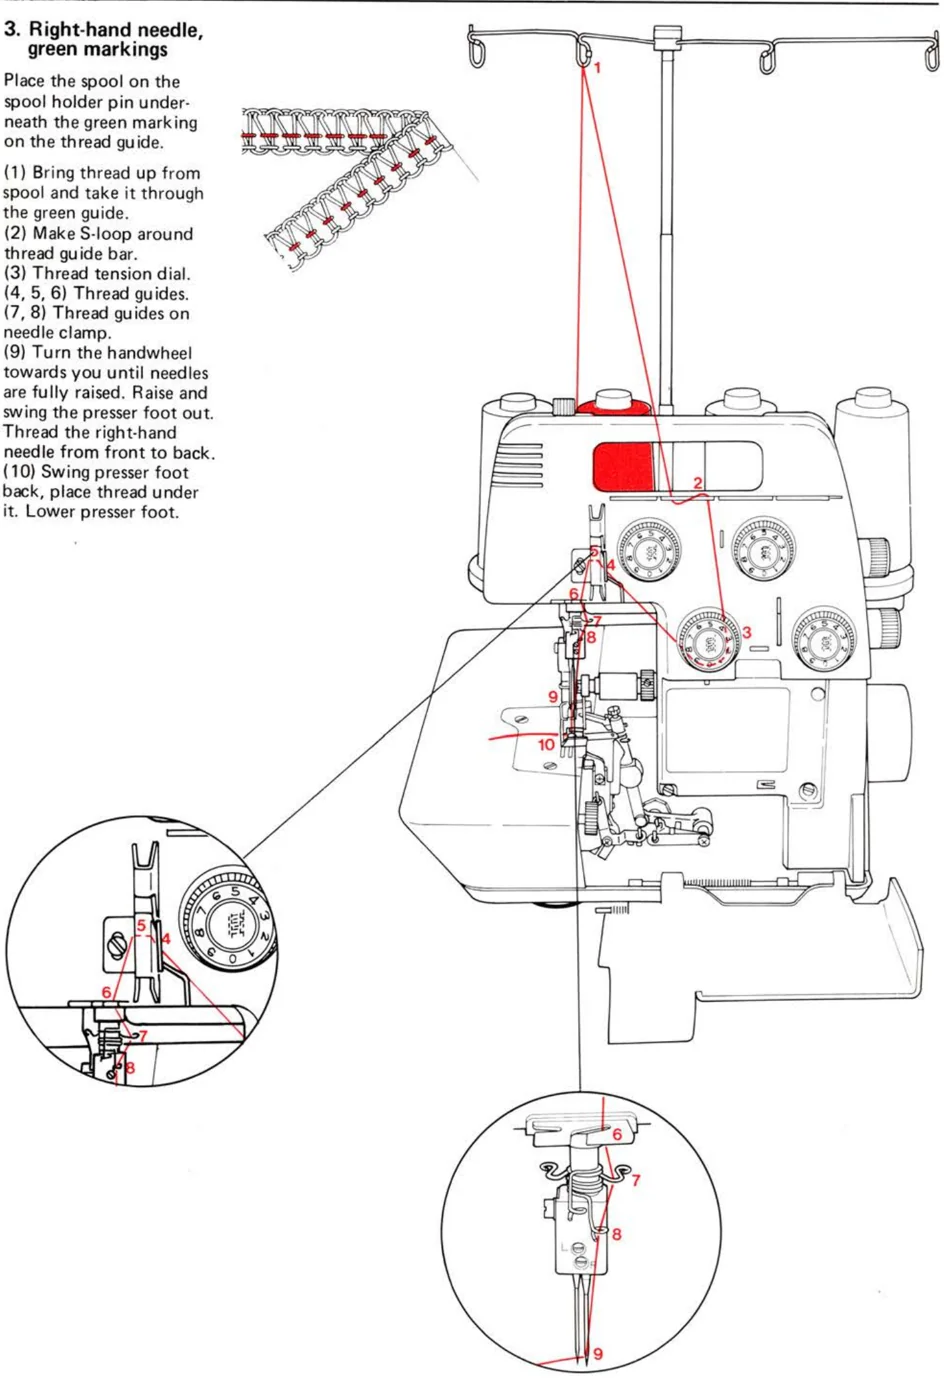
3. Right-hand needle, green markings
Place the spool on the spool holder pin underneath the green marking on the thread guide.
(1) Bring thread up from spool and take it through the green guide. (2) Make S-loop around thread guide bar. (3) Thread tension dial. (4, 5, 6) Thread guides. (7, 8) Thread guides on needle clamp. (9) Turn the handwheel towards you until needles are fully raised. Raise and swing the presser foot out. Thread the right-hand needle from front to back. (10) Swing presser foot back, place thread under it. Lower presser foot.
10
Threading
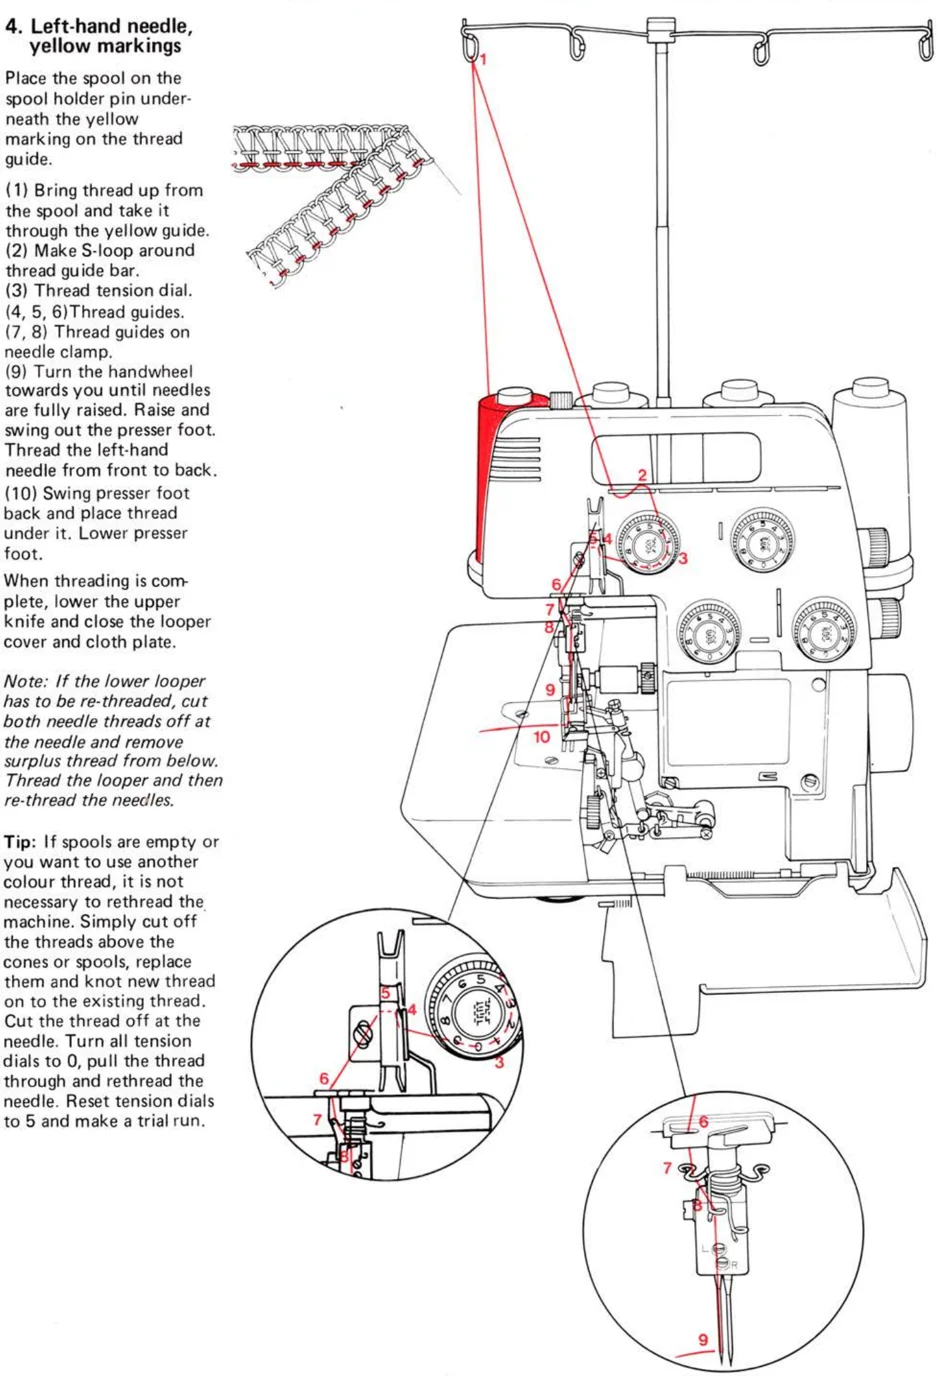
4. Left-hand needle, yellow markings
Place the spool on the spool holder pin under-neath the yellow marking on the thread guide.
(1) Bring thread up from the spool and take it through the yellow guide. (2) Make S-loop around thread guide bar. (3) Thread tension dial. (4, 5, 6) Thread guides. (7, 8) Thread guides on needle clamp. (9) Turn the handwheel towards you until needles are fully raised. Raise and swing out the presser foot. Thread the left-hand needle from front to back. (10) Swing presser foot back and place thread under it. Lower presser foot.
When threading is com-plete, lower the upper knife and close the looper cover and cloth plate.
Note: If the lower looper has to be re-threaded, cut both needle threads off at the needle and remove surplus thread from below. Thread the looper and then re-thread the needles.
Tip: If spools are empty or you want to use another colour thread, it is not necessary to rethread the machine. Simply cut off the threads above the cones or spools, replace them and knot new thread on to the existing thread. Cut the thread off at the needle. Turn all tension dials to 0, pull the thread through and rethread the needle. Reset tension dials to 5 and make a trial run.
11
Threading / Trial Sewing
2/3 thread overlock
The Bernette 334S/334DS sews a 2 or 3 thread overlock. The width of the stitch is determined by the needle used.
For a 3 – 5 mm 2 thread overlock, remove the left-hand needle. Attach the 2 thread conversion attmt. on the top of the upper looper arm (A) and insert the wire hook into the looper eye (B).
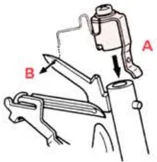
Now thread the lower looper and the right-hand needle (see pages 9, 10). Lay the lower looper thread over the point of the looper and to the left of the wire hook.
The wider 5-7 mm 2 thread overlock is particulary suitable for decorative work with special threads.
Remove the right-hand needle and attach the 2 thread conversion attmt. Thread the lower looper and left needle (see pages 9, 11).
Lay the lower looper thread over the point of the looper and to the left of the wire hook.
For a 3 – 5 mm wide 3 thread overlock stitch, remove the left-hand needle. Then thread both loopers and the right-hand needle (see pages 8–10).
For a 5 – 7 mm wide 3 thread overlock stitch, remove the right-hand needle.
Then thread both loopers and the left-hand needle (see pages 8, 9 and 11).
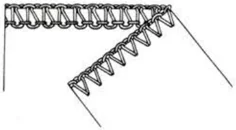
Important: Before starting to sew 2 thread overlock, turn the handwheel forwards to check that the conversion attachment is correctly mounted.
It is important to remove the conversion attachment before returning to 3 or 4 thread overlocking.
Sewing test
After threading, make a trial run.
Always use a double layer of fabric in order to be able to check the stitch formation and thread tension properly.
Set all tension dials to 5. Upper knife in the cutting position. Raise the presser foot and place fabric underneath. Lower the presser foot. Sew.
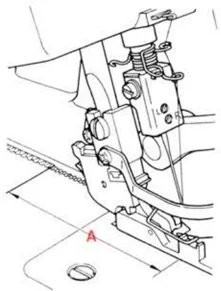
The seam guide markings on the looper cover allow you to guide the fabric easily and perfectly according to the chosen or given seam allowance.
The measurements are taken from the point of needle insertion.
Thread cutter
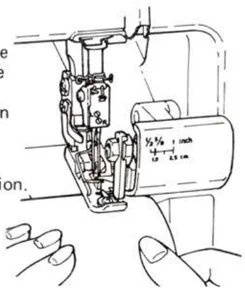
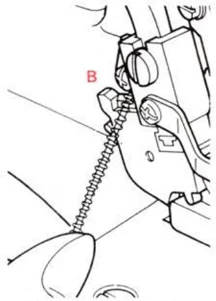
At the end of the seam, continue sewing a 5 – 6 cm (2–2 1/2'') long thread chain (A).
Holding the fabric in one hand, pull the thread chain over the thread cutter on the presser foot shank (B).
Trial sewing / Thread tension
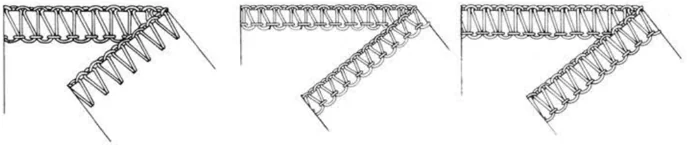
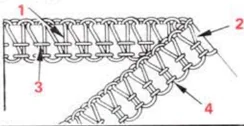
Check your trial run . . . 3/4 thread overlock
- Upper looper thread (blue)
- Lower looper thread (red)
- Right-hand needle thread (green)
- Left-hand needle thread (yellow)
The upper looper thread lies on the upper side of the fabric and the lower looper thread lies on the underside of the fabric. The loops formed by both threads meet exactly on the edge of the fabric.
The right-hand needle forms a stretchy safety seam in the centre of the stitch. The left-hand needle thread anchors both looper threads. When sewing 3 thread overlock, remove either the right-hand needle (wide stitch) or the left-hand needle (narrow stitch).
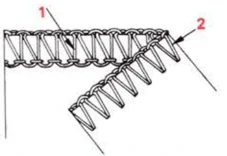
Check your trial run . . . 2 thread overlock
- Lower looper thread (red)
- Needle thread (green or yellow)
The lower looper thread lies on the upper side, the needle thread on the underside of the fabric. The loops formed by both threads meet exactly on the edge of the fabric.
Important: The 2 thread overlock is suitable for neatening or decorating edges and for flat joining seams with special threads. It is not suitable for normal overlocked seams as with time, it would come apart.
Thread tension
Imperfect stitch formation can be easily corrected by adjusting the thread tension.
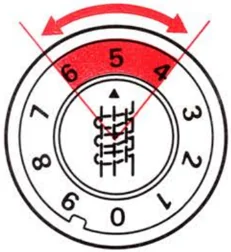
Infinitely variable adjustments can be made from 0 – 9 to suit the type of fabric or thread. The dials cannot be over-rotated.
Turn to the left for less tension. Turn to the right for more tension.
The ideal tension for normal jerseys and woven fabrics for a 3 or 4 thread overlock is between 4 and 6, marked in yellow on the dials.
The basic settings for a 2 thread overlock is between 6 and 8 for the lower looper thread and between 1 and 3 for the needle thread.
The thread tensions may differ considerably to the basic settings if special threads such as Cordonnet, perle yarn or other decorative threads are used.
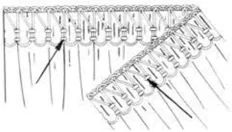
Adjusting the thread tension . . . 3/4 thread overlock
Turn the tension dials by only half or one number then test sew again and check the results.
- The loops are formed on the underside: Tighten the upper looper thread tension (blue). Loosen the lower looper thread tension (red).
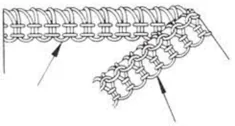
- The left-hand needle thread forms loops on the underside: Tighten the left-hand needle thread tension (yellow).
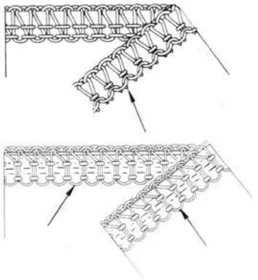
- The loops are formed on the upper side: Tighten the lower looper thread tension (red). Loosen the upper looper thread tension (blue).
-
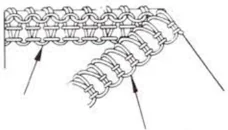
The edge of the fabric curls up: Tension of both looper threads is too tight. Loosen upper and lower looper thread tension (blue and red).
-
The right-hand needle thread forms loops on the underside: Tighten the right-hand needle thread tension (green).
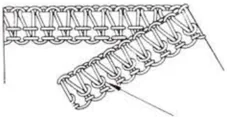
- The fabric puckerers during sewing: Loosen the right or left-hand needle thread tension (green or yellow).
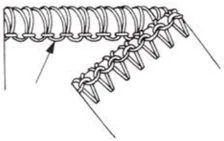
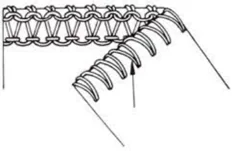
Adjusting the thread tension . . . 2 thread overlock
- The loops are formed on the underside: Increase the lower looper tension (red) and reduce the needle tension (yellow or green).
- The loops are formed on the upperside: Reduce the lower looper tension (red) and increase the needle tension (yellow or green).
13
Needle, thread and fabric
Needle and machine
Your Bernette overlocker is equipped with needle system 130/705 H (household needles). These should be purchased when replacement needles are required.
Needle and thread
The needle size used depends on the thread. The needle should suit the thread.
When sewing, the thread passes through the long groove in the needle. If the needle is too fine, the thread does not fit into the groove and the result is skipped stitches.
Use needles no. 70 – 90 on your Bernette. Thick threads such as buttonhole twist, wool, perle yarn or decorative threads are best used in the loopers.
\begin{tabular}{|l|l|l|} \hline \textbf{Needle no.} & \textbf{Thread} & \textbf{Application} \ \hline 70 – 80 & Polyester continuous thread 150 & Neatening edges. Roll hemming. Fine seams in fine fabrics \ \cline{2-3} & Darning thread & Neatening edges. Roll hemming \ \hline 80 – 90 & Spun polyester thread 120 Synthetic thread & Seams in all fabrics \ \cline{2-3} & Polyester continous thread 120/2 & Neatening edges \ \cline{2-3} & Woolly nylon thread & Stretchy seams in knitted fabrics Roll hemming \ \hline \end{tabular}
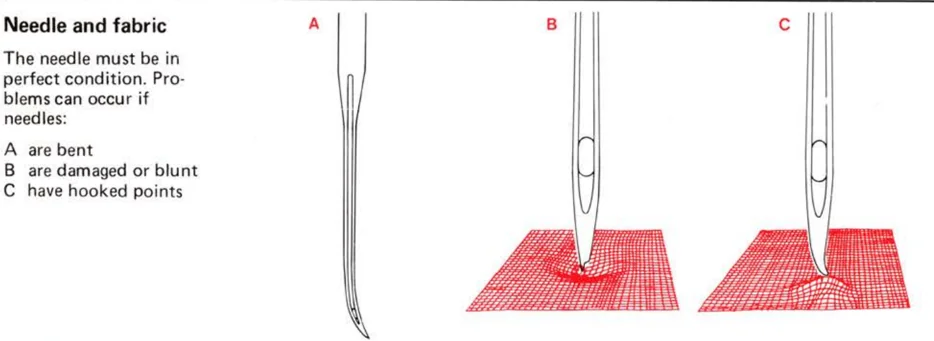
Needle and fabric
The needle must be in perfect condition. Problems can occur if needles: A are bent B are damaged or blunt C have hooked points
Securing seams
Sewing in the thread chain at the beginning of the seam
Sew a 3 – 4 cm (approx. 1 1/2'') thread chain. Sew 2 – 3 stitches on the fabric. With the needle lowered, raise the presser foot. Stretch the thread chain and lay it from the left under the presser foot on the fabric. Lower the presser foot and sew over the thread chain.
Sewing in the thread chain
Sewing in the thread chain at the end of the seam
Sew to the end of the seam. Turn the handwheel towards you until needles are fully raised. Raise the presser foot. Set the stitch selection lever to roll hemming, Carefully pull the fabric away towards the back and the thread chain will be released from the stitch tongue.
Reset the stitch selection lever to overlocking. Turn the work and place it under the foot so that the needle enters the fabric with the first stitch. Sew approx. 2 – 3 cm over the first seam, taking care not to cut the fabric edge.
If thread chains are not sewn in
Make sure you leave enough chain at the beginning and end of the seam so that it can be knotted or pulled through the first/last few stitches with a darning needle.
14
Needle, thread and fabric / Adjustments and settings
Thread breakage during sewing
Sew off immediately at an angle and remove the work. Rethread.
If the lower looper thread has broken, cut off both needle threads at the needle and remove the thread. First thread the looper and then the needle.
Unpicking seams
Using sharp scissors, cut the loops (A). Pull the needle thread (B) and the stitches will come undone.
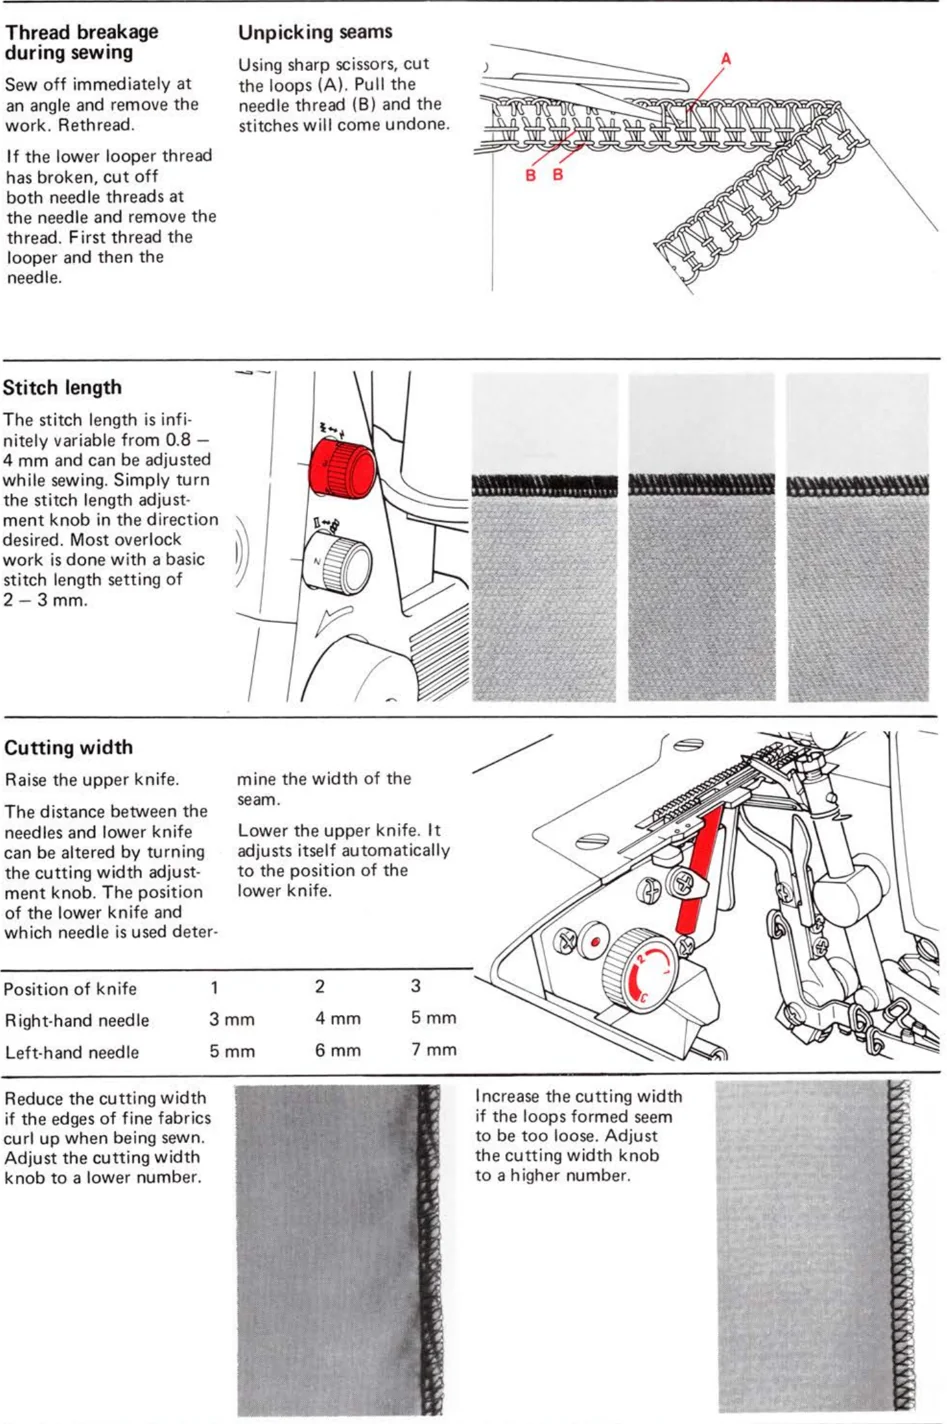
Stitch length
The stitch length is infinitely variable from 0.8 – 4 mm and can be adjusted while sewing. Simply turn the stitch length adjustment knob in the direction desired. Most overlock work is done with a basic stitch length setting of 2 – 3 mm.
Cutting width
Raise the upper knife.
The distance between the needles and lower knife can be altered by turning the cutting width adjustment knob. The position of the lower knife and which needle is used determine the width of the seam.
Lower the upper knife. It adjusts itself automatically to the position of the lower knife.
| Position of knife | 1 | 2 | 3 |
|---|---|---|---|
| Right-hand needle | 3 mm | 4 mm | 5 mm |
| Left-hand needle | 5 mm | 6 mm | 7 mm |
Reduce the cutting width if the edges of fine fabrics curl up when being sewn. Adjust the cutting width knob to a lower number.
Increase the cutting width if the loops formed seem to be too loose. Adjust the cutting width knob to a higher number.
15
Adjustments and settings
Differential feed *
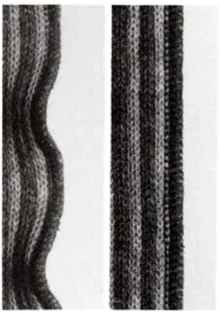
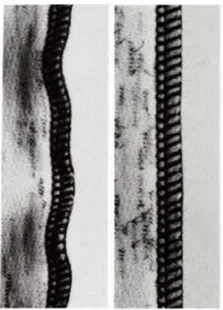
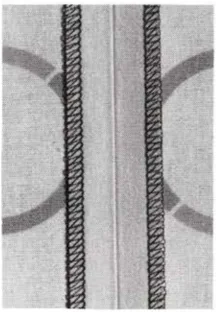
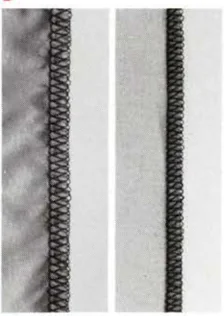
There are two feed dogs — one front (A) and one rear (B). The two feed dogs move independently and the distance each feed dog travels during one complete movement can differ. The differential feed prevents fluting or waving in knitted or stretch fabrics and movement between the layers of fabric. It also ensures pucker-free seams in smooth fabrics such as nylon or closely woven fabrics.
Perfectly flat seams in knits or stretch fabrics.
The distance travelled by the front feed dog should be greater than that of the rear feed dog. The front feed dog, therefore, feeds an amount of fabric which the rear feed dog can take up behind the needle without stretching the fabric.
Pucker-free seams in nylon or closely woven fabrics.
The distance travelled by the rear feed dog should be greater than that of the front feed dog. The front feed dog, therefore, holds the fabric back so that the rear feed dog can take it up behind the needle without any puckering.
Adjusting the differential feed *
The differential feed can be adjusted by simply turning the differential feed adjustment knob in the direction desired. Always make a trial run. The differential feed is infinitely variable and can be adjusted while sewing.
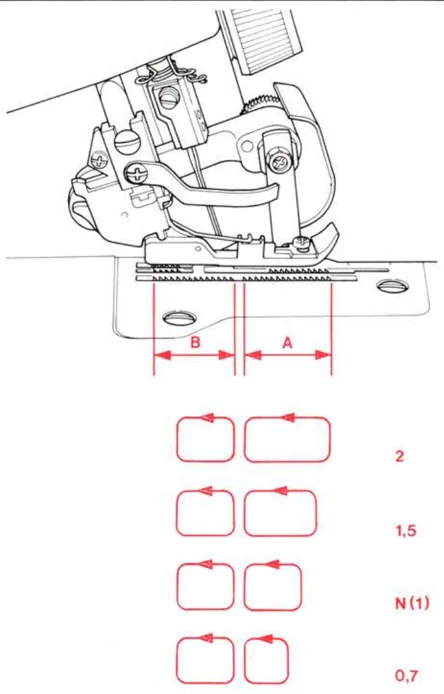
\begin{tabular}{lll} Effect & Fabric \ 2 & Wave-free seams (A) & Thick wool knits, hand knitted articles, very stretchy fabrics \ 1.5 & Wave-free seams (B) & Cotton, silk, synthetic jerseys, sweatshirt fabric and fine knits \ N & Normal feed (C) & Woven fabrics \ 0.7 & No puckering (D) & Fine nylon jersey, closely woven fabrics, lining fabric satin, poplin \ \end{tabular}
16
Adjustments and settings / Practical sewing
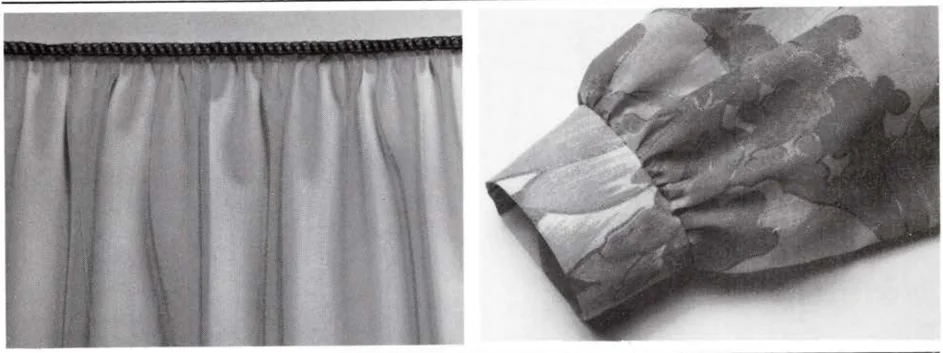
Gathering *
Using the differential feed, a single layer of fabric can be gathered before sewing it to the garment. For example, sleeve heads and lower edges, yokes, lace edging or frills.
Adjustment:
- Stitch: 4 thread overlock
- Differential feed: 2
- Stitch length: 3 – 4
- Cutting width: 2 – 3
- Thread tension: 4 – 6
Increase the thread tension (6 – 8) for a tighter gathering.
Note: When sewing without differential feed, turn the adjustment knob to "N".
Presser foot pressure
The presser foot pressure guarantees perfect feed. It is factory adjusted to a medium setting and does not necessarily have to be adjusted for sewing various different fabrics. Should you wish to adjust it, simply turn the presser foot pressure regulator in the direction desired.
Note: Seams in knitted fabrics will wave if the presser foot pressure is too tight so do not increase it when sewing knits.
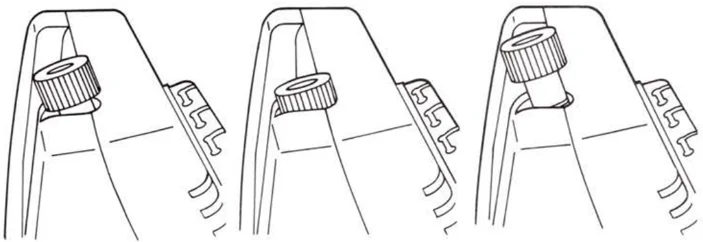
Position of regulator for normal pressure.
More pressure: for thick or stiff fabrics such as denim, tweed, firm linen.
Less pressure: for light-weight or sheer fabrics such as chiffon, georgette, batiste.
17
Adjustments and settings / Practical sewing
Roller hemmer
Turn the power switch to off. Turn handwheel towards you until needles are fully raised.
The roll hemmer is fully integrated in the machine. Simply flick the selection lever and the machine is converted from overlocking to roll hemming. The edge of the fabric will be automatically rolled over producing a very narrow, fine seam.
For overlocking, push the selection lever forwards to the red marking on the stitch plate nearest the presser foot (A)
For roll hemming, pull the selection lever back to the red marking on the stitch plate furthest from the presser foot (B)
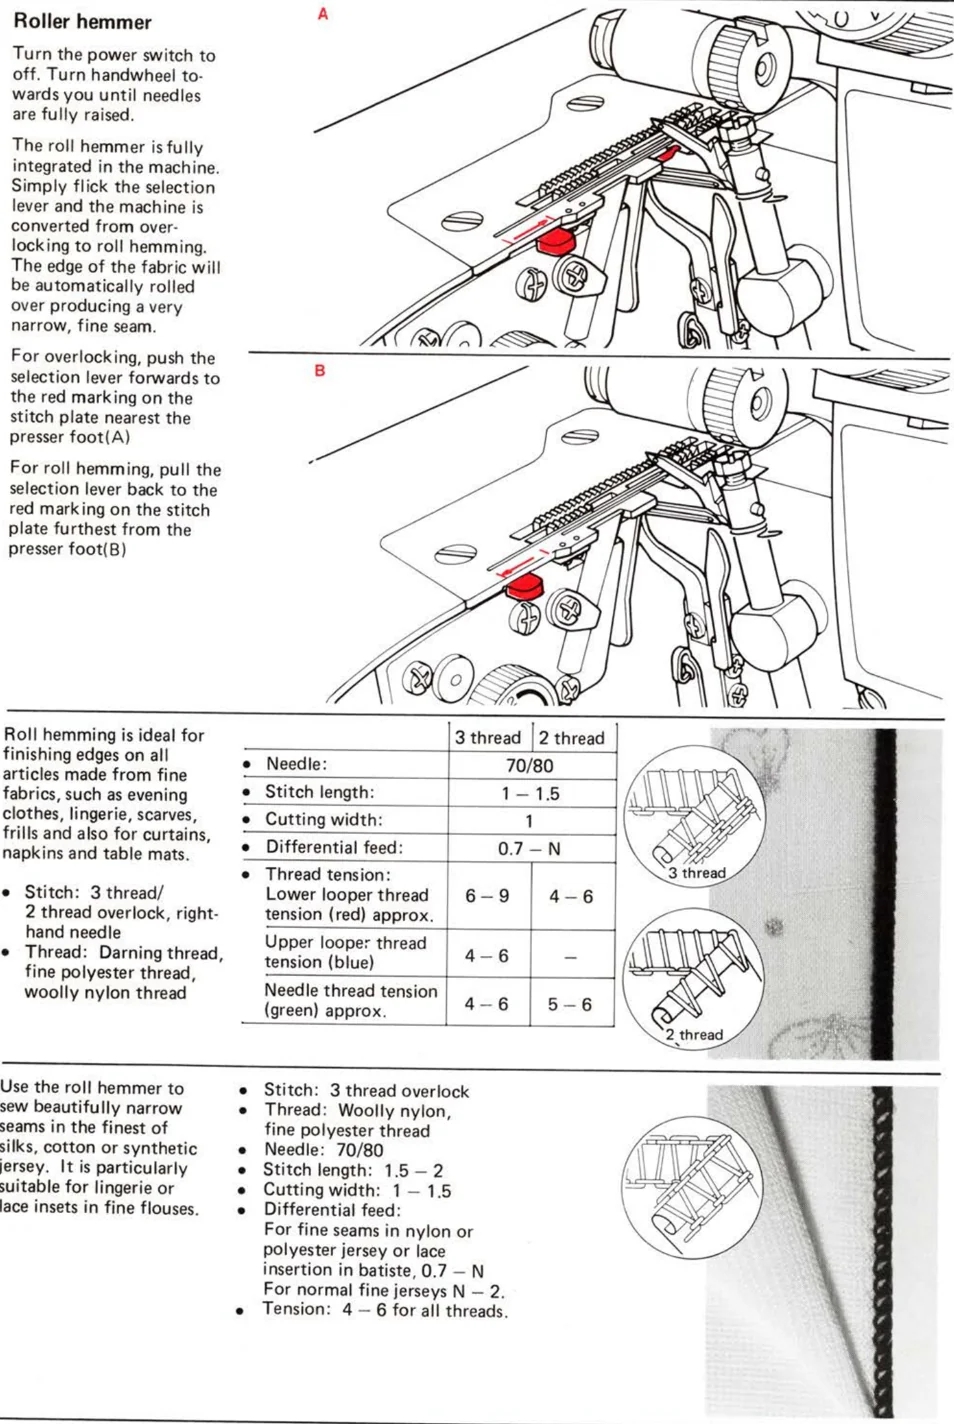
Roll hemming is ideal for finishing edges on all articles made from fine fabrics, such as evening clothes, lingerie, scarves, frills and also for curtains, napkins and table mats.
- Stitch: 3 thread/ 2 thread overlock, right-hand needle
- Thread: Darning thread, fine polyester thread, woolly nylon thread
| 3 thread | 2 thread | |
|---|---|---|
| Needle: | 70/80 | |
| Stitch length: | 1 – 1.5 | |
| Cutting width: | 1 | |
| Differential feed: | 0.7 – N | |
| Thread tension: | ||
| Lower looper thread tension (red) approx. | 6 – 9 | 4 – 6 |
| Upper looper thread tension (blue) | 4 – 6 | – |
| Needle thread tension (green) approx. | 4 – 6 | 5 – 6 |
Use the roll hemmer to sew beautifully narrow seams in the finest of silks, cotton or synthetic jersey. It is particularly suitable for lingerie or lace insets in fine flouses.
- Stitch: 3 thread overlock
- Thread: Woolly nylon, fine polyester thread
- Needle: 70/80
- Stitch length: 1.5 – 2
- Cutting width: 1 – 1.5
- Differential feed: For fine seams in nylon or polyester jersey or lace insertion in batiste, 0.7 – N For normal fine jerseys N – 2.
- Tension: 4 – 6 for all threads.
Adjustments and settings / Practical sewing
Sewing in tape
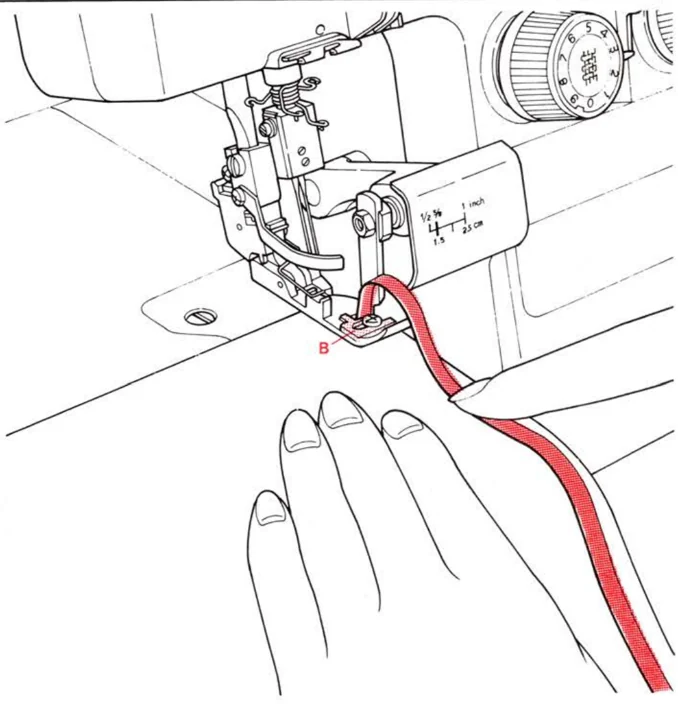
The standard presser foot is equipped with a tape guide. When sewing, a tape can be sewn in at the same time to strengthen or stabilise shoulder or side seams in garments made from knits or stretch fabrics.
- Turn the handwheel towards you until needles are fully raised.
- Raise and swing the presser foot out.
- Slip the tape into the tape slot and pull through slightly.
- Swing presser foot back and lower it. Sew a few stitches on the tape until the right-hand needle catches the left-hand edge of the tape.
- Loosen the setscrew (A) and adjust the tape guide to suit the width of the tape (B).
- Retighten setscrew.
- Raise the tip of the presser foot and place work underneath.
- Sew.
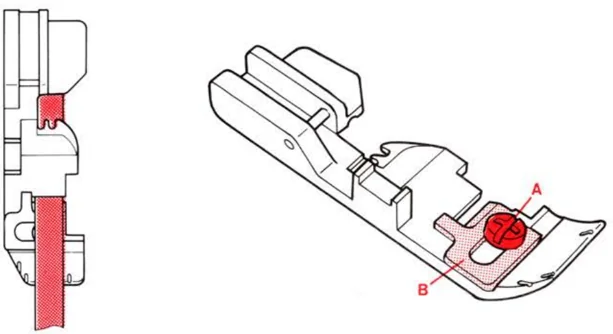
Tip: If you pull gently on the tape, the fabric can be eased in. If this is not wanted, let the tape feed through loosely.
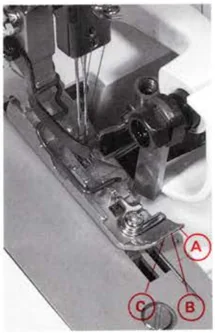
Seam guides/markings
The markings on the presser foot allow you to guide the fabric easily. (A) Cutting line (B) Right needle insertion (seam width for 3 thread overlock with right needle). (C) Left needle insertion (seam width 3 or 4 thread overlock with left needle).
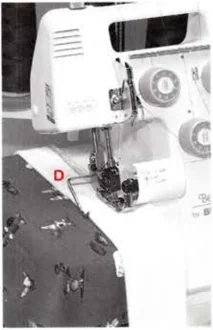
The seam guide is a practical standard accessory. Simply insert into the space provided on the presser foot shaft and adjust to the desired seam width. It is ideal for cutting perfectly equal fabric strips, e.g. for bias binding. Always remove all threads and needles when cutting only. It is very helpful when sewing on ribbing. Just guide the folded edge of the ribbing along the seam guide for a perfectly even finished (D).
19
Practical sewing
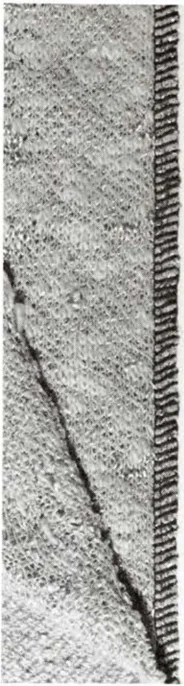
4 thread seam in thick knits
Secure but stretchy seam in knitted fabrics. Ideal for hand or machine knitted pullovers, dresses or jackets.
- Stitch: 4 thread overlock
- Thread: Overlock thread, polyester machine thread, woolly nylon
- Needle: 80/90
- Stitch length: 2.5 – 3
- Cutting width: 3
- Differential feed: 1.5 – 2*
- Upper knife: Cutting position
- Thread tension: 4 – 6
Tip: When using wool in the looper, reduce looper tension (1–3).
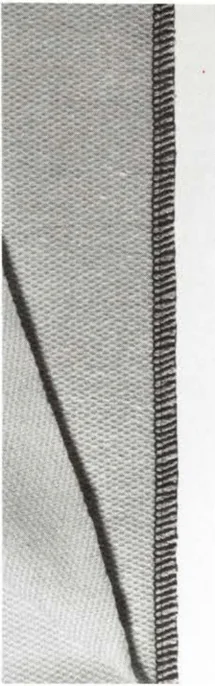
4 thread seam in jerseys
Very stretchy seam in knits and for sewing on bands/ribbing. Double jersey, velour, sweatshirt fabric. For sportswear, jogging suits, sweatshirts and T-shirts.
- Stitch: 4 thread overlock
- Thread: Overlock thread, polyester machine thread, woolly nylon
- Needles: 80 – 90
- Stitch length: 2 – 3
- Cutting width: 3
- Differential feed: approx. 1.5*
- Upper knife: Cutting position
- Thread tension: 4 – 6
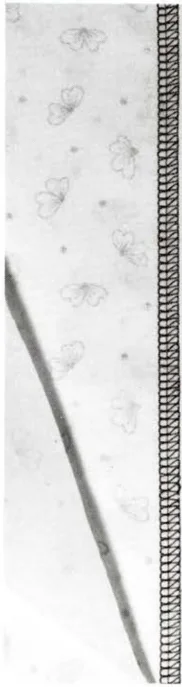
4 thread seam in fine woven fabrics
Seams in fine woven fabrics. Batiste, crepe de chine, poplin. For blouses, shirts, beachwear, pyjamas.
- Stitch: 4 thread overlock
- Thread: Overlock thread, polyester machine thread
- Needles: 70 – 80
- Stitch length: 2 – 3
- Cutting width: 3
- Differential feed: 0.7 – N*
- Upper knife: Cutting position
- Thread tension: 4 – 6
Note: Reduce the needle thread tension slightly (approx. 4) for flat seams in closely woven fabrics.
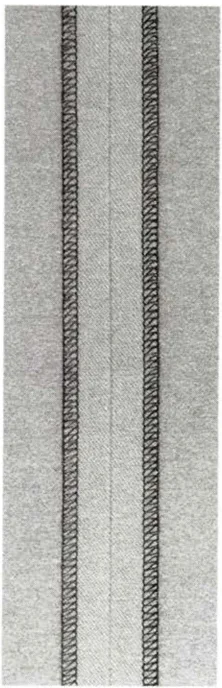
2/3 thread neatening (narrow)
Neatening edges in all fabrics. Seam allowances, hems and facings.
- Stitch: 2 or 3 thread overlock, right needle
- Thread: Overlock thread fine polyester machine thread, darning thread
- Needle: 70/80
- Stitch length: 2 – 3
- Cutting width: approx. 2
- Differential feed*: 0.7 – N for woven, N – 2 for knits *
- Upper knife: Cutting position
- Thread tension: 3 thread overlock 4 – 6 2 thread overlock lower looper (red) (green) 1 – 3
Note: Neatening lining, crepe de chine or popline: Stitch length 2, differential feed 0.7 *, reduce needle tension.
Practical sewing
3 thread seam
Very stretchy seams in fine knits, cotton, synthetic or silk jerseys, interlock. For T-shirts, sportswear, children's pullovers, swimming costumes, gymnastic outfits, pyjamas.
- Stitch: 3 thread overlock, right needle
- Thread: Overlock thread, polyester machine thread, woolly nylon
- Needle: 70 – 80
- Stitch length: 2 – 3
- Cutting width: 2 – 3
- Differential feed: N – 1.5*
- Upper knife: Cutting position
- Thread tension: 4 – 6
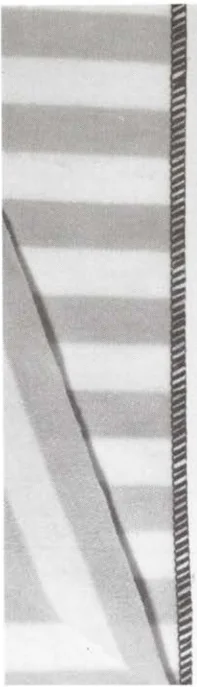
3 thread neatening (wide)
Neatening cut edges on loosely woven fabrics which tend to fray. Linen, towelling, damask, brocade. For curtains, tablecloths, towels, beach wraps.
- Stitch: 3 thread overlock, left needle
- Thread: Overlock thread, polyester machine thread, woolly nylon
- Needle: 80
- Stitch length: 2 – 3
- Cutting width: 2 – 3
- Differential feed: N – 1.5*
- Upper knife: Cutting position
- Thread tension: 4 – 6
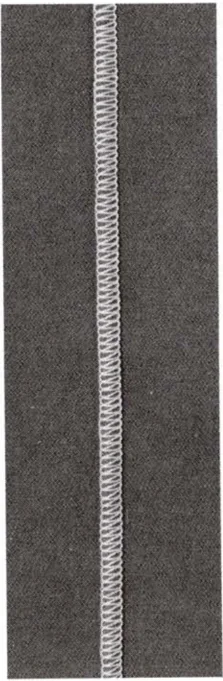
2 thread flatlock
Decorative seam in woven fabrics or knits. Sweatshirts, pullovers, tack suits, patchwork.
- Stitch: 2 thread overlock, left needle
- Thread: Lower looper: decorative threads such as Cordonnet, metal threads, perle yarn, fine wool, woolly nylon. Needle: overlock thread, polyester machine thread.
- Stitch length: 2 – 3
- Cutting width: 2 – 3
- Differential feed *: N – 1.5
- Upper knife: Cutting position or raised
- Tension: Lower looper (red) 6 – 8, needle (yellow) 1 – 3.
After sewing, pull the seam apart gently and press.
Note: When sewing with the knife raised, guide the fabric edge along the cutting line marking on the presser foot.
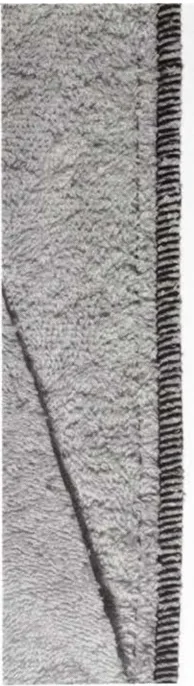
3 thread decorative edge
Decorative and quickly sewn edging. Revers, collars, seams on jackets, coats, suits, fur jackets. Decorative edges on curtains, tablecloths and mats.
- Stitch: 3 thread overlock
- Thread: Loopers: perle yearn, metal thread, Cordonnet, fine wool.
- Needle: overlock thread, polyester machine thread.
- Needle: 80, 90
- Stitch length : 2 – 4
- Cutting width: 3
- Differential feed: 0.7 – 1.5*
- Upper knife: Cutting position
- Thread tension: yellow 4 – 6, blue, red 1 – 3
Note: When using perle yarn or wool, it might be better not to thread them round the tension dials. Sew slowly and watch to make sure that the looper thread runs off the spool smoothly.
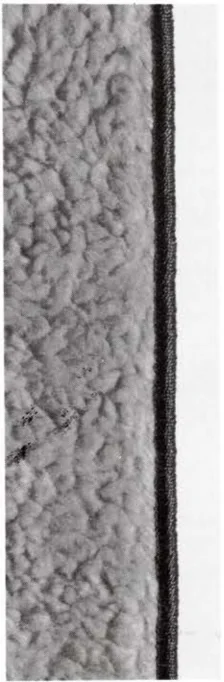
21
Maintenance
Changing the upper knife
The upper knife (moving knife) is made from special material and generally does not need replacing. Should it get damaged, it can be replaced by your local Bernette dealer.
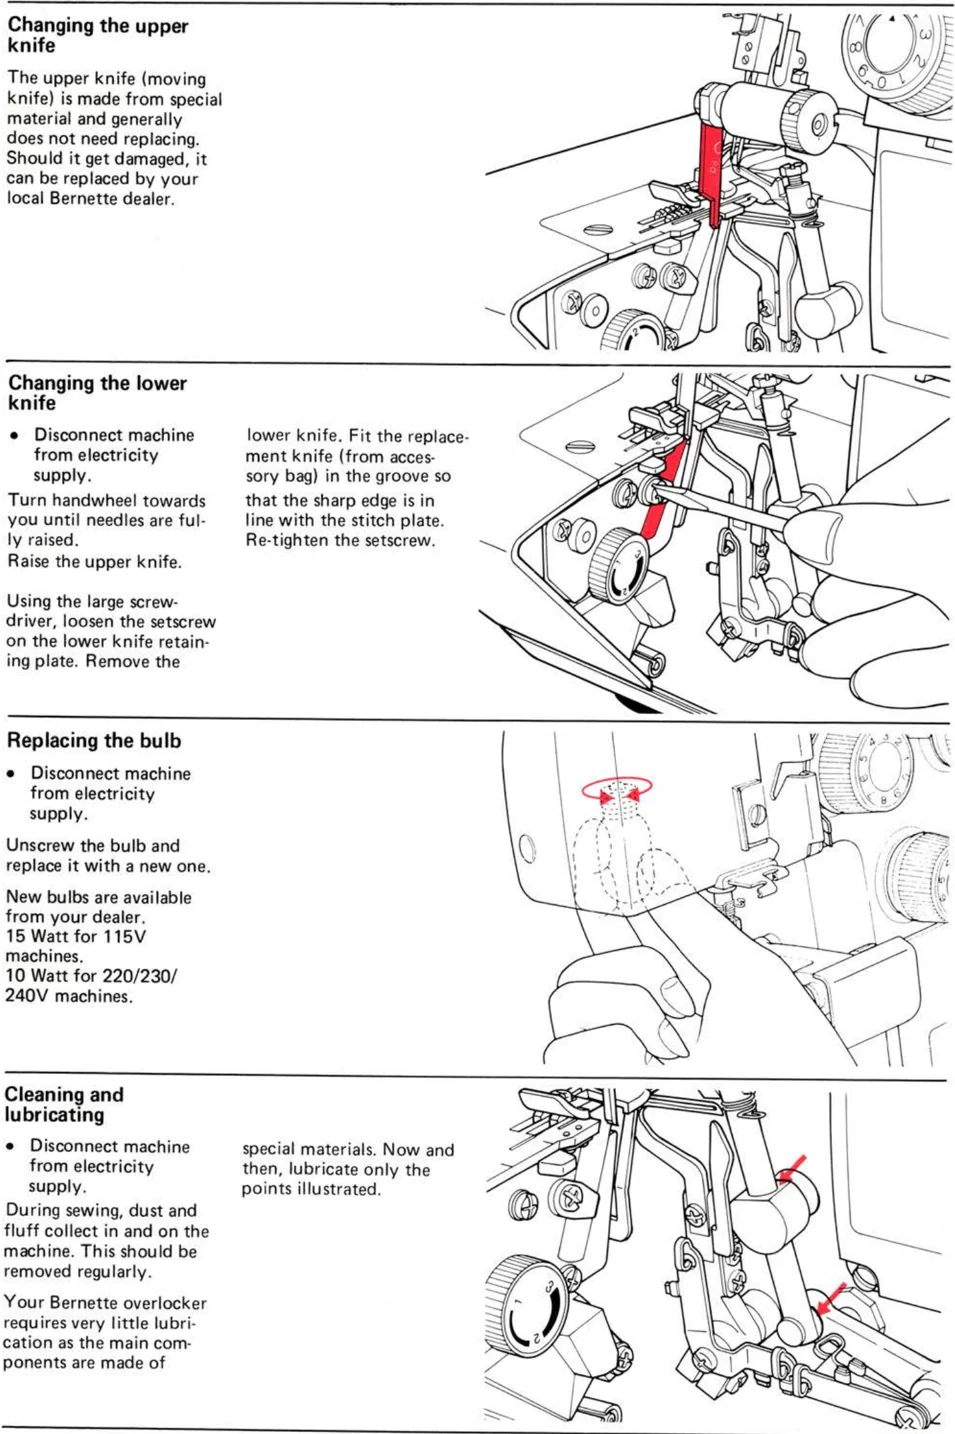
Changing the lower knife
- Disconnect machine from electricity supply.
Turn handwheel towards you until needles are fully raised.
Raise the upper knife.
Using the large screwdriver, loosen the setscrew on the lower knife retaining plate. Remove the lower knife. Fit the replacement knife (from accessory bag) in the groove so that the sharp edge is in line with the stitch plate. Re-tighten the setscrew.
Replacing the bulb
- Disconnect machine from electricity supply.
Unscrew the bulb and replace it with a new one.
New bulbs are available from your dealer. 15 Watt for 115V machines. 10 Watt for 220/230/240V machines.
Cleaning and lubricating
- Disconnect machine from electricity supply.
During sewing, dust and fluff collect in and on the machine. This should be removed regularly.
Your Bernette overlocker requires very little lubrication as the main components are made of special materials. Now and then, lubricate only the points illustrated.
22
Trouble shooting guide
| Problem | Cause | Solution | Page |
|---|---|---|---|
| Fabric does not feed evenly | Presser foot pressure is too low. | Adjust the presser foot pressure. | 17 |
| Lower knife is blunt or wrongly positioned. | Replace the lower knife. | 22 | |
| Thread breaks | Thread tension is too tight for thread being used. | Reduce thread tension. | 7 |
| Needles not inserted correctly. | Insert needles fully into needle clamp with flat side to the back. | 6, 14 | |
| Use system 130/705 H needles. | |||
| Needles break | Needles are bent, blunt or points are damaged. | Replace the needles. | 6, 14 |
| Needles not inserted correctly. | Insert needles fully into needle clamp with flat side to the back. | 6 | |
| Fabric was pulled while sewing. | Guide fabric gently with both hands. | ||
| Skipped stitches | Needles are bent or blunt. | Replace the needles. | 6, 14 |
| Wrong needles used. | Use system 130/705 H needles. | 14 | |
| Presser foot pressure is too low. | Increase presser foot pressure. | 17 | |
| Poor stitch formation | Thread is not wound correctly round tension dials. | Check if thread is lying between tension discs. | 7 |
| Thread has got caught. | Check threading path of each thread. | 8, 9, 10, 11 | |
| Seams flute or wave, especially when sewing knits | Presser foot pressure is too high. | Reduce presser foot pressure. | 17 |
| Differential feed is set incorrectly. * | Adjust differential feed to N – 2 * | 16 | |
| Fabric was pulled while sewing. | Guide fabric gently. | ||
| Seams pucker | Thread tension is too tight. | Reduce thread tension. | 7 |
| Differential feed is set incorrectly. * | Adjust differential feed to 0,7 – N. * | 16 | |
| Fabric edges curl | Too much fabric is in the stitch. | Reduce cutting width. | 15 |
| Thread tension too tight. | Reduce thread tension. | 7 |
Index
A Accessories – looper cover – in accessory bag, inside front cover Anti-vibration cones 3
B Bulb – replacing 22
C Cleaning and lubricating 22 Cloth plate cover – opening/closing 4 Cones – positioning 3 Correct stitch formation 7 Cutting width – adjusting 15
D Decorative finishes 21 Decorative thread 21 Details of machine, inside front cover Differential feed – adjusting 16 Domestic spools 3
E Easing in fabric 19 Edges – finishing 20/21 – neatening
F Fabric edges curl up 13/15/23 Fabric edges wave 16/17/23 Fabric feed 17 Fabric/needle/thread 15 Feed – uneven 22/17/23 Flat seams 21 Foot control – attaching 2 – electronic 2
G Gathering 17
H Handwheel – rotation 4
K Knife – holder 6 – position lower knife 15 – raising 6 – replacing 22 Knotting on thread 11
L Left-hand needle thread – threading 11 – tension 13 Light switch 4 Looper cover – opening/closing 4 Looper – upper/lower threading 8/9 Loose loop formation 15
M Machine does not sew 4 Maintenance 22 Micro safety switch 4
N Neatening – edges 20/21 – seam allowances 20/21 – thick fabrics 21 Needles – breaking 13/6/14/23 – inserting/replacing 5 – size 14 – system 14 – thread/fabric 14 Needle thread tension – adjusting 13 New spools/cones – knotting on 11 Normal thread tension 13
O Opening/closing – looper cover 4 – cloth plate 4 Overlocking – 3 thread/applications 20/21 – 4 thread/applications 20/21 – 2 thread/applications 20/21
P Poor stitch formation 7/23 Power switch 4 Presser foot – raising 5 – markings 19 – pressure 17 – swing-out 5 – tape guide 19 Puckered seams 13/16/23
R Replacing – bulb 22 – knives 22 – spools/cones 11 Right-hand needle thread – threading 10 – tension 13 Roll hemmer 18
S Seams – adjusting width 15 – cross 14 – allowances/neatening 19 – in fine fabrics 23 – in knits 20 – in stretch fabrics 20 – puckering 13 – unpicking 15 – waving in knits 17 Seam guide 19 Securing thread ends 14 Selection lever – overlocking/roll hemmer 18 Sewing in tape 19 Sewing light 4 Sewing speed 2 Sewing test 12 – checking 13 Sewing – with decorative threads 21 – with differential feed 17 Skipped stitches 14/6/23 S-loop – thread guide bar 7 Slow sewing 2 Spare knife 22 Special accessories, back cover Spools – positioning 3 – replacing 11 Spool holder pins 3 Stabilising seams 19 Starting to sew 6 Stitch formation 13 Stitch length – adjusting 15 Stitch types 20 – 4 thread overlock/applications 20 – 3 thread overlock/applications 20/21 – 2 thread overlock/applications 20/21 Stitch width – 3 thread overlock 12 Support rod 2 Swing-out foot 5 Switch – power/light 4
T Technical Data, Inside back cover Thread – breakage 11/13/6/14/23 – cutter 12 – replacing/knotting on 11 Thread ends – securing 14 Thread guide bar – threading 7 Thread guide stand – assembling 2 Threading – 3 thread overlock 10 – 4 thread overlock 11 – 2 thread overlock 20/21 – loopers 8/9 – preparation 7 Thread/needle/fabric 14 Thread tension – adjusting 13 – checking trial run 13 – dials 7 – special threads 13 Tidy work area 3 Trial sewing 12
U Uneven feed 22/17/23 Unpicking seams 15 Upper knife – raising 6 Upper looper – threading 8
W Waste collector 3 Wave-free seams in knits 19 Wide cutting width 19
24
Technical data
| Parameter | Specification |
|---|---|
| Stitch choice | 2 needle, 4 thread overlock with integrated safety seam1 needle, 3 thread overlock1 needle, 2 thread overlock |
| Seam width | 3 – 7 mm (2/3 thread overlock)5 – 7 mm (4 thread overlock) |
| Stitch length | 0.8 – 4 mm |
| Differential feed | No waving or fluting in knits N – 2No puckering 0.7 – N |
| Presser foot | Swing-out, snap-on sole |
| Handwheel | Rotates forwards as on household sewing machine |
| Needle system | 130/705 H for both needles |
| Sewing speed | Up to 1500 s.p.m. |
| Weight | 334 DS: 7.5 kg/334S: 7.4 kgapprox. 16 lbs |
| Dimensions | 300 W x 325 D x 300 H mm13″ W x 12 □/□″ D x 12″H |
We reserve the right to make changes in the interests of technical progress.
Impressum
Author: C. Paravicini
Steckborn
Production: STAR AG,
Stein am Rhein
Printed in Japan
© Copyright by F. Gegauf Ltd.
501 546 13 GB
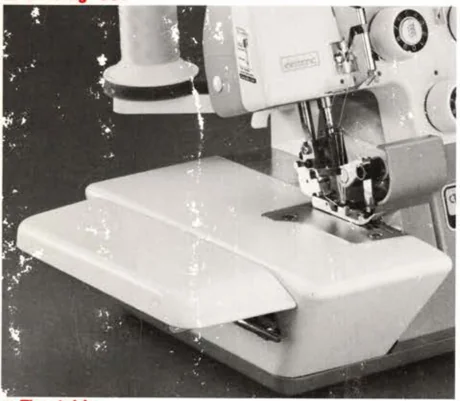
Special accessories:
▲ Blind stitch foot
▲ Elastica*er
▲ Cording foot
▲ Flap table