Dear «aurora» Customer
BERNINA has added another great sewing and embroidery computer to the very successful aurora product line. The new aurora 450 has a new hook system which enables you dear BERNINA customer to make wider stitches.
Now BERNINA offers three different aurora models – the BERNINA customer can choose their perfect sewing and embroidery computer according to her needs and wishes. All aurora models have the capability to add the world famous BERNINA Stitch Regulator. The aurora 440 QE has this great presser foot included in the standard accessories.
The aurora 430 / 440 QE / 450 are designed to give you the best sewing features possible. If you choose to expand your creative possibilities by exploring the world of embroidery, you can connect your sewing computer to your home PC and purchase an embroidery module from your BERNINA Dealer, and you can become an embroidery virtuoso.
I wish you great satisfaction and a wonderful experience with your new aurora sewing and embroidery computer.
H.P. Ueltschi President
BERNINA International AG CH - 8266 Steckborn www.bernina.com
BERNINA+

2 Safety instructions
IMPORTANT SAFETY INSTRUCTIONS !
! When using an electrical appliance, basic safety precautions should always be followed, including the following: Read all instructions before using this sewing computer. When the sewing computer is not in use, it should be disconnected from the electricity supply by removing the plug from the outlet.
DANGER
To reduce the risk of electrical shock:
- An appliance should never be left unattended when plugged in.
- Always unplug this sewing computer from the electrical outlet immediately after using and before cleaning.
WARNING
To reduce the risk of burns, fire, electrical shock or injury to persons:
- Do not allow to be used as a toy. Close attention is necessary when this sewing computer is used by or near children and infirm persons. This sewing computer is not intended for use by persons (including children) with reduced physical, sensory or mental capabilities, or lack of experience and knowledge, unless they have been given supervision or instruction concerning use of the sewing computer by a person responsible for their safety. Children should be supervised to ensure that they do not play with the sewing computer.
- Use this sewing computer only for its intended use as described in this manual. Use only attachments recommended by the manufacturer as contained in this manual.
- Never operate this sewing computer if:
- it has a damaged cord or plug,
- it is not working properly
- it has been dropped or damaged,
- it has fallen into water Return the sewing computer to the nearest authorized BERNINA dealer or service center for examination, repair, electrical or mechanical adjustment.
- Never operate the sewing computer with any air vents blocked. Keep ventilation openings of the sewing computer and foot controller free from accumulation of lint, dust and fabric remnants and the like.
- Keep fingers away from all moving parts. Special care is required around the sewing needle.
- Always use the BERNINA original stitch plate. The wrong plate can cause needle breakage.
- Do not use bent needles.
- Do not pull or push fabric while stitching, this may deflect the needle, causing it to break.
- Turn power switch to «0» (off) when making any adjustments in the needle area, such as threading or changing the needle, threading the bobbin or changing the presser foot etc.
- Always unplug the sewing computer from the electrical outlet when removing covers, lubricating or when making any other user servicing adjustments mentioned in this instruction manual.
- Never drop or insert any object into any openings on the sewing computer.
- Do not use the sewing computer outdoors.
- Do not operate where aerosol (spray) products are being used or where oxygen is being administered.
- To disconnect, turn all controls to the off («0») position then remove the plug from the outlet.
- Do not unplug by pulling on the cord, instead, grasp the plug before pulling.
- No responsibility will be taken on behalf of BERNINA for any possible damage as the result of misuse of the sewing computer.
- Under no circumstances should the sewing computer be left unattended when using the embroidery module.
- This sewing computer is provided with double insulation (except USA / Canada). Use only identical replacement parts. See instructions for servicing of double-insulated machines.
SERVICING DOUBLE-INSULATED PRODUCTS
In a double-insulated product, two systems of insulation are provided instead of grounding. No grounding means is provided on a double-insulated product nor should a means for grounding be added to the product. Servicing a double-insulated product requires extreme care and knowledge of the system and should only be done by qualified service personnel. Replacement parts for a double-insulated product must be identical to those parts in the product. A double insulated product is marked with the words «DOUBLE INSULATION» or «DOUBLE INSULATED».
The symbol [square within a square] may also be marked on the product.
This sewing and embroidery computer is intended for household use only.
SAVE THESE INSTRUCTIONS!

Your sewing computer
4 - 22
- Accessories 4-7
- Details aurora 430 / 440 QE / 450 8-9
- Setting up the sewing computer 10-17
- Thread tension 17
- Important facts on threads and needles 18-19
- Stitch plate, Feed dog and Fabric feed 20-21
- Presser foot pressure, Balance 22
- Cleaning / Trouble shooting 57-58
Display
23 - 29
- Display 23
- Function buttons 24-25
- Memory 26-29
Applications
30 - 56
- Stitch selection 430 / 440 QE / 450 30-32
- Temporary altered stitch memory 33
- Application of practical stitches, Quilt stitches, Decorative stitches 34-47
- Buttonholes - Important information 48
- Application of buttonholes / Eyelets / Button sew - on 49-56
All about embroidery
59 - 80
- Details 59
- Accessories 60-62
- Setting up the embroidery computer 63-67
- Important embroidery information 67-69
- Embroidery operating requirements 70
- Bernina embroidery software 70-71
- Software - EC on PC 72-77
- Starting to embroider 78
- Mega-Hoop 79-80
- Stitch summary 81-83
Index
84 - 85
4 Key to signs
Key to signs

Supplementary information!

Additional information on the corresponding subject you will find on the relevant page.

Helpful tips!

Please refer to the safety instructions! Risk of injury!
Very important! Risk of damage!
All rights reserved. In order to improve the product, and for our customers' benefit, all of the sewing and embroidery computer's features, parts, and accessories are subject to unannounced changes and alterations at any time.
Text Herbert Stolz
Drawings Müller-Melzer ID, Kreuzlingen
Design concept Susanne Ribi
Copyright 2008 BERNINA International AG, Steckborn
Accessories
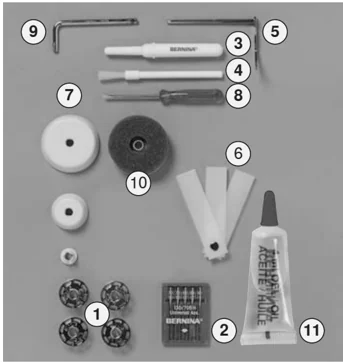
Standard accessories:
- 5 bobbins (one in bobbin case)
- Needle selection 130/705H
- Seam ripper
- Brush
- Seam guide
- Height compensating tool
- 3 spool discs
- Small screwdriver
- Angular torx key
- Foam pad
- Oiler filled
aurora 430 / 440 QE aurora 450
Accessories
- foot control
- instruction manual
- power cable
- warranty card
- Free Hand System presser foot lifter
- slide-on table
- seam guide for slide-on table
- Instructional presentation CD-ROM
Presser feet*
 1 $^{430/440}$ , 1C$^{450}$
Reverse pattern foot
Straight stitch
Practical and decorative stitch
Quilt stitch
- Eyelets
- Securing
 2$^{430}$ , 2A$^{450}$
Overlock foot
Overlock seam,
Overlock hem,
Narrow satin stitch
- For knits and wovens
- Edge finishing
 3A
Automatic button-hole foot with slide
Buttonholes on smooth fabrics,
Darning
 4
Zipper foot
Sewing in zippers,
Straight stitch
 5
Blindstitch foot
Blind hem,
Edge stitching,
Straight stitch
Blindstitch
- for hems and blindstitch applique
 9
Darning foot
Darning, Monograms or freehand embroidery
Straight stitch,
Basting stitch
- Darning
- sewing on buttons
 20$^{440}$, 20C$^{450}$
Open embroidery foot
Embroidery,
Appliqué, Satin stitch seams,
Monograms
 37$^{440}$
Patchwork foot
1/4" / 6mm
Patchwork with 1/4" or 1/8" (6mm/3mm) seam allowance
 42$^{440}$
BSR foot
Straight stitch, Freehand quilting
 50$^{440}$
Walking foot
For fabrics which stick or tend to slip; Quilting,
Straight stitch, Quilt stitch
Decorative stitch
- sewing difficult fabrics, e.g. velvets, matching plaids, squares, etc.
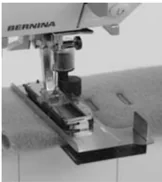
Compensation plate for sewing buttonholes** Improves the fabric feed when sewing buttonholes in difficult fabrics
- can vary from country to country ** Optional accessories
6 Accessories
Accessory box 430 / 440 QE Accessory box 450
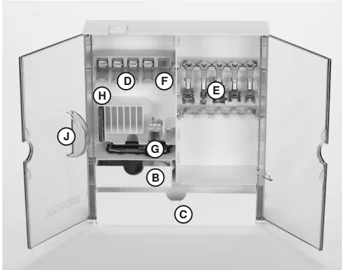
Free standing accessory box
- On the back of the box, pull both feet out until they click into place
- stand box in desired position
Storing accessories Standard accessories are supplied in a plastic bag. The box is equipped with one small and one large drawer (B and C) as well as compartments for bobbin holders D and presser feet E. (Additional compartments and drawers are available as optional extras).
- push the bobbins into the compartments provided
- to remove a bobbin, press the compartment holder F lightly
- insert presser foot into holder E
- Buttonhole foot with slide no. 3A can be stored in compartment G
- the needle selection box can be stored in compartment H
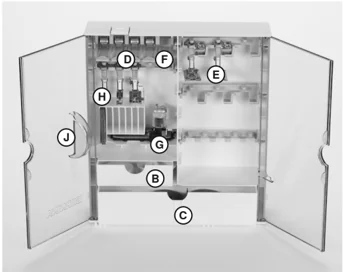
Attaching the accessory box to the sewing computer
- close the doors
- push feet back into position
- attach the box to the sewing computer (catch A must engage); inserting the presser foot lifter into the opening J
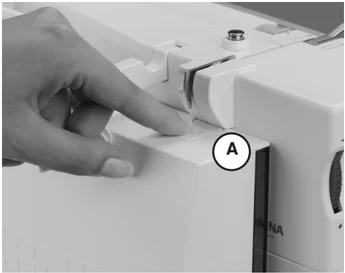
Removing the accessory box
- press catch A on the top of the box
- remove box to the rear
! First lower the presser foot lifter!
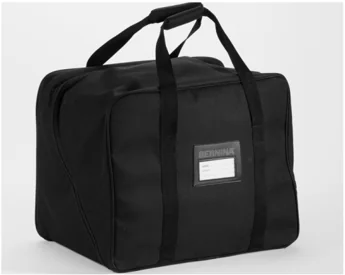
Reinforced soft cover
- protects from dust and dirt
- protects sewing computer when transporting
- compartments for accessories
The cover and accessory box come with the sewing computer. The cover should be used to protect the sewing computer when it is not in use. The foot control, power cable, sewing table and instruction manual can be stored in the cover.
Optional accessories 7
Optional accessories
BERNINA Specialty Presser Feet
The standard selection of presser feet covers most normal sewing requirements, but we recommend the use of BERNINA specialty presser feet for specific sewing tasks such as quilting, heirloom sewing, home decorating, tailoring, etc. They are available from your BERNINA dealer.
 3
Buttonhole foot
Buttonholes
 8
Jeans foot
Straight stitching in thick, firm fabrics
 10C/10
Edge stitch foot
Straight stitch
- Stitching edges
 14
Zipper foot with guide
Sewing in zippers, Straight stitch
 18
Button sew-on foot
Sewing on buttons, hooks and eyes
 21
Braiding foot
Zig-zag stitch
- Couching with wool to 3mm or light cord
 32
Pintuck foot
Straight stitch
- Sewing pintucks in fine fabrics
 35
Invisible zipper foot
Sewing in zippers, Straight stitch
 39
Embroidery foot
Zig-zag stitch, Decorative stitches
- Buttonhole seams
- sewing decorative stitches
 43
Freemotion couching foot
Straight stitch
- Attaching cords in a curved effect
 57
Patchwork foot with guide 1/4" / 6mm
Patchwork with 1/4" or 1/8" (6mm/3mm) seam allowance
Punching-Kit only 430/440 QE Straight stitch
- felting
 Lens set
We recommend to use the BERNINA lens set for more sewing comfort (better view of needle area).
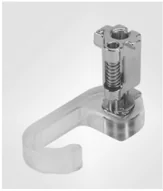
 Straight Stitch Plate 450
 Straight Stitch Plate 430 / 440 QE
8 Details
Details
Front view
Back view
Details 9
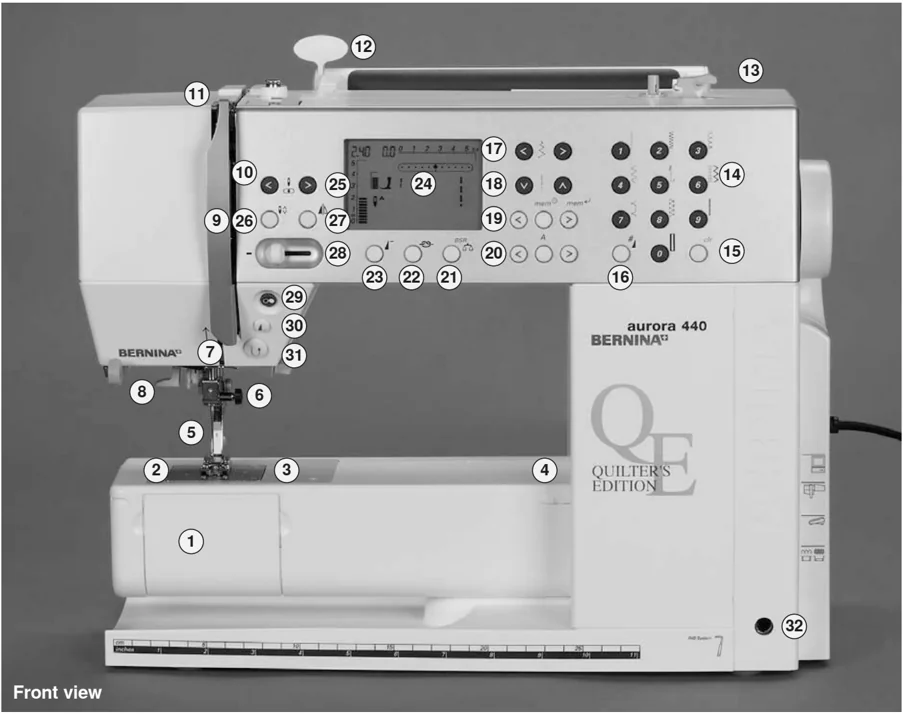
Front view 1 Bobbin cover 2 Stitch plate 3 Attachment base for special accessories 4 Darning hoop connection 5 Presser foot 6 Needle clamp 7 Thread guide 8 Needle threader 9 Thread take-up cover 10 Thread path 11 Thread take-up 12 Holder for stitch card 13 Bobbin winder with on/off switch and thread cutter 14 Stitch selection buttons 15 «clr» (clear) button 16 #-button (hash) 17 Stitch width buttons 18 Stitch length buttons 19 «mem» (Memory / Operating buttons) 20 Alphabet / Motif scroll buttons 21 Balance / BSR button 22 Securing function button 23 Pattern begin button 24 Display 25 Needle position buttons 26 Needle stop up/down button 27 Mirror image button 28 Slide speed control 29 Start / Stop - button 30 Pattern end button 31 Quick reverse button 32 FHS (Free Hand System) connection
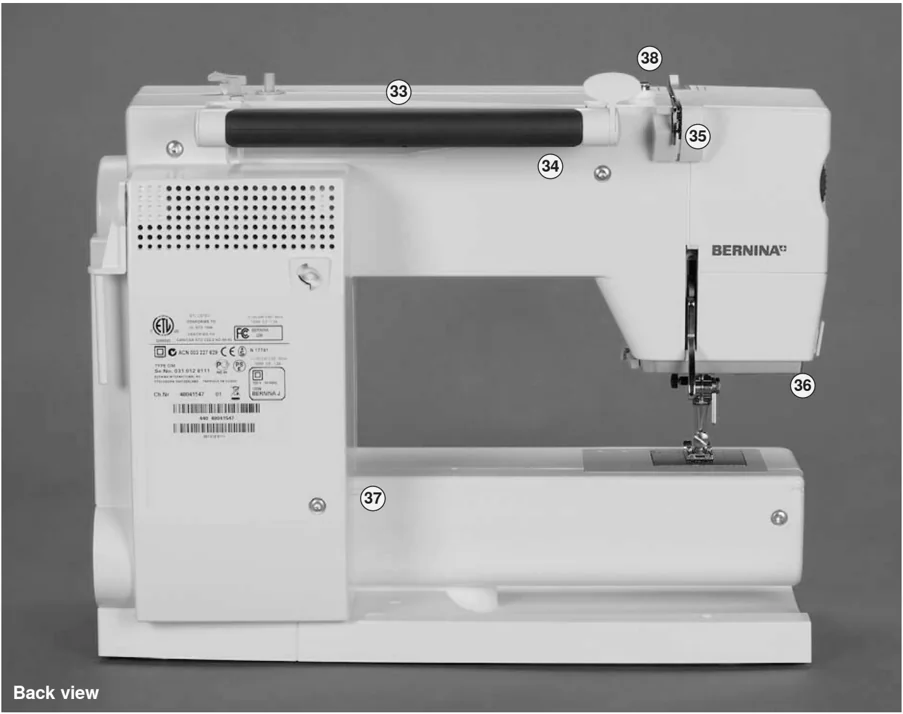
Back view 33 Horizontal spool pin 34 Carrying handle 35 Rear thread guideng 36 CFL sewing light 37 Slide-on table socket 38 Bobbin pre-tension
 Side view (Head frame)
 39 Tension adjustment wheel 40 Presser foot pressure 41 Presser foot lifter 42 Thread cutter on head frame 43 Magnifying glass holder
Side view (handwheel) 44 Handwheel 45 Spool pin (vertical, collapsible) 46 Power switch on/off («0») 47 Power plug socket 48 PC connection 49 Embroidery module connection (optional accessory) 50 Foot control socket 51 Drop feed dog
 Side view (handwheel)
10 Setting up the sewing computer
Power switch / Power cable
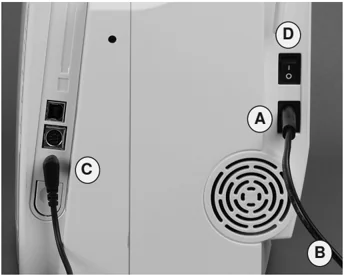
The power cable
- plug A into sewing computer
- plug B into wall socket
Foot control cable
- plug C into sewing computer
The power switch (D) The switch is on the handwheel side I the sewing computer is switched on («I») 0 the sewing computer is switched off («0»)
The sewing light is switched on and off with the power switch.
! Refer to the safety instructions
⚠ Important! (USA/Canada only) This sewing computer has a polarized plug (one blade wider than the other). To reduce the risk of electrical shock, this plug is intended to fit in a polarized outlet only one way. If the plug does not fit fully in the outlet, reverse the plug. If it still does not fit, contact a qualified electrician to install the proper outlet. Do not modify the plug in any way!
Foot control
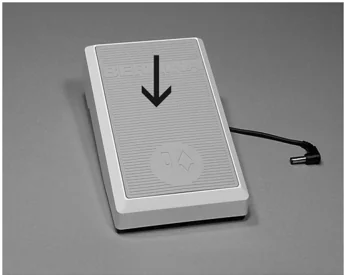
Sewing speed
- control the sewing speed by depressing the foot control
- raise or lower the needle by tapping on the foot control with your heel
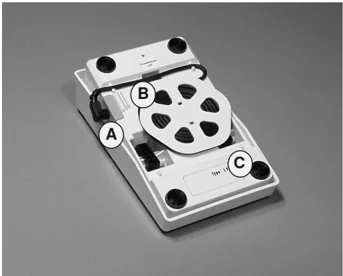
Cable tidy
- wind the cable around the spool
- insert the plug into A
When sewing
- unwind the cable to the desired length and slip into B or C
⚠ Important! (USA/Canada only) Use only foot controller type LV1 with sewing computer model aurora 430 / 440 QE / 450.
Setting up the sewing computer 11
CFL Sewing Light
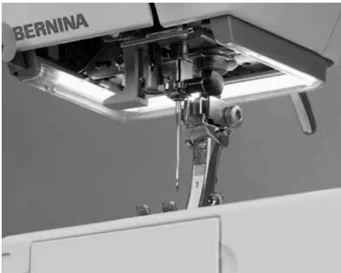
Contrary to an ordinary bulb, the CFL sewing light has a better illumination and a longer life.
Please note that a defective CFL sewing light must ONLY be replaced by an authorized technician. The sewing computer must be brought to an authorized BERNINA dealer!
Free Hand System (FHS) presser foot lifter
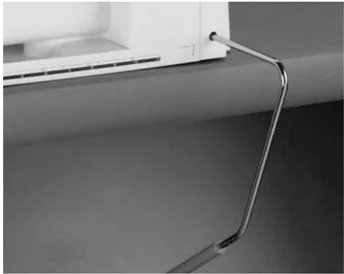
Your dealer can adjust the FHS if necessary.
Raising and lowering the presser foot
- knee-operated presser foot lever to raise and lower the presser foot - your hands remain free to guide the fabric
- with your knee push lever to the right
- the feed dog is lowered simultaneously
- the feed dog is raised as soon as the first stitch is sewn
Attaching the presser foot lifter
- insert the lever into respective opening - you should be able to operate the FHS with your knee in your normal sitting position
Slide-on table
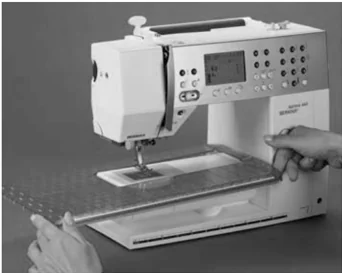
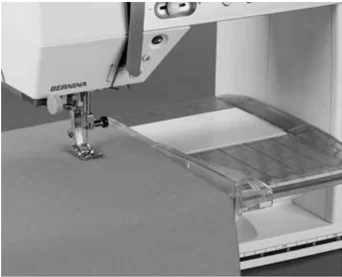
Always raise needle and presser foot when attaching or removing the slide-on table!
Larger sewing surface
- the slide-on table increases the sewing surface
To attach
- raise needle and presser foot
- slide over free-arm to the right until it engages
To remove
- raise needle and presser foot
- use slight pressure - with your thumb against the housing and the index against the table - to slide it off to the left
Seam guide
- slide into extension table guides from left or right
- can be moved over full table length
Scale
- «0» corresponds to the center needle position
12 Setting up the sewing computer
Threading the upper thread
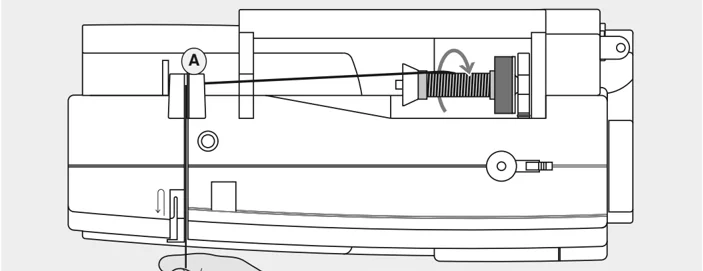
Attaching the thread spool
-
raise the needle and presser foot
-
turn the power switch to «0» (off)
-
attach the foam pad
-
place thread spool on spool holder in such way that the thread unwinds clockwise
-
attach the appropriate spool disc; diameter of spool determines disc size. There must be no clearance between the disc and the spool
-
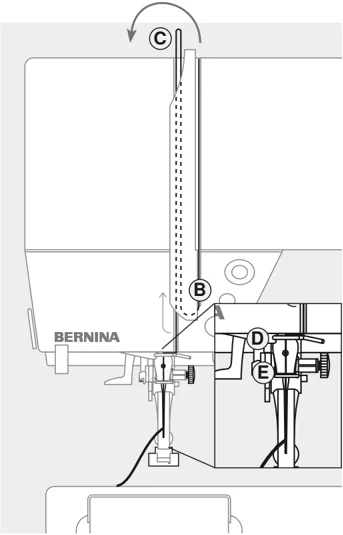
take thread through rear guide A
-
then into slit of upper thread tension
-
pull thread down to the right of the take-up cover to B
-
take thread up to the left of the cover to C in the direction of the arrow, placing it in the take-up lever
-
take thread down and through guides D and E
! Refer to the safety instructions!
Setting up the sewing computer 13
Threading the Double Needle
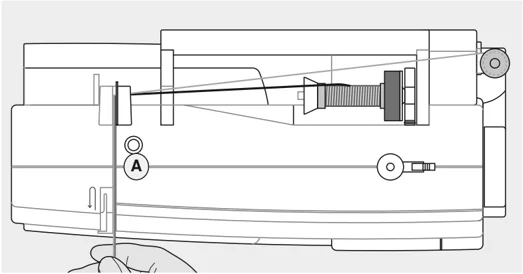
Threading the First Thread
- place thread spool on horizontal spool pin and thread
- guide the thread to the front in the slit and past the tension disc A on the right side
- thread sewing computer as usual and thread the right needle
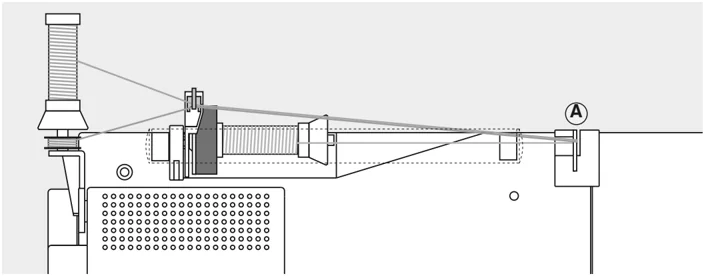
Threading the Second Thread
- when using the supplementary spool pin (vertical) always attach the foam pad (prevents the thread from getting caught on the spool pin)
- place thread spool on the additional spool pin and thread
- guide the thread to the front in the slit and past the tension disc A on the left side
- thread the left needle
- threads must not be twisted together
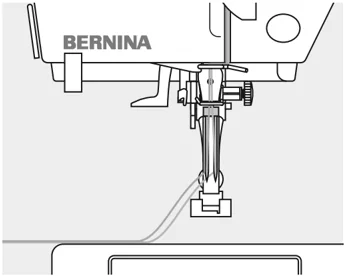
By using the Supplementary thread guide (special accessories), thread winds off the spool much easier.
Threading the Triple Needle
- two thread spools and one full bobbin are needed
- place one thread spool on horizontal spool pin
- place second thread spool and the bobbin, separated by a spool disc, on additional spool pin (both spools have to turn in the same direction)
- thread as usual by guiding two threads on the left side of the tension disc A and one thread on the right side of the disc
14 Setting up the sewing computer
Needle threader
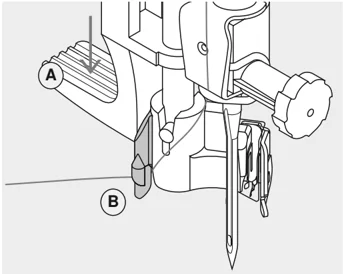
Press lever down
- Raise needle
- Lower presser foot
- Hold thread to the left and back
- Press down lever A, guiding the thread around hook B to the right, to the needle
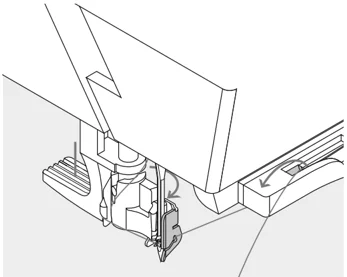
Guide thread in front of the needle
- Pull thread from the front into the thread guide until it catches (wire hook) and pull from the back forwards over the thread cutter on the right side of the CFL sewing light
- The thread is cut and at the same time held in place
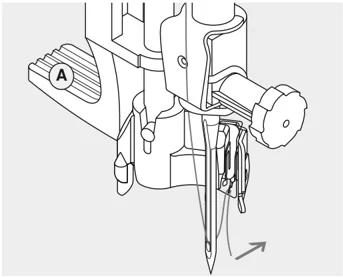
Release lever
- Release lever A
- Put the thread under the foot and pull the thread backwards or
- Put the thread under the foot, then pull it from front to back over the thread cutter on left side of the head frame
Double and triple needles must be threaded by hand.
Thread cutter
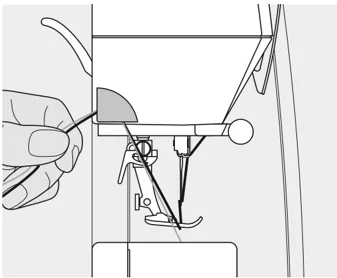
Thread cutter on head frame
- pull both threads from front to back over the cutter
- the threads release automatically as soon as the first stitch is sewn
Supplementary spool pin
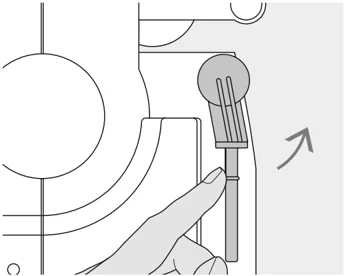
Collapsible vertical spool pin
- essential aid for sewing with more than one thread, i.e. double needle work
- turn pin up to stop when sewing
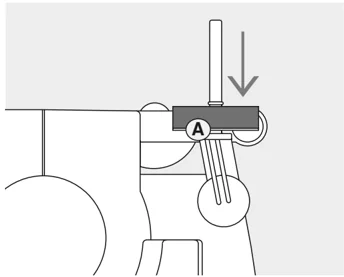
- we recommend to use foam pad A for better stabilizing of the spool and even unwinding of the thread
Setting up the sewing computer 15
Winding the bobbin
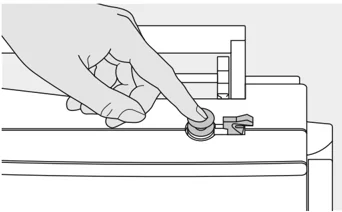
Winding the bobbin
- turn power switch to «I» (on)
- place empty bobbin on spindle
Threading the bobbin
-
place thread on spool pin
-
attach appropriate spool disc - diameter of thread spool determines disc size
-
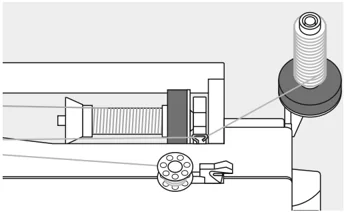
following the direction of the arrow, take thread through the rear guide and around the pre-tension stud
-
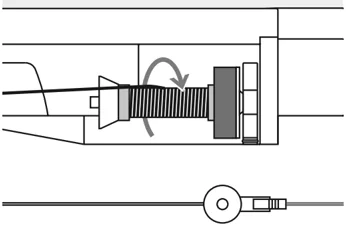
wind the thread two to three times around the empty bobbin and cut off any excess thread on the thread cutter
-
push engaging lever against bobbin, the winder works automatically
-
the motor will stop automatically when the bobbin is full
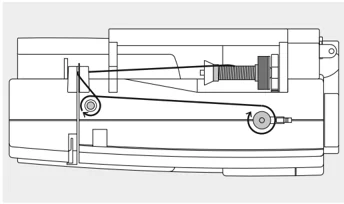
Thread cutter
- pull thread over thread cutter when removing the bobbin
Winding the bobbin while sewing or embroidering
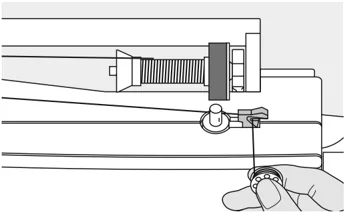
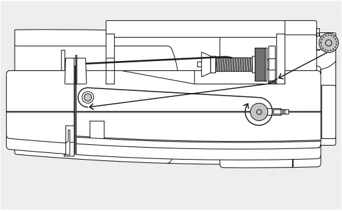
- place thread spool on vertical spool then, following the direction of the arrow, take thread through the thread guide and around the pre-tension stud
- then proceed as mentioned above
Inserting the bobbin
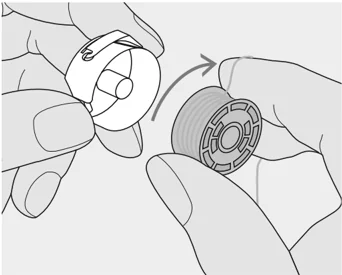
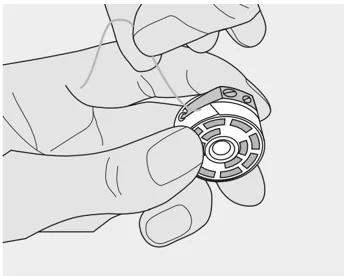
Inserting the bobbin Insert the bobbin so that the thread winds clockwise.
Pulling the thread under the spring Pull the thread into the slit, then to the left under the spring.
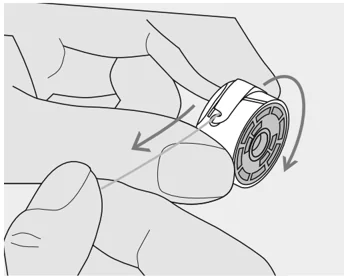
Clockwise turning of the bobbin The bobbin must turn clockwise.
The bobbins are inserted and threaded in the same way in the aurora models 430, 440 QE and 450.
16 Setting up the sewing computer
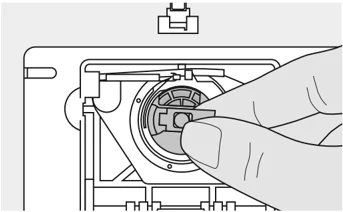
Bobbin case*
! image (image0)
To remove the bobbin case • raise the needle • turn power switch to «0» (off) • open the bobbin cover • grasp the latch of the bobbin case • remove case
! image (image1)
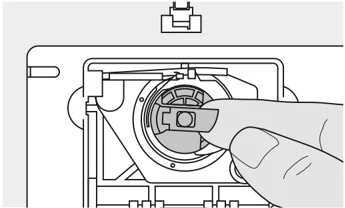
To insert the bobbin case • hold the bobbin case latch • aurora 430 / 440 QE: the finger on the case should point upwards • aurora 450: bobbin case opening points up • insert so that it clicks into place • close the bobbin cover
! image (image2)
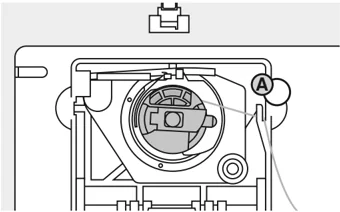
Bobbin thread cutter • insert the bobbin case • take the thread over cutter A and cut it • the bobbin thread does not have to be brought up as the loose end is just the right length to start sewing
* pictures = aurora 450
! image (image3)
Refer to the safety instructions!
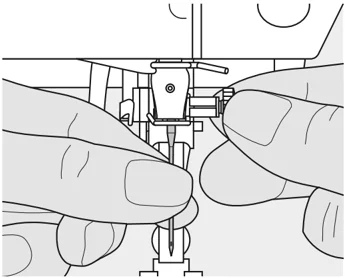
Changing the needle
! image (image4)
Removing the needle • raise the needle • turn power switch to «0» (off) • lower the presser foot • loosen the needle clamp screw • pull the needle down to remove
Inserting the needle • flat side of needle to the back • insert the needle as far as it will go • tighten the needle clamp screw
! image (image5)
Refer to the safety instructions!
Setting up the sewing computer 17
Changing the presser foot
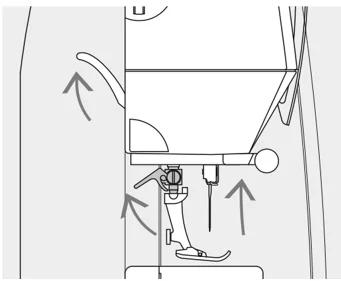
Changing the presser foot
- raise the needle and presser foot
- turn power switch to «0» (off)
- raise the clamping lever
- remove the presser foot
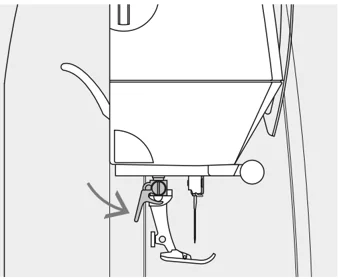
Attaching the presser foot
- guide the foot upwards over the cone
- press the clamping lever down
Thread tension
\begin{tabular}{lll} For example: & Tension & Needle \ Metallic thread & ca. 3 & 90 \ Monofilament & ca. 2–4 & 80 \ \end{tabular}
For special sewing work, the thread tension can be adjusted to suit the selected fabric and stitch pattern.
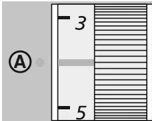
The basic setting
- is indicated when the red line on the tension adjustment wheel is in line with the marking A
- the tension does not need adjusting for normal sewing work

Thread tension settings Perfect stitch formation
- the stitch formation is in the fabric

Upper thread tension too tight
- the lower thread is pulled more to the right side of the fabric
- to reduce the upper thread tension turn tension adjustment wheel to 3 - 1

Upper thread tension too loose
- the upper thread is pulled more to the wrong side of the fabric
- to increase the upper thread tension turn tension adjustment wheel to 5 - 10
18 Important facts about thread and needles
Important facts about thread and needle
With the right combination of thread and needle optimum sewing results are achieved. The following are the guidelines: replace needle when starting a new sewing project.
Thread
The thread is chosen according to use. For a perfect sewing result, thread and material quality play an important role. It is recommended to use quality brand threads.
Cotton thread
- cotton threads are particularly suitable for cotton fabrics
- mercerized cotton threads have a slight sheen
Polyester thread
- polyester thread is suitable for practically all sewing needs
- it has a high tensile strength and is particularly colorfast
- polyester thread is more flexible and is recommended where a strong and elastic seam is required
Needle, thread and fabric
The correct needle size depends on the selected thread and fabric. Fabric type and structure determine which thread weight, needle size and needle tip should be used.
Needle summary
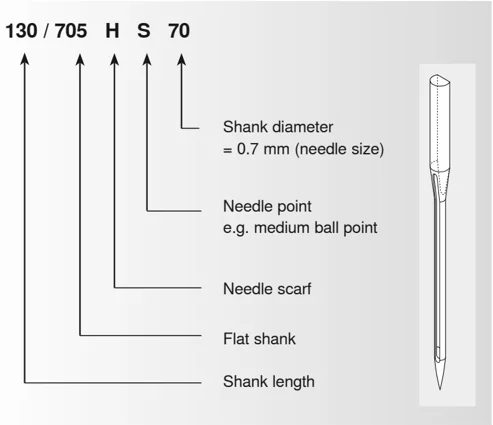
BERNINA requires needle system 130/705 H. This system number refers to shank shape as well as to length and form of the needle point.
Checking the needle condition
The needle condition should be checked and the needle replaced regularly. A defective needle not only damages the fabric but also the sewing computer.
\begin{tabular}{ll} \textbf{Guidelines} & \textbf{Needle No.} \ fine fabrics: & \ fine thread (darning thread, & \ embroidery thread) & 70–75 \ mediumweight fabrics: & \ normal thread & 80–90 \ heavyweight fabrics: & \ heavier thread & 100, 110, 120 \ \end{tabular}
Needle/thread combination
In order to check the needle/thread compatibility, the correct size thread must correspond with the correct size needle.
Correct needle/thread combination When sewing, the thread should travel smoothly down the long groove on the front of the needle.
Too thin thread or too thick needle The sewing thread has too much play in the groove. This could lead to skipped stitches and damage to the thread.
Too thick thread or too fine needle The thread rubs on the edges of the groove and can get jammed. This can break the thread.


Needle summary
Many materials are easier to sew if the appropriate needle is used.
| Type of needle | Model | Suitable for | Needle size |
|---|---|---|---|
| Universal130/705 H | Normal point, slightly rounded | For nearly all natural and synthetic fabrics (woven and knitted) | 60–100 |
| Jersey/Stretch130/705 H-S130/705 H-SES130/705 H-SUK | Ball point | Jersey, stretch fabrics | 70–90 |
| Leather130/705 H-LL130/705 H-LR | Cutting point | Natural and synthetic leather and plastic | 90–100 |
| Jeans130/705 H-J | Very fine point | Heavyweight fabrics such as denim, canvas, overalls | 80–110 |
| Microtex130/705 H-M | Especially fine point | Micro fiber fabrics and silk | 60–90 |
| Quilting130/705 H-Q | Fine point | Straight and topstitching | 75–90 |
| Embroidery130/705 H-E | Large eye, slight ball point | Embroidery on all natural and synthetic fabrics | 75–90 |
| Metafil130/705 H-MET | Large eye | Sewing with metallic threads | 75-90 |
| Cordonnet/Topstitching130/705 H-N | Small ball point, long eye | Topstitching with thick thread | 80–100 |
| Wing needle130/705 HO | Wide needle (wing) | Hemstitching | 100–120 |
| Double wing needle130/705 H-ZWI-HO | Special effects with hemstitch embroidery | 100 | |
| Double needle130/705 H-ZWI | Needle distances for 430 / 440 QE / 450: 1,0 / 1,6 / 2,0 / 2,5 / 3,0 / 4,0; plus 6,0 / 8,0 for 450 | Visible hems in stretch fabrics, pintucks, decorative sewing | 70–100 |
| Triple needle130/705 H-DRI | Needle distance 3.0 | Decorative sewing | 80 |
Special needles are available at your BERNINA dealer.
20 Stitch plate, feed-dog and fabric feed
Stitch plate
 9mm (inch- or mm-measurements) just aurora 450
 5,5mm (inch- or mm-measurements)
Stitch plate markings
- the stitch plates are marked with vertical lines in millimeters or inches
- mm measurements are at the front
- inch measurements are at the back
- the measurements correspond to the distance from the needle to the line
- needle insertion point is position 0 (center needle position)
- the mm/inch measurements are marked to the right and left
- the lines help to guide the fabric for sewing seams and for topstitching
- the horizontal markings are helpful for sewing corners and buttonholes, etc.
Removing the stitch plate
- turn power switch off («0»)
- raise the presser foot and needle
- lower the feed dog
- press the stitch plate down at the back right corner until it flips up
- remove the stitch plate
Replacing the stitch plate
- place the stitch plate over the opening A and press down until it clicks into place
Feed dog
 Button on handwheel side
 Button flush with housing = Sewing position
 Button depressed = Darning position
- for freehand sewing, e.g. darning, freehand embroidery, freehand quilting
- for embroidery with the embroidery module
Feed dog and fabric feed
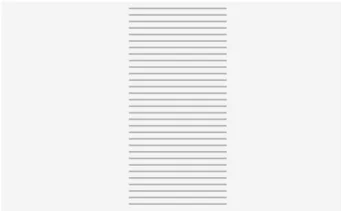
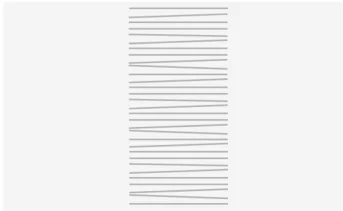
Let the fabric feed evenly.
Feed dog and stitch length
With each stitch the feed dog moves forward by one step. The length of this step is determined by the stitch length selected.
Pulling, pushing or holding back the fabric will result in uneven stitches.
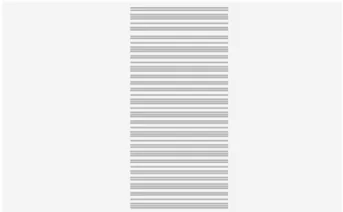
With an extremely short stitch length, the steps are also very short. The fabric moves under the foot quite slowly, even at full sewing speed.
Buttonholes, satin stitch and decorative stitches are all sewn with a very short stitch length.
Stitch plate, feed-dog and fabric feed 21
Feed dog and fabric feed with height compensating tool
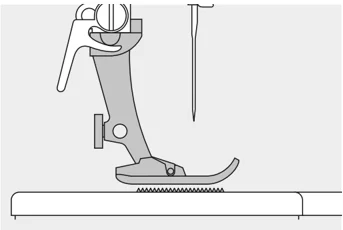
The feed dog works accurately when the foot is level.
If the foot is at an angle, e.g. when sewing over thick to thin or vice-versa, the feed dog cannot grip and feed the fabric and the fabric might jam.
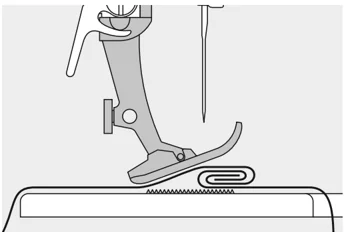
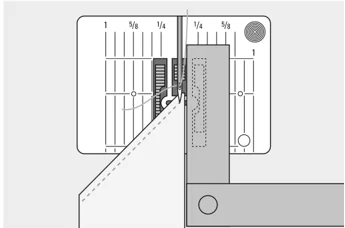
Uneven layers To solve this problem, place one, two or three compensating plates as required behind the needle under the presser foot to level it.
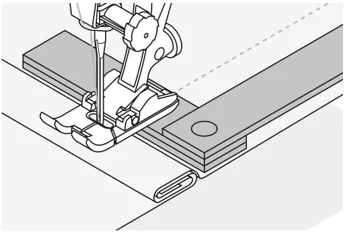
To correct the height in front of the foot, place one or more plates to the right of the foot close to the needle. Sew until the foot is level again and remove the plates.
Feed dog and sewing corners
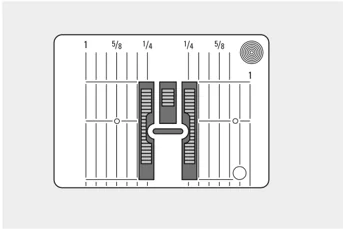
The space between the two rows of the feed dog is relatively large due to the width of the stitch plate hole.
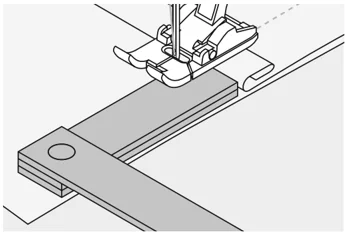
Place one or more plates as close as possible to the edge of the fabric on the right side of the presser foot. This allows for better feeding of the fabric when sewing corners.
22 Presser foot pressure and Balance
Presser foot pressure
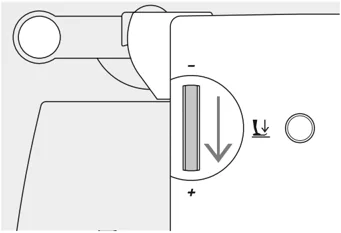
Dial on head frame
- the pressure is adjusted at the left side of the head frame
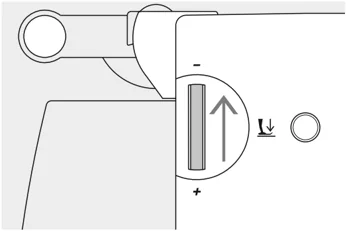
Standard pressure
- for normal sewing work
- default = 47
- the default setting is always visible, it blinks
47
Increased pressure
- for firm fabrics
- improves fabric feed
60
Reduced pressure
- for jerseys and loose knits
- to prevent fabric from stretching
- adjust pressure so that the fabric still feeds correctly
15
Balance
Different fabrics, threads, stabilizers and interfacings can affect programmed stitches so, that sometimes they might not join or might overlap, i.e. the stitches that make up the pattern are too close together or too far apart. These effects can be corrected with the Balance so that the stitch formation can be adjusted where necessary to suit the fabric.
Do not forget to reset the balance by pressing the balance or clr button after sewing with adjusted balance values.
Balance for practical and decorative stitches
When sewing soft fabrics such as jersey or tricot, the fabric tends to stretch under the presser foot which also stretches the stitch being sewn. For example, the Honeycomb stitch opens up and is too long. Thicker fabrics might cause the stitch to overlap, making it too short. Correcting with the Balance is very easy. Test-sew first!
Stitch formation too long
Stitch formation too close
Desired stitch formation
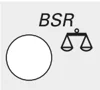
BSR
BSR
-
press the Balance button
-
press the left Needle position button = shorter stitch length (maximum 9 steps)
-
press the Balance button
-
press the right Needle position button = longer stitch length (maximum 9 steps)

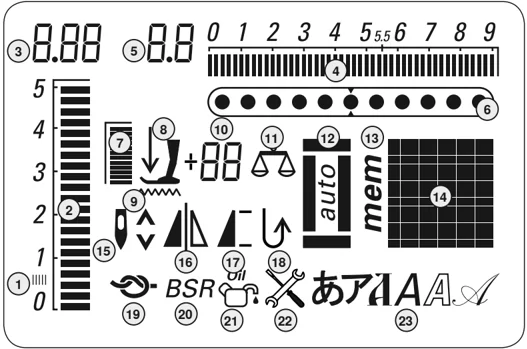
Display
aurora 430 / 440 QE aurora 450
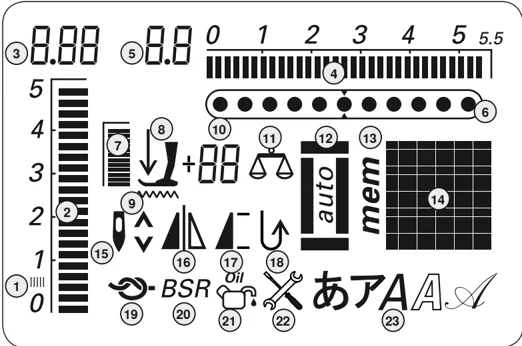
- Satin stitch: dense, short zig-zag stitch
- Stitch length: basic setting blinks constantly
- Stitch length: actual value
- Stitch width: basic setting blinks constantly
- Stitch width: actual value
- Needle position: 11 positions
- Presser foot pressure: basic setting blinks
- Arrow and presser foot symbol: blink when presser foot is raised and the sewing computer is started
- Feed dog symbol: blinks when feed dog is not lowered in the BSR mode and embroidery mode
- Triple digital display a. Presser foot indicator: displays matching foot for selected stitch b. Presser foot pressure: displays presserfoot pressure during adjusting c. Balance: displays the balance steps during balancing
- Balance: visible when the Balance button is pressed
- Buttonhole: visible when buttonhole is selected
- «mem»: visible when Memory is open
- Stitch: graphic or numeric
- Needle stop up / down: default stop up/ in BSR mode down
- Mirror image: left / right
- Pattern begin/Pattern end
- Continuous reverse sewing
- Securing function
- BSR: Bernina Stitch Regulator
- Cleaning notification: visible when the sewing computer must be cleaned/oiled
- Service notification: visible when the sewing computer must be taken for a service to the BERNINA dealer
- Alphabet
24 Functions
Function buttons
 Stitch width
- left button = narrows the stitch width
- right button = widens the stitch width
- keep button pressed = quick steps
- the basic setting of the selected stitch blinks constantly
 Stitch length
- left button = shortens the length
- right button = elongates the length
- keep button pressed = quick steps
- the basic setting of the selected stitch blinks constantly
 Needle position
- left button = needle to the left
- right button = needle to the right
- keep button pressed = quick steps
- total of 11 needle positions: 5 left, 5 right and 1 center
 Pattern begin
- press the button
- the needle moves to the beginning of a stitch or stitch program
 Mirror image (left/right)
- press the button
- mirror image of selected stitch will be sewn
 «clr» (clear)
- press the button
- stitch length, stitch width, needle positions are returned to basic settings
- active functions are deleted
Exception: needle stop down
 Securing function (with 4 stitches)
- press the button before starting to sew = individual stitches or stitch combination will be secured at the beginning
- press the button during an individual stitch = the stitch will be secured at the end
- the sewing computer stops
- press the button during stitching a stitch combination = the stitch combination will be secured at the end
- the sewing computer stops
 Needle up/down
In the basic setting the arrow points up.
- press the button briefly:
- the needle will go up or down (same as tapping on the foot control)
- press the button longer:
- the needle will go down
- the arrow on the display points down
- the sewing computer stops with the needle down
- press the button longer again:
- the needle will go up
- the arrow on the display points up
- the sewing computer stops with the needle up
 Balance / BSR
Balance
- press the button
- the balance symbol on the display is active
- press the left arrow of the needle position = subtracts space between stitches
- press the right arrow of the needle position = adds space between stitches
- press the button again = the balance is turned off, the altered stitch returns to the basic settings
- altered needle position settings remain during the balance process
BSR
- with the attached BSR foot the BSR function is switched on and off by pressing the button
 Slide speed control
- the motor speed can be freely adjusted from minimum to maximum with the slide control
- when winding the bobbin thread the speed of the winder can be regulated, when the sewing computer is not sewing
 mem (Memory)
- press the mem button
- «mem» will appear on the display
- the empty memory spaces (90) or (60) and the cursor blink
- use the left arrow and the mem←-button to scroll and program stitches, letters and numbers
Functions 25
 Reverse sewing
quick reverse:
- press the button
- sews in reverse until the button is released
- programs buttonholes
- programs darning length
- seam end in securing program no. 5
- manual securing at beginning and end of seam
continuous reverse:
- press button until a beep is heard before sewing and the symbol is visible on the display
- the sewing computer sews the chosen stitch in reverse
- to cancel: press button until a beep is heard before sewing and the symbol goes off
 Pattern end / Pattern repeat
press the button while sewing
- the sewing computer stops at the end of the active single stitch or the active stitch in a stitch combination (in Memory) press and release button before sewing
- the Pattern end symbol appears on the display
- a single stitch or the first stitch of a stitch combination in the Memory will be sewn 1x, the sewing computer will stop
- when continuing to sew the Pattern end function is turned off again and the Pattern end symbol disappears press button until a beep is heard before sewing
- the Pattern end symbol appears on the display
- a stitch or stitch combination in the Memory will be sewn 1x
- the Pattern end function is active as long as the button is pressed again until a beep is heard before sewing
- the Pattern end symbol on the display disappears
Start-Stop button
- starts and stops the sewing computer when operating it without foot control
- starts and stops the sewing / embroidery computer in the embroidery mode with attached embroidery module
- starts and stops the BSR function when BSR foot is attached and plugged in; without foot control
 Stitches
- in single mode, press the arrow buttons to scroll through all stitch patterns
Alphabets, numbers
- press the center-button
- one of the existing fonts will appear on the display
- press the Alphabet button to select the font
- press the right button to scroll letters, numbers and special characters for-wards (A B C...)
- press the left button to scroll special characters backwards ( ] [ ) ...)
Letters/numbers/special characters A B C D E F G H I J K L M N O P Q R S T U V W X Y Z Ä Ö Ü Å Æ Œ Ø Ñ È É Ê À  1 2 3 4 5 6 7 8 9 0 _ - . ' ! + = & ÷ ? % ¢ @ ( ) [ ]
 # -button
Standard = graphic display
- press button and enter desired stitch number
- the stitch will be displayed graphically (image)
Alternative = numeric display
- press button until a short beep is heard
- the display of the active stitch will change from graphic (image) to numeric (num-ber)
- further stitches will now be displayed numerically (number) switch again to standard display in the same manner
Entering 3 digit stitch numbers:
- press button until the number «1» appears
- now enter the other two numbers