Memory Craft 6500
PROFESSIONAL
Instruction book
JANOME

IMPORTANT SAFETY INSTRUCTIONS
When using an electrical appliance, basic safety precautions should always be followed, including the followings: Read all instructions before using this appliance.
DANGER— To reduce the risk of electric shock:
- An appliance should never be left unattended when plugged in. Always unplug this sewing machine from the electric outlet immediately after using and before cleaning.
- Always unplug before replacing a sewing machine bulb. Replace bulb with same type rated 12 Volts, 5 Watts.
WARNING — To reduce the risk of burns, fire, electric shock, or injury to persons:
- Do not allow to be used as a toy. Close attention is necessary when this sewing machine is used by or near children.
- Use this appliance only for its intended use as described in this owner’s manual. Use only attachments recommended by the manufacturer as contained in this owner’s manual.
- Never operate this sewing machine if it has a damaged cord or plug, if it is not working properly, if it has been dropped or damaged, or dropped into water. Return this sewing machine to the nearest authorized dealers or service center for examination, repair, electrical or mechanical adjustment.
- Never operate the appliance with any air opening blocked. Keep ventilation openings of this sewing machine and foot controller free from accumulation of lint, dust and loose cloth.
- Never drop or insert any object into any opening.
- Do not use outdoors.
- Do not operate where aerosol (spray) products are being used or where oxygen is being administered.
- To disconnect, turn all controls to the off (“O”) position, then remove plug from outlet.
- Do not unplug by pulling on cord. To unplug, grasp the plug, not the cord.
- Keep fingers away from all moving parts. Special care is required around the sewing machine needle.
- Always use the proper needle plate. The wrong plate can cause the needle to break.
- Do not use bent needles.
- Do not pull or push fabric while stitching. It may deflect the needle causing it to break.
- Switch this sewing machine off (“O”) when making any adjustment in the needle area, such as threading the needle, changing the needle, threading the bobbin or changing the presser foot, and the like.
- Always unplug this sewing machine from the electrical outlet when removing covers, lubricating, or when making any other adjustments mentioned in this owner’s manual.
SAVE THESE INSTRUCTIONS
The design and specifications are subject to change without a prior notice.
TABLE OF CONTENTS
-
KNOW YOUR MACHINE ........ 3
-
Name of Parts ........ 3
-
Standard Accessories ........ 4
-
GETTING READY TO SEW ........ 5
-
Connecting the Power Supply ........ 5
-
Controlling Sewing Speed ........ 5
-
Speed control lever ........ 5
-
Foot control ........ 5
-
Function Buttons ........ 6
-
Pattern selection buttons ........ 8
-
Raising and Lowering the Presser Foot ........ 9
-
Attaching the Knee Lifter ........ 9
-
Changing the Presser Foot ........ 10
-
Detaching and Attaching the Foot Holder ........ 10
-
Variety of Presser Feet and Their Uses ........ 11
-
Winding the Bobbin ........ 12
-
Removing the bobbin ........ 12
-
Setting the spool of thread ........ 12
-
Winding the bobbin ........ 13
-
Inserting the bobbin ........ 14
-
Threading the Machine ........ 15
-
Automatic Needle Threader ........ 17
-
Drawing Up the Bobbin Thread ........ 18
-
Changing Needles ........ 19
-
Thread and Needle Chart ........ 19
-
Balancing Thread Tension ........ 20
-
Adjusting the tension ........ 20
-
Adjusting the Foot Pressure ........ 21
-
Dropping the Feed Dog ........ 21
-
Selecting the Sewing Mode ........ 22
-
The Help Button ........ 23
-
Selecting the Pattern ........ 23
-
Customizing Machine Settings ........ 24
-
Resumption setting ........ 24
-
Sound setting ........ 24
-
Language selection ........ 24
-
BASIC STITCHES (Mode 1) ........ 25
-
Straight Stitch ........ 25
-
To sew ........ 25
-
To sew from the edge of thick fabric ........ 25
-
Securing seam ........ 25
-
Changing sewing direction ........ 26
-
Using the cloth guide ........ 26
-
Using the seam guide lines ........ 26
-
Adjusting the needle drop position ........ 27
-
Adjusting the stitch length ........ 27
-
Variety of the straight stitches ........ 28
-
Basting ........ 29
-
Zigzag Stitch ........ 30
-
Adjusting the stitch width ........ 30
-
Adjusting the stitch length ........ 30 Variety of Overcasting Stitches (Modes 1 and 3) ... 31
-
Overcasting with zigzag stitch ........ 31
-
Overcasting stitch ........ 31
-
Multiple zigzag stitch (Tricot stitch) ........ 31
-
Knit stitch ........ 32
-
Double overedge stitch ........ 32
-
Overlock stitch ........ 32
-
Zipper Sewing ........ 33
-
Fabric preparation ........ 33
-
To sew ........ 34
-
Rolled Hem ........ 36
-
PATCHWORK AND QUILTING (Mode 2) ........ 37
-
Patchwork ........ 37
-
Angle scale on the needle plate ........ 37
-
Seaming patchwork pieces ........ 37
-
Patchwork stitches ........ 37 Stitch in the ditch with the even feed foot... 38
-
Quilting ........ 38
-
Quilting bar for the even feed foot ........ 38
-
Quilting bar for the zigzag foot ........ 39
-
Clasp stitch ........ 40
-
Applique ........ 40
-
Programming French Knots ........ 41
1
UTILITY STITCHES AND
-
DECORATIVE STITCHES (Mode 3) ........ 42
-
Buttonholes ........ 42
-
Sensor buttonholes ........ 43
-
To sew ........ 43
-
Double layer buttonhole ........ 46
-
Corded buttonhole ........ 46
-
Changing buttonhole width ........ 47
-
Changing buttonhole stitch density ........ 47
-
Automatic buttonhole ........ 48
-
Button Sewing ........ 50
-
Darning ........ 51
-
To sew a shorter darning ........ 52
-
To adjust the evenness of darning ........ 52
-
Tacking ........ 53
-
To sew a shorter tack ........ 53
-
Eyelet ........ 54
-
Adjusting the shape of an eyelet ........ 54
-
Blind Hem ........ 55
-
To sew ........ 55
-
Changing needle drop position ........ 56 To make the straight stitches
-
in blind hem stitch longer ........ 56
-
Shell Tucking ........ 57
-
Scallop Stitch ........ 57
-
Cording ........ 57
-
Twin Needle Sewing ........ 58
-
Programming a Pattern Combination ........ 60 One cycle sewing with the auto-lock stitch 60 Pattern combination with auto thread cutting 61
-
Elongation Sewing ........ 62 Programming pattern combination with
-
a mirror Image ........ 62 Sewing the pattern combination from the beginning 63 Sewing the current pattern from the beginning 63 Making a copy and a mirror Image of
-
programmed patterns ........ 63
-
Editing Program ........ 64
-
Unified needle drop position ........ 64 Custom stitch adjustment (Mode 2 and 3 only) 65 Storing and recalling the pattern combination 65
-
MONOGRAMMING (Mode 4) ........ 66
-
Selecting a Letter Style ........ 66
-
Programming a Monogram ........ 67
-
Editing a Monogram ........ 68
-
Inserting a letter (character) ........ 68
-
Deleting a letter (character) ........ 68
-
CARE AND MAINTENANCE ........ 69
-
Correcting Distorted Stitch Patterns ........ 69
-
Cleaning the Hook Race and Feed Dog ........ 70
-
Replacing the Light Bulb ........ 71
-
Problems And Warning Signals ........ 72
-
Troubleshooting ........ 74
2
KNOW YOUR MACHINE
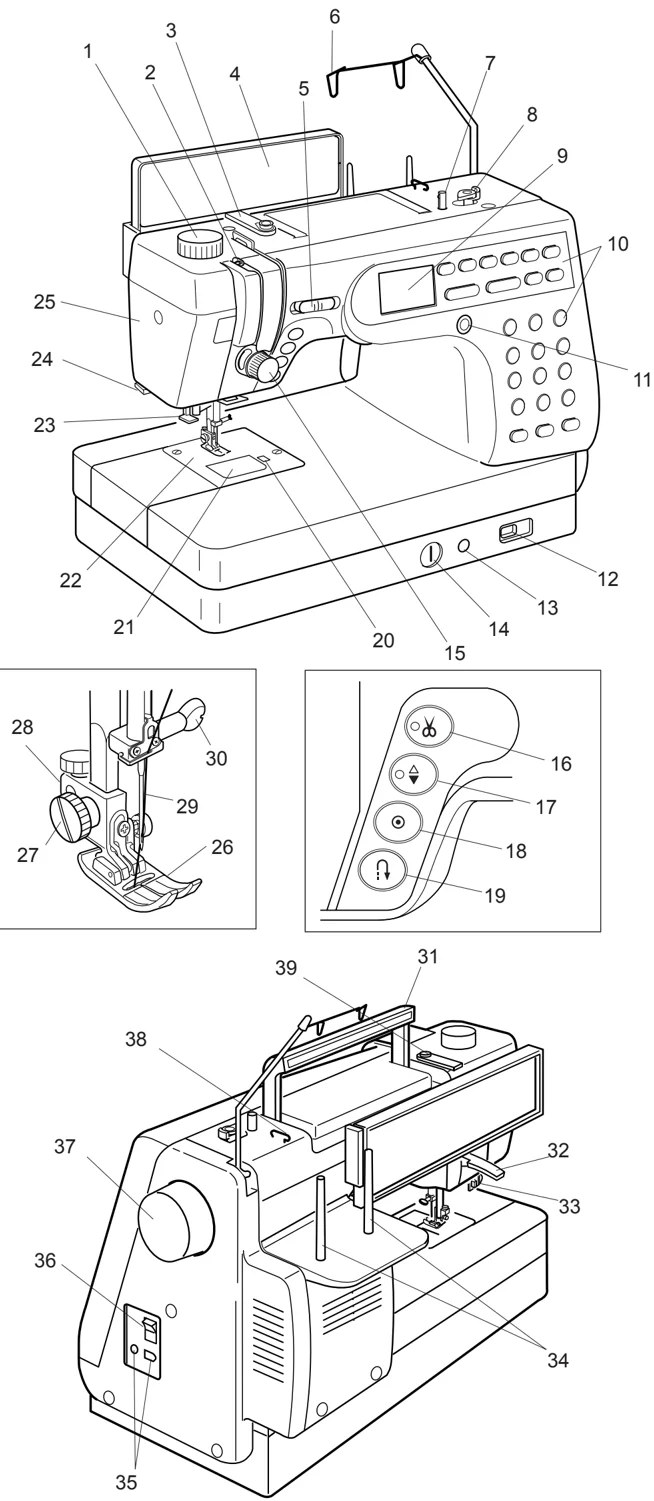
Name of Parts
- Foot Pressure Dial
- Thread Take-up Lever
- Thread Guide
- Quick Reference Board
- Speed Control Lever
- Retractable Thread Guide
- Bobbin Winder Spindle
- Bobbin Winder Stopper
- LCD Screen
- Function Buttons
- LCD Contrast Adjusting Dial
- Drop Feed Lever
- Knee Lifter Socket
- Stitch Balance Adjusting Dial
- Tension Regulating Dial
- Thread Cutter Button
- Up/Down Needle Button
- Auto-Lock Button
- Reverse Button
- Hook Cover Plate Release Button
- Hook Cover Plate
- Needle Plate
- Needle Threader
- Thread Cutter
- Face Plate
- Zigzag Foot A
- Thumb Screw
- Foot Holder
- Needle
- Needle Clamp Screw
- Carrying Handle
- Presser Foot Lifter
- Buttonhole Lever
- Spool Pins
- Machine Sockets
- Power Switch
- Handwheel
- Thread Guide
- Bobbin Winding Tension Disk
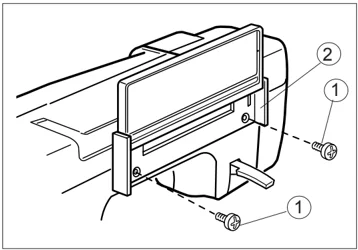
Attaching the quick reference board The quick reference board and setscrews are included in the standard accessories. Fix the quick reference board on the backside of the machine with the two setscrews. Tighten the screws firmly with a screwdriver.
① Setscrews ② Quick Reference Board
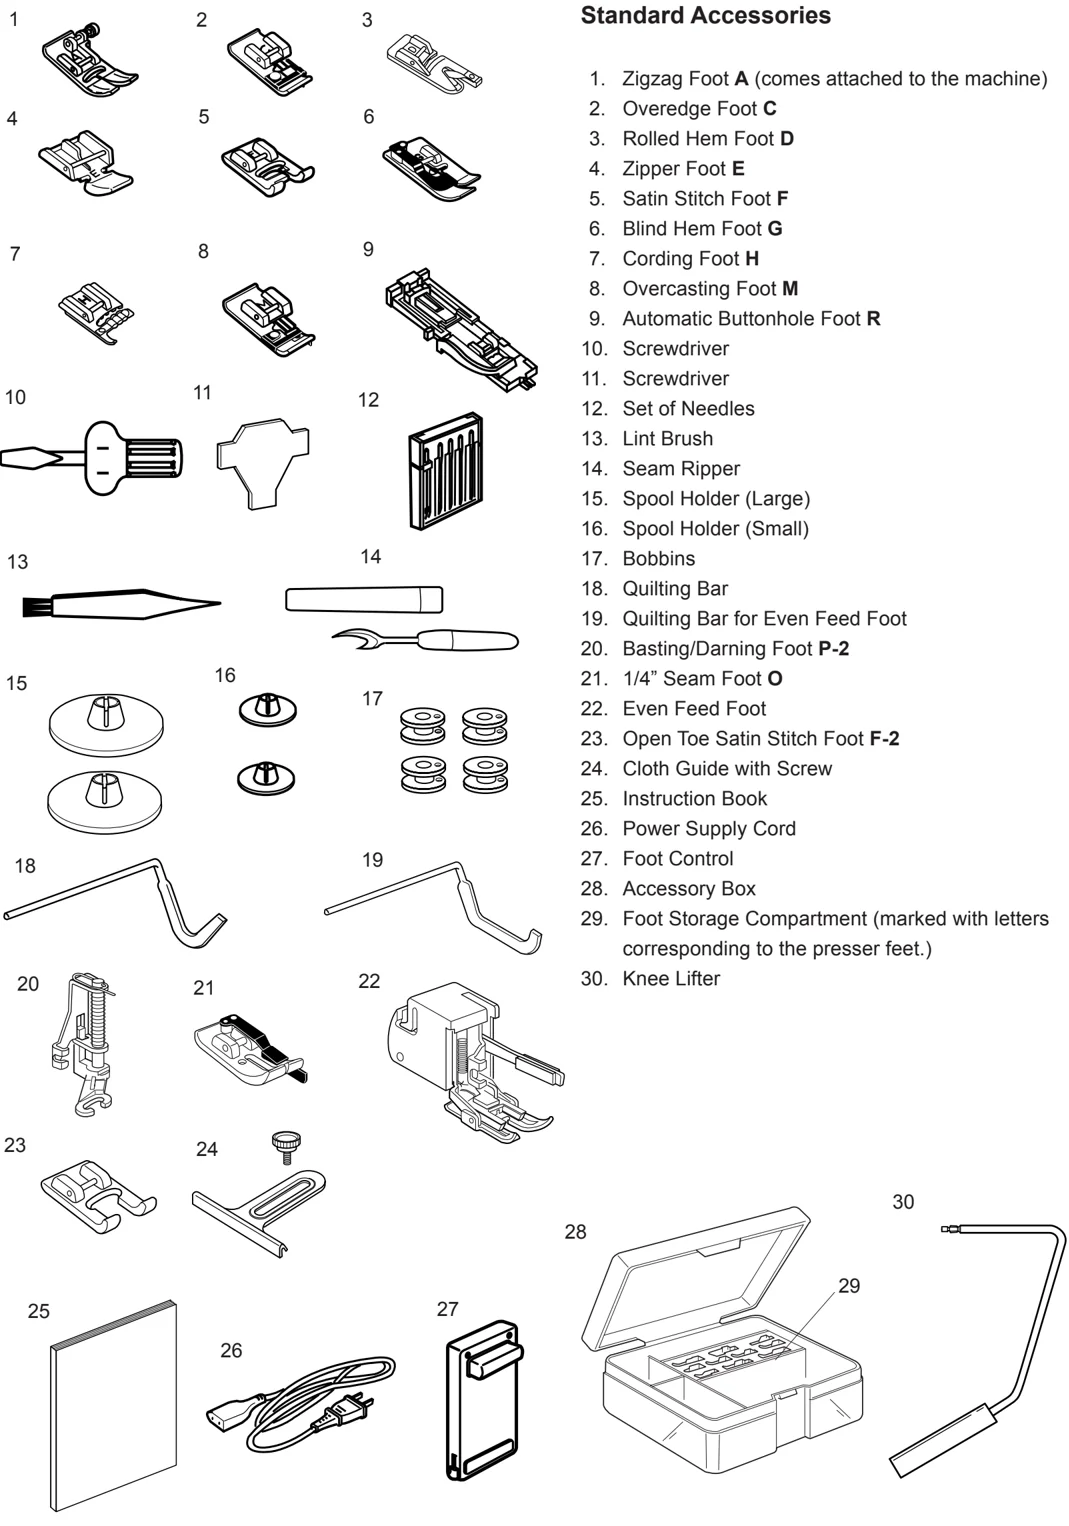
Standard Accessories
- Zigzag Foot A (comes attached to the machine)
- Overedge Foot C
- Rolled Hem Foot D
- Zipper Foot E
- Satin Stitch Foot F
- Blind Hem Foot G
- Cording Foot H
- Overcasting Foot M
- Automatic Buttonhole Foot R
- Screwdriver
- Screwdriver
- Set of Needles
- Lint Brush
- Seam Ripper
- Spool Holder (Large)
- Spool Holder (Small)
- Bobbins
- Quilting Bar
- Quilting Bar for Even Feed Foot
- Basting/Darning Foot P-2
- 1/4" Seam Foot O
- Even Feed Foot
- Open Toe Satin Stitch Foot F-2
- Cloth Guide with Screw
- Instruction Book
- Power Supply Cord
- Foot Control
- Accessory Box
- Foot Storage Compartment (marked with letters corresponding to the presser feet.)
- Knee Lifter
4
GETTING READY TO SEW
Connecting the Power Supply
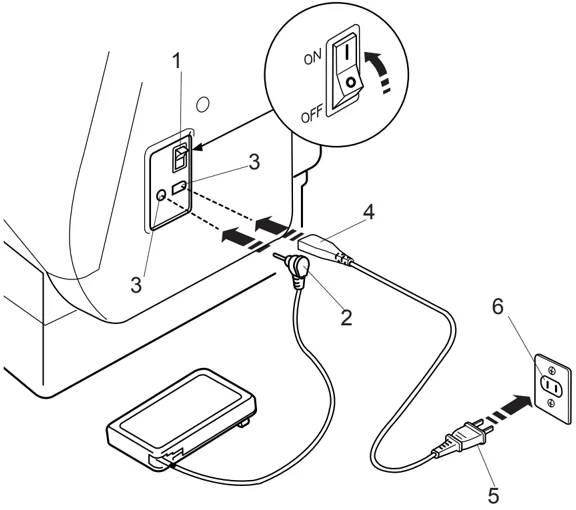
Turn off the power switch. Insert the foot control plug into the machine socket. Insert the machine plug into the machine socket. Insert the power supply plug into the wall outlet. Turn on the power switch.
1 Power Switch 2 Foot Control Plug 3 Machine Socket 4 Machine Plug 5 Power Supply Plug 6 Wall Outlet
NOTE: If you turn off the power switch, wait for 5 seconds before turning it on again.
For Your Safety: While in operation, always keep your eyes on the sewing area, and do not touch any moving parts such as the thread take-up lever, handwheel or needle. Always turn off the power switch and unplug from the power supply:
- when leaving the machine unattended.
- when attaching or removing parts.
- when cleaning the machine. Do not place anything on the foot control, otherwise the machine will run intermittently.
Operating Instructions: The symbol "O" of a switch indicates the "off" position of a switch. For appliances with a polarized plug (one blade wider than the other). To reduce the risk of electric shock, this plug is intended to fit in a polarized outlet only one way. If it does not fit fully in the outlet, reverse the plug. If it still does not fit, contact a qualified electrician to install the proper outlet. Do not modify the plug in any way.
Controlling Sewing Speed
Speed control lever
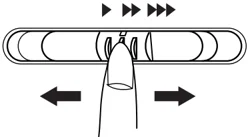
You can limit the maximum sewing speed by the speed control lever according to your sewing needs. To increase sewing speed, slide the lever to the right. To decrease sewing speed, slide the lever to the left.
Foot control
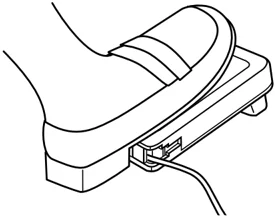
Pressing on the foot control can vary sewing speed. The harder you press the foot control, the faster the machine runs.
NOTES: The machine runs at the maximum speed set by the speed control lever when the foot control is being fully depressed. Keep the foot control free from accumulation of lint, dust and loose cloth. Do not place anything on the foot control.
Operating Instructions: Foot controller Model 21371 is for use with sewing machine model MC6500.
5
Function Buttons
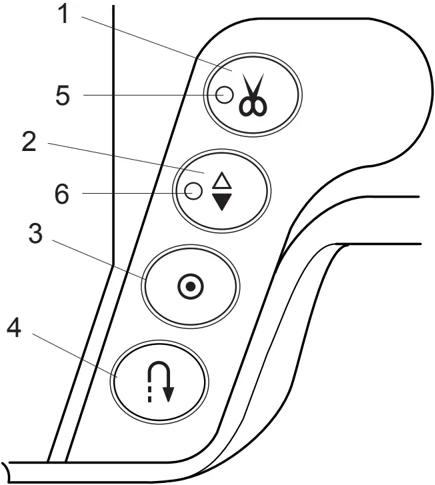
1 Thread cutter button Press this button after finishing sewing and the machine will trim the threads. The LED signal blinks while cutting the threads. 5 Thread Cutter Signal
NOTES: The auto thread cutter will work well with normal sewing threads #30 or finer. Use the thread cutter on the face plate to cut the specialized or thick threads if the auto thread cutter does not work well. When starting the next seam, pull the needle thread to pick the bobbin thread up and draw them to the back and under the foot. Clean the auto thread cutter mechanism regularly to avoid malfunction due to built up lint. (See page 70.) Avoid using a paper spool when it begins to empty since it will not unwind smoothly. It may cause the thread to bunch or slip when using the auto thread cutter.
2 Up/Down needle button Press this button to bring the needle bar up or down. The LED signal will turn on when the needle is down. The LED signal will turn off when the needle is up. The machine will stop with the needle up or down depending on the needle position determined by this button. The machine will always stop with the needle up after auto thread cutting or buttonhole stitching. 6 LED signal
3 Auto-Lock button When stitch pattern 01, 02, 08 or 09 has been selected, the machine will immediately sew locking stitches and automatically stop when the auto-lock button is pressed. When sewing all other stitches, the machine will sew locking stitches at the end of the pattern being sewn and automatically stop.
4 Reverse button When stitch pattern 01, 02, 08 or 09 has been selected, the machine will sew in reverse while the reverse button is pressed. If you press the reverse button when sewing all other stitches, the machine will immediately sew locking stitches and automatically stop.
6
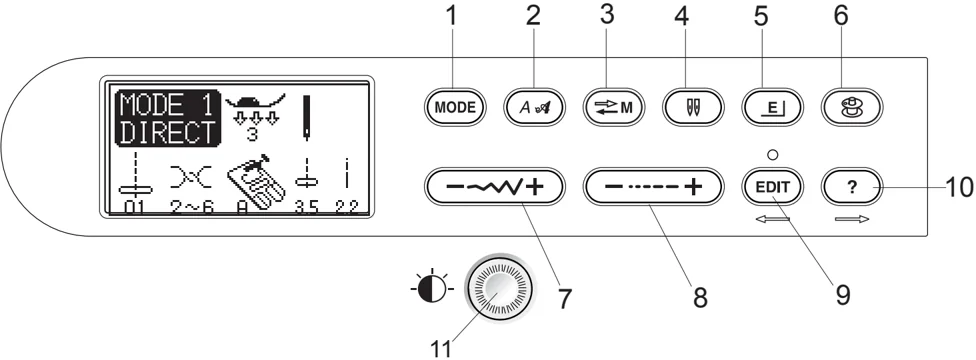
| 1 | MODE | Mode button: Press this button to select the desired mode. |
|---|---|---|
| 2 | A | Letter style button: Press this button to change the letter style of monogram. |
| 3 | M | Memory/recall button: Press this button to register or recall programmed pattern combinations. The previous pattern combination will be replaced by the new combination when pressing this button after programming. The registered pattern combination will be recalled when pressing this button on the initial screen of the selected mode. |
| 4 | Twin needle button: Press this button when sewing with a twin needle. | |
| 5 | E | Elongation button: Press this button to elongate satin stitch patterns. |
| 6 | Bobbin winding button: Press this button to wind the bobbin. | |
| 7 | –~W+ | Stitch width adjusting button: Press this button to alter the stitch width. |
| 8 | –-----+ | Stitch length adjusting button: Press this button to alter the stitch length. |
| 9 | EDIT | Editing button: Press this button to edit the programmed patterns. In the editing mode this button is used to shift the cursor to the left. |
| 10 | ? | Help button: Press this button to view alternative applications of certain stitches. In the editing mode this button is used to shift the cursor to the right. |
| 11 | LCD contrast adjusting dial: Turn this dial to adjust contrast of the LCD Screen. |
7



12
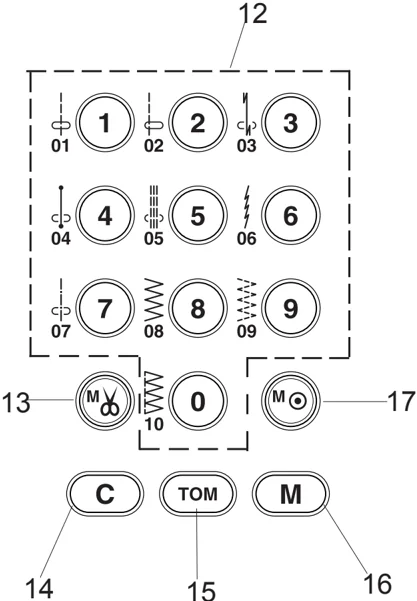
12 Pattern selection buttons
Press these buttons to select the desired pattern. In the direct selection mode (Mode 1), patterns number 01 to 10 can be directly selected by pressing the corresponding button.
In other modes, enter the two-digit pattern number with the numeral buttons.
13 Auto thread cutter button: Press this button after the last memorized pattern and the machine will automatically trim the threads when sewing is finished.
14 Clear button: Press this button to delete a pattern from programmed pattern combination. Pressing this button after sewing or pressing and holding for a few seconds will delete entire pattern combination and the LCD screen will return to the initial display of the selected mode.
15 Turnover memory button: Press this button to memorize a pattern in mirror image. In the monogram mode, pressing this button will reduce the letter to 2/3 of the original size.
16 Memory button: Press this button to memorize the desired patterns. Up to 50 patterns can be memorized.
17 Locking stitch button: Press this button after memorizing the last pattern and the machine will sew the pattern combination and lock the stitch off then stop automatically when sewing is finished.
8


Raising and Lowering the Presser Foot
The presser foot lifter raises and lowers the presser foot. You can raise the presser foot about 6 mm (1/4") higher than the normal up position by exerting more pressure when lifting the presser foot lifter. This allows for easy removal of the presser foot and helps you to place thick fabrics under it.
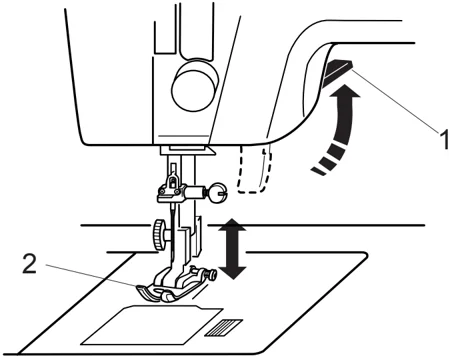
1 Presser Foot Lifter 2 Presser Foot 3 Up Position 4 Extra Lift
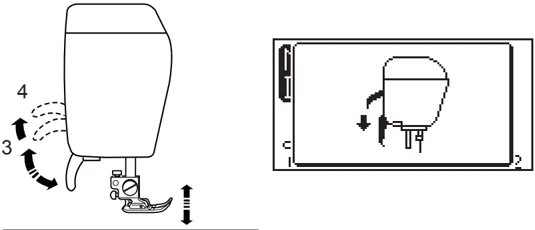
NOTE: If you start the machine with the presser foot up, the LCD screen will advise you to lower the foot. Lower the foot then restart the machine.
Attaching the Knee Lifter
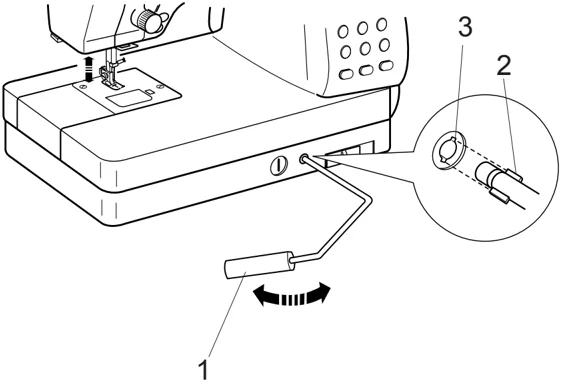
The Knee Lifter is extremely helpful when sewing applique, patchwork and quilting since it allows you to handle the fabric while your knee controls the presser foot.
Match the ribs on the knee lifter with the notches in the knee lifter socket and insert the knee lifter.
1 Knee Lifter 2 Ribs 3 Notches
Push the knee lifter with your knee to raise and lower the presser foot.
NOTE: Do not touch the knee lifter while sewing, otherwise the fabric will not be fed smoothly.
9
Changing the Presser Foot
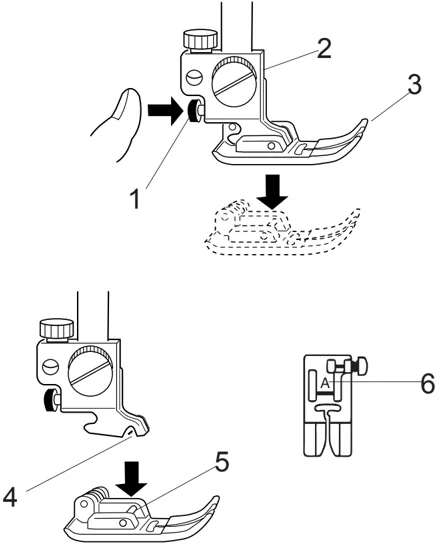
CAUTION: Turn OFF the power switch before changing the foot. Always use the proper foot for the selected pattern. Wrong foot can cause the needle to break.
To snap off: Raise the needle and presser foot. Press the red button on the back of the foot holder and the foot will drop.
1 Red Button 2 Foot Holder 3 Presser Foot
To snap on: Place the presser foot so the pin on the foot lies just under the groove of the foot holder. Lower the foot holder to lock the foot in place. Each foot is marked with a letter for identification.
4 Groove 5 Pin 6 Identification Letter
Detaching and Attaching the Foot Holder
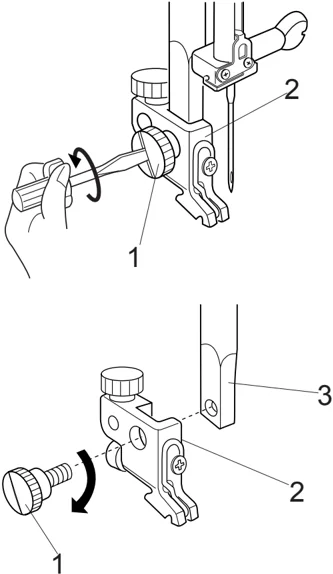
WARNING: Turn OFF the power switch before detaching or attaching the foot holder.
To detach: Raise the presser bar and turn the thumbscrew counterclockwise to remove the foot holder.
1 Thumbscrew 2 Foot holder
To attach: Align the hole in the foot holder with the threaded hole in the presser bar and insert the thumbscrew through the hole. Tighten the thumbscrew by turning it clockwise.
3 Presser Bar
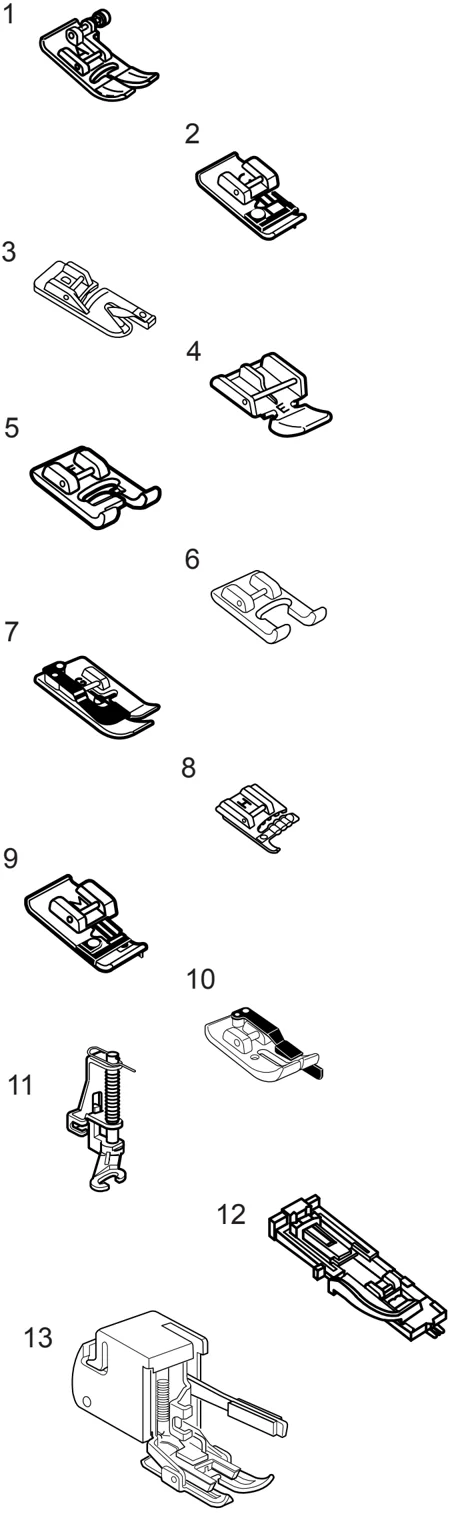
Variety of Presser Feet and Their Uses
-
Zigzag foot A: This is the most versatile foot. It can be used for various stitches including straight stitches and zigzag stitches. It is designed to achieve firm and neat seam results.
-
Overedge foot C: This foot is exclusively for overedging. The brush on the foot effectively prevents skipped stitches on the raw edge of fabrics.
-
Rolled hem foot D: This special foot is for sewing a rolled hem. The curl of the foot helps to form a hem at a constant width.
-
Zipper foot E: This foot is for sewing zippers. The zipper teeth are guided through the grooves on the bottom of the foot.
-
Satin stitch foot F: This clear plastic foot is ideal for satin stitches and decorative stitches. The center groove on the bottom of the foot ensures smooth feeding of dense stitches.
-
Craft foot F-2: This is an open toe satin stitch foot for patchwork and appliqué.
-
Blind hem foot G: This foot is specially designed for blind hemming. The guide on the foot helps feed the fabric and sew a straight and nearly invisible blind-hem.
-
Cording foot: This foot is specially designed to hold one or three strands of cording to create braiding.
-
Overcasting Foot M: This foot is specially designed to simulate professional style overlocking. The wires on the foot effectively prevent the fabric edge from puckering or rolling.
-
1/4" seam foot O: This foot is useful for patchwork piecing. The guide on the foot maintains an exact 1/4" (0.7 cm) seam allowance.
-
Basting/darning foot P-2: This is a special foot for basting. It holds the fabric while taking a stitch, synchronizing with the needle bar movement. This foot can also be used for freemotion embroidery or quilting.
-
Automatic buttonhole foot R: This foot is for buttonholes and for darning. Place a button in the button holder on the rear of the foot. This automatically sets the buttonhole size.
-
Even feed foot: This is a special attachment for hard-to- feed materials. This foot effectively prevents fabrics from shifting and puckering. It is great for quilting and matching plaids.
Winding the Bobbin
Removing the bobbin
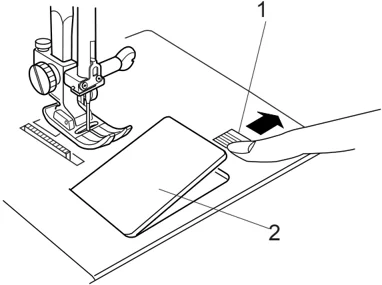
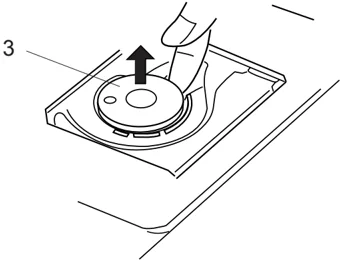
Slide the hook cover plate release button to the right, and remove the hook cover plate.
Lift out the bobbin from the bobbin holder.
1 Hook Cover Plate Release Button 2 Hook Cover Plate 3 Bobbin
NOTES: Avoid using a bobbin when it begins to empty since it may cause thread bunching. Always use the correct bobbin. Using a wrong bobbin may cause malfunctions.
Setting the spool of thread
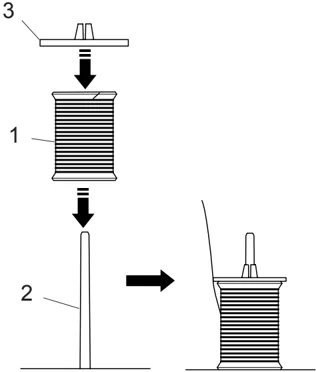
Place the spool of thread on the spool pin with the thread coming off the spool as shown. Attach the spool holder, and press it firmly against the spool of thread.
1 Spool of Thread 2 Spool Pin 3 Spool Holder
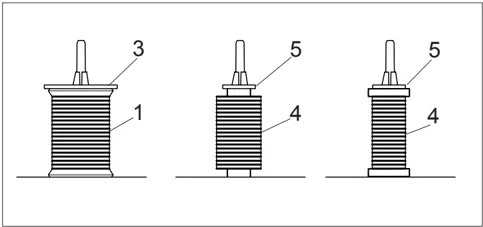
NOTES: Avoid using a paper spool when it begins to empty since it will not unwind smoothly. It may cause the thread to bunch or slip when using the auto thread cutter. Use the large spool holder for ordinary spools, while the small spool holder for small spools.
4 Small Spool 5 Small Spool Holder
12
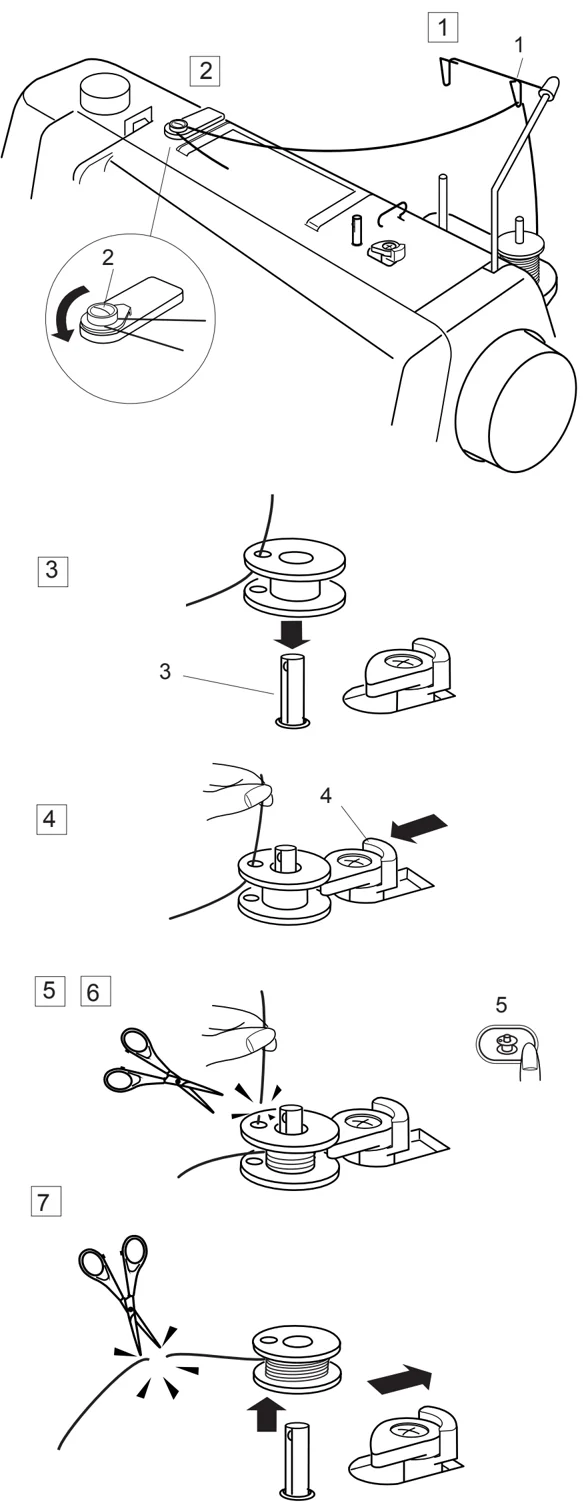
Winding the bobbin
1 Pass the thread through the guide on the thread guide post from behind. 1 Thread Guide Post
2 Pass the thread under the bobbin winding tension disk. 2 Bobbin Winding Tension Disk
3 Thread through the hole in the bobbin from the inside to the outside. 3 Bobbin Winder Spindle
4 Put the bobbin on the bobbin winder spindle. Push the bobbin winder stopper to the left. 4 Bobbin Winder Stopper
5 6 Hold the free end of the thread in your hand and press the bobbin winding button. Press the bobbin winding button again to stop the bobbin when it has made several turns, and cut the thread close to the hole in the bobbin. 5 Bobbin Winding Button
7 Press the bobbin winding button again. When the bobbin is fully wound, the machine will stop automatically. Return the bobbin winder stopper to its original position, and cut the thread.
NOTE: The Memory Craft 6500 has an exclusive motor for bobbin winding, which allows you to wind the bobbin while stitching.
13
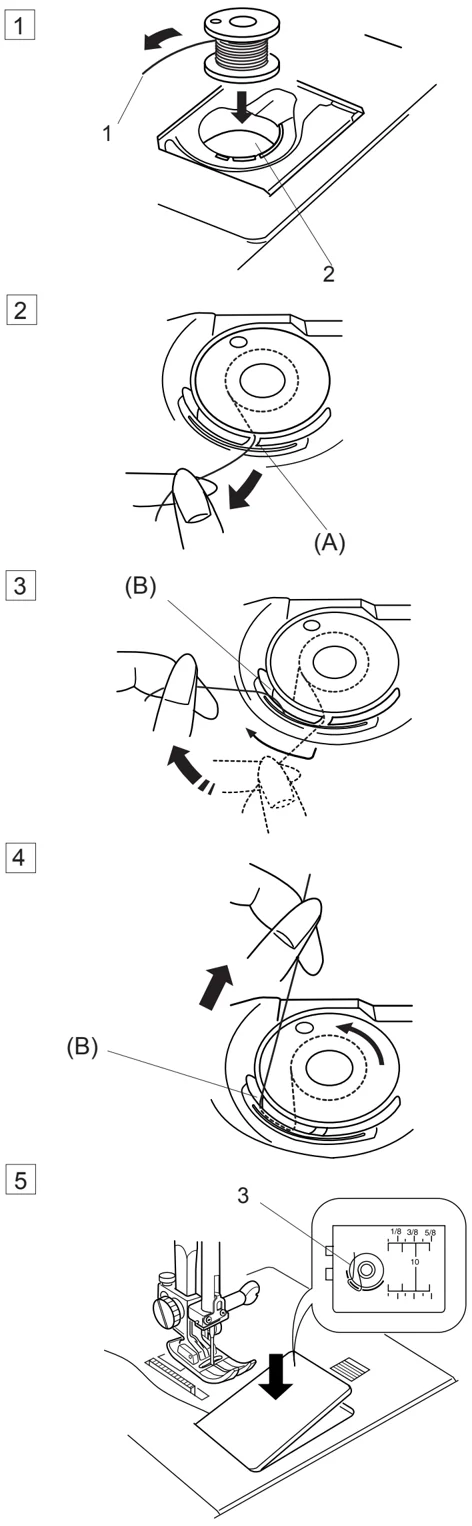
Inserting the bobbin
1 Place the bobbin in the bobbin holder with the thread running off counterclockwise. 1 Thread 2 Bobbin Holder
2 Guide the thread into notch (A) on the front of the bobbin holder.
3 Draw the thread to the left, sliding it between the tension spring blades.
4 Continue to draw the thread lightly until the thread slips into side notch (B). The bobbin should turn counterclockwise when pulling the bobbin thread. If not, reverse the bobbin and re-thread.
5 Pull out about 10 cm (4") of thread to the rear. Refer to the threading chart shown on the hook cover plate. Reattach the hook cover plate. 3 Threading Chart
Threading the Machine
Raise the presser foot lifter. Press the up/down needle button twice to raise the needle to its highest position.
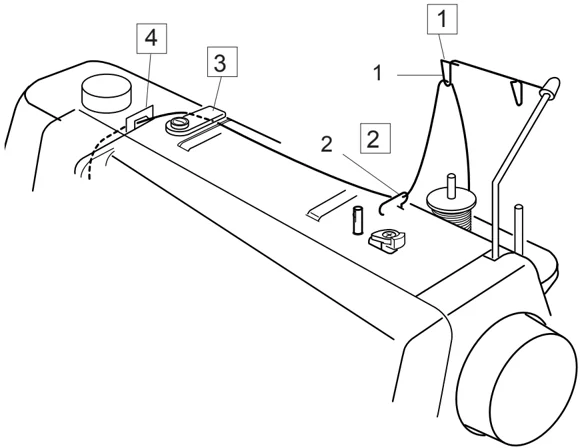
1 Pass the thread through the guide on the thread guide bar from behind. 1 Thread Guide Bar
2 Pass the thread through the right thread guide. 2 Right Thread Guide
3 Hold the upper thread with both hands as shown and slip it under the thread guide plate. 3 Thread Guide Plate
4 Draw the thread toward you and pass it into the left thread guide. Draw the thread along the right channel. 4 Left Thread Guide
NOTE: Be sure to use the spool holder to secure the spool in place.
Threading the Machine (continued)
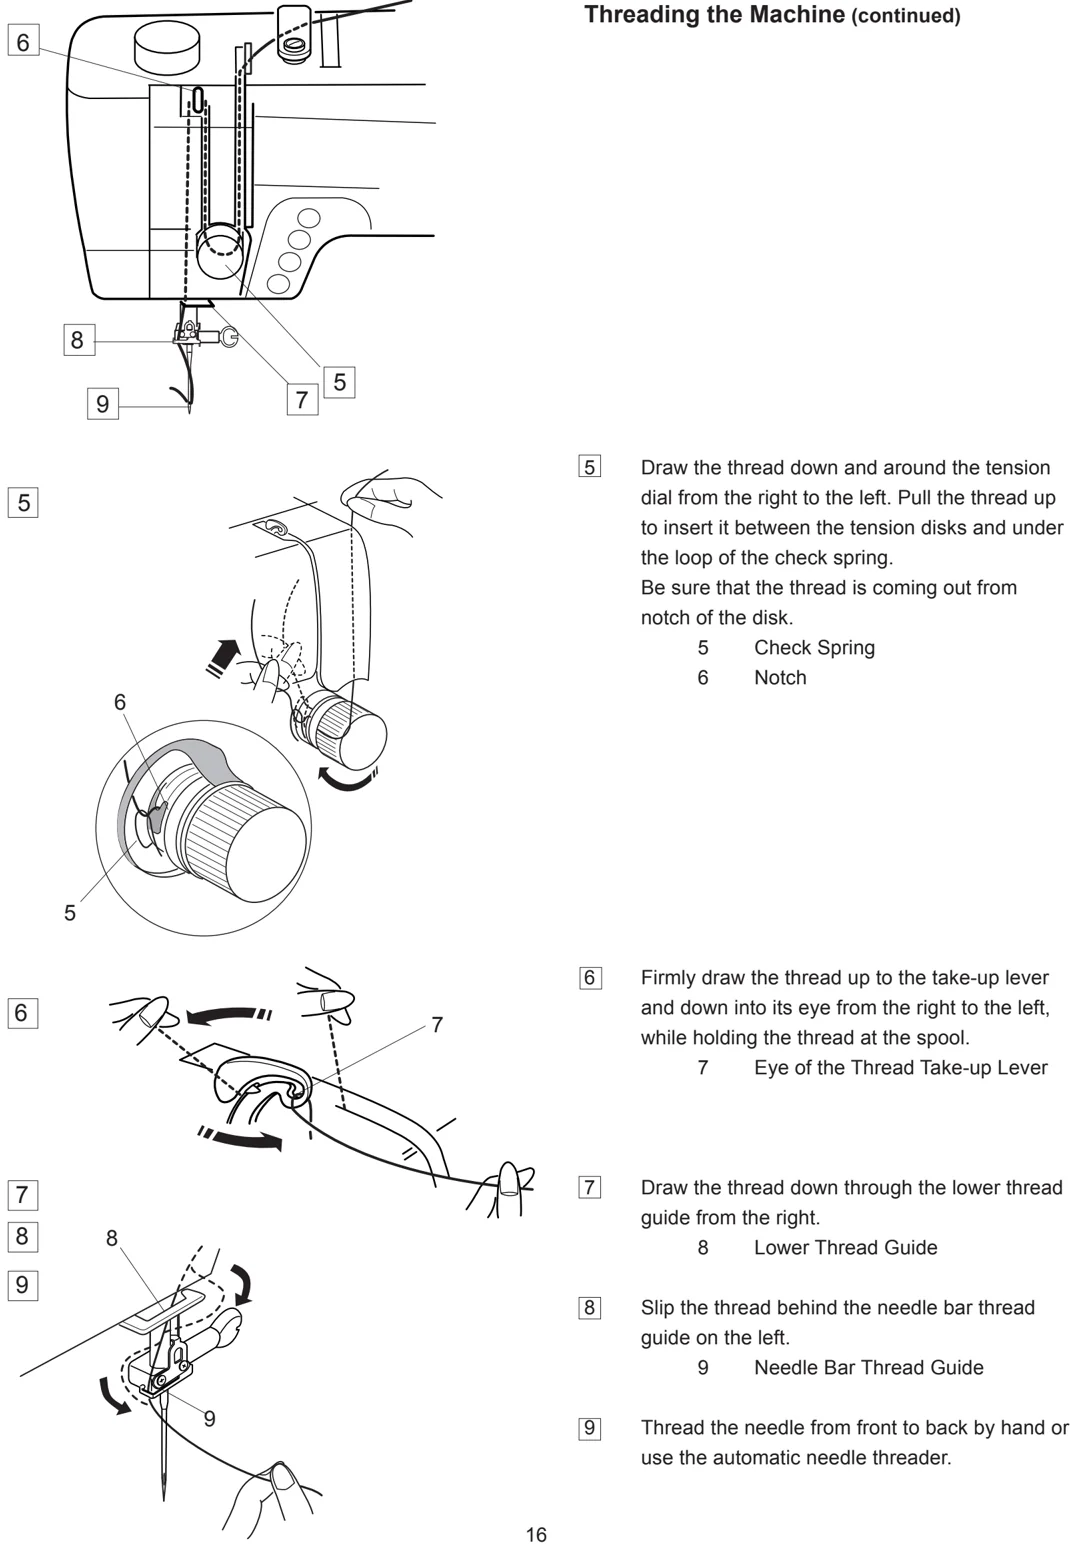
5 Draw the thread down and around the tension dial from the right to the left. Pull the thread up to insert it between the tension disks and under the loop of the check spring. Be sure that the thread is coming out from notch of the disk. 5 Check Spring 6 Notch
6 Firmly draw the thread up to the take-up lever and down into its eye from the right to the left, while holding the thread at the spool. 7 Eye of the Thread Take-up Lever
7 Draw the thread down through the lower thread guide from the right. 8 Lower Thread Guide
8 Slip the thread behind the needle bar thread guide on the left. 9 Needle Bar Thread Guide
9 Thread the needle from front to back by hand or use the automatic needle threader.
16
Automatic Needle Threader
[1] Raise the needle to its highest position by pressing the up/down needle button twice. [2] Turn the power switch off. [3] Lower the presser foot. 1 Up/Down Needle Button
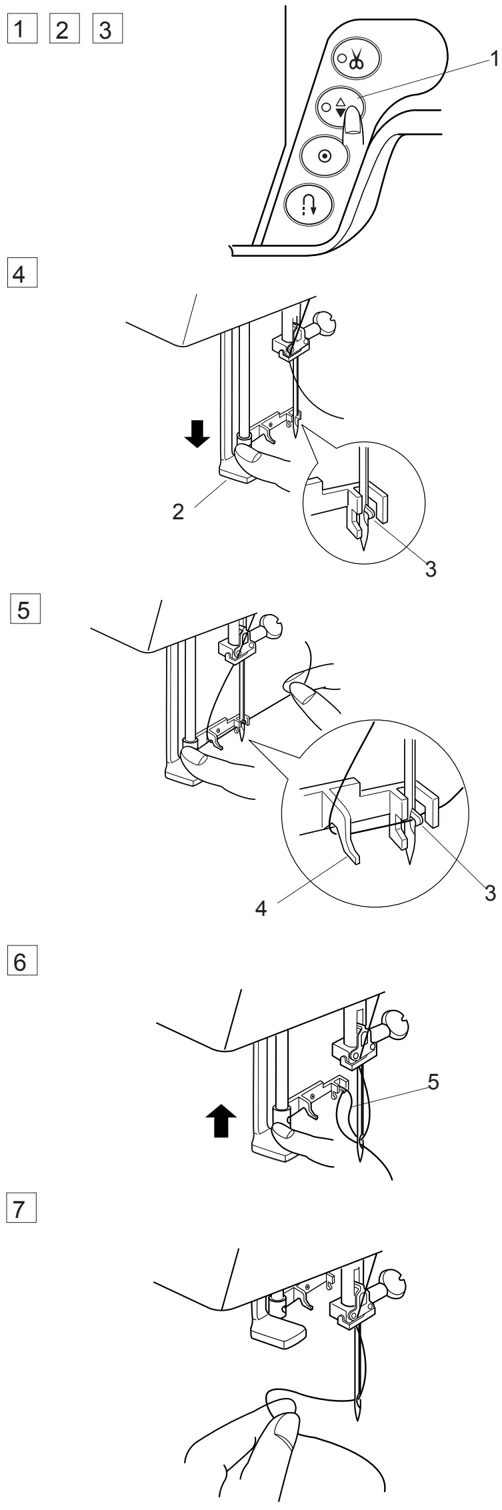
[4] Depress the needle threader knob as far as it will go. The hook comes out through the needle eye from behind. 2 Needle Threader Knob 3 Hook
[5] Draw the thread down around the threader guide and under the hook. 4 Threader Guide
[6] Release the threader knob slowly while holding the thread end with your hand. A loop of the thread is pulled up through the needle eye. 5 Loop of Thread
[7] Remove the loop from the threader and pull out the thread end from the needle eye.
NOTES: The automatic threader works well with the threads #50-100 and needles #11-16, including the blue tipped needle. The automatic needle threader cannot be used for threading the twin needle. If the hook fails to pull a loop of the thread, check the needle and its setting.
Drawing Up the Bobbin Thread
1 Raise the Presser Foot Lifter. Hold the needle thread with your finger and press the up/down needle button twice to pick up the bobbin thread. 1 Needle Thread 2 Needle Up/Down Button
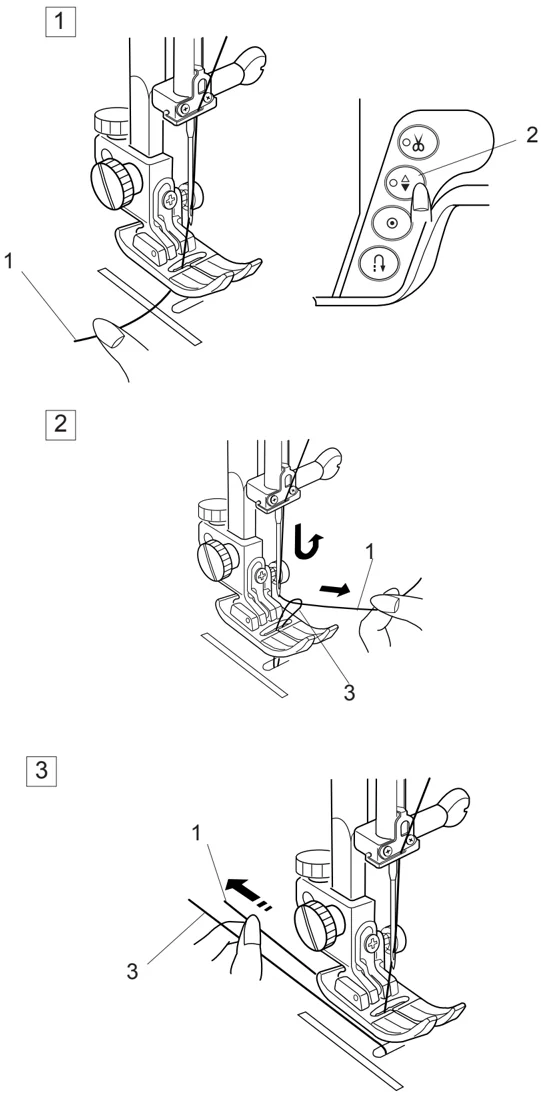
2 Draw up the needle thread to bring up a loop of the bobbin thread. 3 Bobbin Thread
3 Slide 10 cm (4") of both threads to the back under the presser foot.
18
Changing Needles
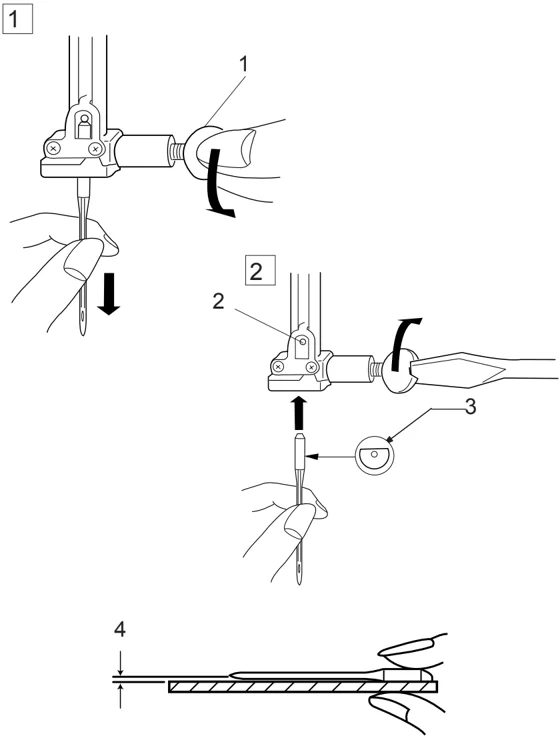
Raise the needle by pressing the up/down needle button and lower the presser foot. Turn off the power switch.
[1] Loosen the needle clamp screw by turning it counterclockwise. Remove the needle from the clamp. 1 Needle Clamp Screw
[2] Insert a new needle into the needle clamp with the flat side of the needle to the rear. When inserting the needle into the needle clamp, push it up against the stopper pin and tighten the needle clamp screw firmly. 2 Stopper Pin 3 Flat Side
To check needle straightness, place the flat side of the needle onto something flat (a needle plate, glass etc.) The gap between the needle and the flat surface should be consistent. Never use a blunt needle. 4 Gap
CAUTION: Always make sure to turn the power switch off and disconnect the machine from power supply before changing the needle.
Thread and Needle Chart
| WEIGHT | FABRIC | TYPE of NEEDLE | NEEDLE SIZE |
|---|---|---|---|
| Very Light | Chiffon, Georgette, Fine Lace, OrgandyNet, Tulle | UniversalBall Point | 9 (65)9 (65) |
| Light | Batiste, Voile, Lawn, Pure Silk, Crepe de Chine,Sheer Crepe, Chambray, Handkerchief Linen,Gingham, Challis, Percale, Wool Crepe, Peau de Soie,Taffeta, Satin, Silk Surah, Satin-backedCrepe, Qiana | Blue Tipped NeedleUniversal | 11 (75)11 (75)12 (80) |
| Single Knits, Jersey, Swim wear, and Tricot | Blue Tipped NeedleBall Point | 11 (75)11 (75) | |
| Leather Suede | Wedge PointLeather Needle | 11 (75) | |
| Medium | Flannel, Velour, Velvet, Muslin, Velveteen,Poplin, Corduroy, Broadcloth, Linen, Chintz,Gabardine, Felt, Terry, Burlap, Quilted Fabrics | Universal | 14 (90) |
| Double Knits, (synthetic and natural) StretchVelour, Stretch Terry, Sweater Knits | Ball Point | 14 (90) | |
| Leather, Vinyl, Suede | Wedge PointLeather Needle | 14 (90) | |
| Heavy | Denim, Sailcloth, Ticking | Denim Needle | 16 (100) |
| Double Faced Wool, Heavy Coating, Fake Fur,Drapery Fabrics | Universal | 16 (100) | |
| Leather, Suede | Wedge PointLeather Needle | 16 (100)18 (110) | |
| Very Heavy | Canvas, Duck, Upholstery Fabrics | Universal | 16 (100) |
| Topstitching for Special Finish | Topstitching Needle | 14 (90) |
19
Balancing Thread Tension
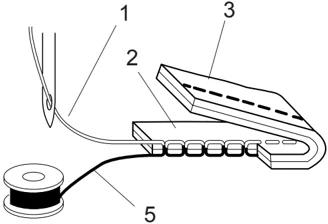
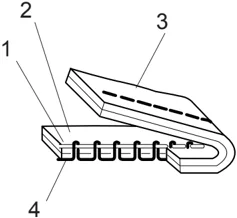
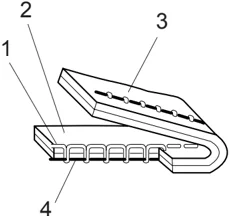
Correct tension: The ideal straight stitch has threads locked between two layers of fabric. For an ideal zigzag stitch, the bobbin thread does not show on the right side of the fabric, and the needle thread shows slightly on the wrong side of the fabric.
1 Needle Thread 2 Right Side of the Fabric 3 Wrong Side of the Fabric 4 Bobbin Thread
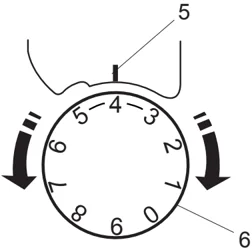
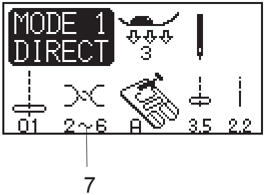
Adjusting the tension Tension adjustment may be needed depending on the sewing materials, layers of fabric and other sewing conditions. Turn the tension control dial to set the desired number at the setting mark. Consult information on the LCD screen for the recommended tension setting.
5 Setting Mark 6 Tension Control Dial 7 Recommended Tension Setting
Needle thread tension is too tight: The bobbin thread will appear on the right side of the fabric. Loosen the needle thread tension by moving the dial to a lower number.
Needle thread tension is too loose: The needle thread will appear on the wrong side of the fabric. Tighten the needle thread tension by moving the dial to a higher number.
Adjusting the Foot Pressure
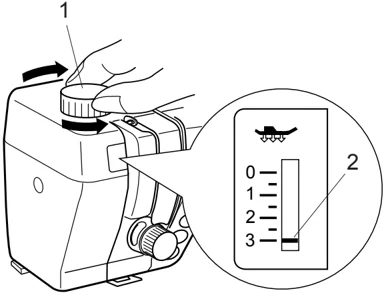
The foot pressure dial should be set at “3” for regular sewing. Reduce the pressure for appliqué, sewing on fine synthetics and elastic fabrics. Set the dial at “1” when sewing extra fine fabrics.
1 Foot Pressure Dial 2 Setting mark
NOTE: Do not reduce the foot pressure lower than “0”.
Dropping the Feed Dog
The feed dog can be lowered by the drop feed lever for sewing on buttons, freemotion embroidery etc. Shift the drop feed lever to the right to lower the feed dog. Shift the lever to the left to raise the feed dog, it will return to the up position when starting the machine.
1 Drop Feed Lever 2 Down position 3 Up position
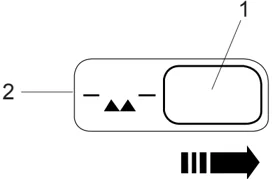
NOTE: The feed dog should be in up position for normal sewing. A message will show on the LCD screen when starting the machine with the feed dog dropped. The machine will run with the feed dog dropped when pattern 01, 02, 08, 09 (Mode 1), 25, 28, 53 or 57 to 60 (Mode 2) has been selected. The machine will not sew with the feed dog dropped when other patterns have been selected.
4 Message on the LCD screen

Selecting the Sewing Mode
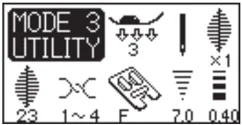
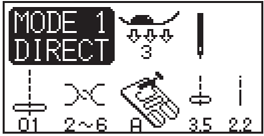
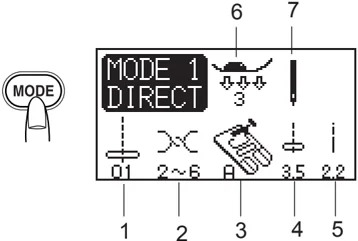
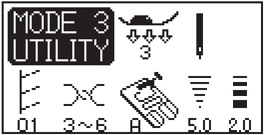
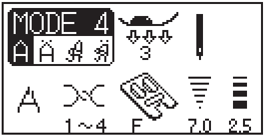
On the LCD screen, the mode number and the following information are displayed:
1 Stitch Pattern 2 Recommended Thread Tension 3 Recommended Foot 4 Stitch Width 5 Stitch Length 6 Recommended Foot Pressure 7 Single or Twin Needle Setting
The following 4 sewing modes are available:
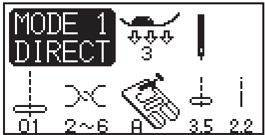
Mode 1 (Direct): The 10 most commonly used stitches can be selected directly.
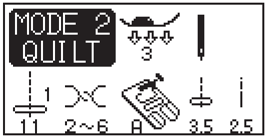
Mode 2 (Quilting): The patterns for patchwork quilting are available.
Mode 3 (Utility): The buttonholes, utility and decorative stitches are available.
Mode 4 (Monogram): Monogramming in Block and Script styles can be programmed.
The Help Button
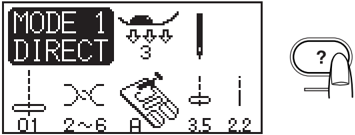
Pressing this button will show alternative applications of the selected pattern when the pattern 01, 08, 09, 10 (Mode 1), or 01, 02, 03, 04, 05 or 22 (Mode 3) has been selected.
Example: When the pattern 01 has been selected. Each time you press the help button, the LCD will show as follows:
1 The zigzag foot and quilting bar for quilting will be shown.
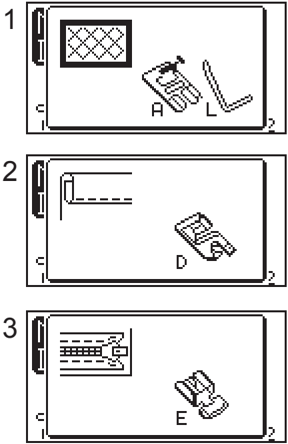
2 The rolled hem foot for rolled hem will be shown.
3 The zipper foot for zipper sewing will be shown.
Selecting the Pattern
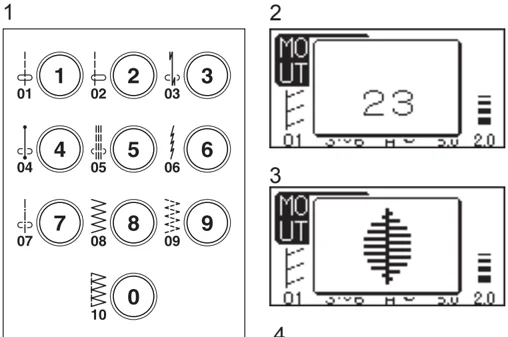
Mode 1: Press one of the numeral buttons corresponding to the desired pattern. NOTE: Pressing the "0" button will select the pattern 10.
Other Modes: Enter the 2-digit pattern number by pressing the numeral buttons.
The LCD screen will show the pattern number, stitch image then main display for the selected pattern. 1 Pattern Selection Button 2 Pattern Number Display 3 Stitch Image Display 4 Main Display
23