4 APPENDIX
STITCH SETTINGS
Applications, stitch lengths and widths and whether the twin needle can be used are listed for utility stitches in the following table.
CAUTION
- Select a stitch width of 5.0 mm (3/16 inch) or less, otherwise the needle may break or the machine may be damaged.
- When using the twin needle, be sure to attach zigzag foot “J”, otherwise the needle may break or the machine may be damaged.
Utility stitches
\begin{tabular}{|l|l|c|c|c|c|c|p{3.5cm}|c|c|c|c|c|c|c|} \hline \multicolumn{2}{|c|}{\textbf{Stitch Name}} & \textbf{Pattern} & \textbf{Presser Foot} & \multicolumn{4}{|c|}{\textbf{Pattern No.}} & \multicolumn{2}{|c|}{\textbf{Stitch Width [mm (inch.)]}} & \multicolumn{2}{|c|}{\textbf{Stitch Length [mm (inch.)]}} & \textbf{Twin Needle} & \textbf{Walking Foot} & \textbf{Reverse/ Reinforcement Stitching} \ \cline{5-8}\cline{9-12} \multicolumn{2}{|c|}{} & & & \textbf{70 stitches model} & \textbf{60 stitches model} & \textbf{50 stitches model} & \textbf{40 stitches model} & \textbf{Application} & \textbf{Auto} & \textbf{Manual} & \textbf{Auto} & \textbf{Manual} & & & \ \hline \multirow{2}{}{Straight} & Left & |---| & J & 00 & 00 & 00 & 00 & Basic stitching, sewing gathers or pintucks, etc. & 0.0 (0) & 0.0–7.0 (0–1/4) & 2.5 (3/32) & 0.2–5.0 (1/64–3/16) & No & Yes** & Rev.* \ \cline{2-15} & Center & |---| & J & 01 & 01 & 01 & 01 & Attaching zippers, basic stitching, and sewing gathers or pintucks, etc. & – & – & 2.5 (3/32) & 0.2–5.0 (1/64–3/16) & Yes (J) & Yes*** & Rev.* \ \hline Triple stretch stitch & & ||||||| & J & 02 & 02 & 02 & 02 & Attaching sleeves, sewing inseams, sewing stretch fabrics and decorative stitching & 0.0 (0) & 0.0–7.0 (0–1/4) & 2.5 (3/32) & 1.5–4.0 (1/16–3/16) & No & No & Rfc.** \ \hline Stretch stitch & & ~~~~ & J & 03 & 03 & 03 & 03 & Sewing stretch fabrics and decorative stitching & 1.0 (1/16) & 1.0–3.0 (1/16–1/8) & 2.5 (3/32) & 1.0–4.0 (1/16–3/16) & Yes**** (J) & No & Rfc.** \ \hline Zigzag stitch & & ~~~~~~ & J & 04 & 04 & 04 & 04 & Overcasting and attaching appliqués & 3.5 (1/8) & 0.0–7.0 (0–1/4) & 1.4 (1/16) & 0.0–4.0 (0–3/16) & Yes**** (J) & Yes*** & Rev.* \ \hline 3-point zig-zag stitch & & ::::: & J & 05 & 05 & 05 & 05 & Overcasting on medium weight or stretch fabrics, attaching elastic, darning, etc. & 5.0 (3/16) & 1.5–7.0 (1/16–1/4) & 1.0 (1/16) & 0.2–4.0 (1/64–3/16) & Yes**** (J) & No & Rfc.** \ \hline \multirow{3}{}{Overcasting stitch} & & VVVV & G & 06 & 06 & 06 & 06 & Overcasting on thin or medium weight fabrics & 3.5 (1/8) & 2.5–5.0 (3/32–3/16) & 2.0 (1/16) & 1.0–4.0 (1/16–3/16) & No & No & Rfc.** \ \cline{2-15} & & WWW & G & 07 & 07 & 07 & 07 & Overcasting on thick fabrics & 5.0 (3/16) & 2.5–5.0 (3/32–3/16) & 2.5 (3/32) & 1.0–4.0 (1/16–3/16) & No & No & Rfc.** \ \cline{2-15} & & TTTT & J & 08 & 08 & 08 & 08 & Overcasting on stretch fabrics & 5.0 (3/16) & 0.0–7.0 (0–1/4) & 2.5 (3/32) & 0.5–4.0 (1/32–3/16) & Yes*** (J) & No & Rfc.** \ \hline \end{tabular}
*Rev.: Reverse **Rfc.: Reinforcement ***Do not use reverse stitching. ****Select a stitch width of 5.0 mm (3/16 inch) or less.

Stitch Chart
| Stitch Name | Pattern | Presser Foot | Pattern No. | Application | Stitch Width [mm (inch.)] | Stitch Length [mm (inch.)] | Twin Needle | Walking Foot | Reverse/ Reinforcement Stitching | |||||||||
|---|---|---|---|---|---|---|---|---|---|---|---|---|---|---|---|---|---|---|
| 70 stitches model | 60 stitches model | 50 stitches model | 40 stitches model | Auto | Manual | Auto | Manual | |||||||||||
| Blind hem stitch | \.../ | R | 09 | 09 | 09 | 09 | Blind hem stitching on medium weight fabrics | 0 (0) | 3 – –3 | 2.0 (1/16) | 1.0–3.5 (1/16–1/8) | No | No | Rfc.* | ||||
| \\// | R | 10 | 10 | 10 | 10 | Blind hem stitching on stretch fabrics | 0 (0) | 3 – –3 | 2.0 (1/16) | 1.0–3.5 (1/16–1/8) | No | No | Rfc.* | |||||
| Appliqué stitch | J | 11 | 11 | 11 | 11 | Appliqué stitching | 3.5 (1/8) | 2.5–5.0 (3/32–3/16) | 2.5 (3/32) | 1.6–4.0 (1/16–3/16) | Yes** (J) | No | Rfc.* | |||||
| Shell tuck stitch | J | 12 | 12 | 12 | 12 | Shell tuck stitching | 4.0 (3/16) | 0.0–7.0 (0–1/4) | 2.5 (3/32) | 0.2–4.0 (1/64–3/16) | Yes** (J) | No | Rfc.* | |||||
| Satin scallop stitch | \\\\\ | N | 13 | 13 | 13 | 13 | Scallop stitching | 5.0 (3/16) | 2.5–7.0 (3/32–1/4) | 0.5 (1/32) | 0.1–1.0 (1/64–1/16) | Yes** (J) | No | Rfc.* | ||||
| Joining stitch | \/\/ | J | 14 | 14 | 14 | 14 | Patchwork stitching and decorative stitching | 4.0 (3/16) | 0.0–7.0 (0–1/4) | 1.2 (1/16) | 0.2–4.0 (1/64–3/16) | Yes** (J) | No | Rfc.* | ||||
| △△△ | J | 15 | 15 | 15 | 15 | Patchwork stitching, decorative stitching and sewing overcasting on both pieces of fabrics, such as with tricot | 5.0 (3/16) | 2.5–7.0 (3/32–1/4) | 2.5 (3/32) | 1.0–4.0 (1/16–3/16) | Yes** (J) | No | Rfc.* | |||||
| \\\ | J | 16 | 16 | 16 | 16 | Patchwork stitching and decorative stitching | 5.0 (3/16) | 0.0–7.0 (0–1/4) | 1.2 (1/16) | 0.2–4.0 (1/64–3/16) | Yes** (J) | No | Rfc.* | |||||
| Fagoting stitch | \\\ | J | 17 | 17 | 17 | 17 | Fagoting, smocking and decorative stitching | 5.0 (3/16) | 0.0–7.0 (□-□/□) | 2.5 (3/32) | 1.0–4.0 (1/16-3/16) | Yes** (J) | No | Rfc.* | ||||
| XXXX | J | 18 | 18 | 18 | 18 | Fagoting, smocking and decorative stitching | 5.0 (3/16) | 2.5–7.0 (3/32–1/4) | 2.5 (3/32) | 1.0–4.0 (1/16–3/16) | Yes** (J) | No | Rfc.* | |||||
| Decorative stitch | J | 19 | 19 | 19 | 19 | Decorative stitching | 4.0 (3/16) | 0.0–7.0 (□-□/□) | 3.0 (1/8) | 2.0–4.0 (1/16–3/16) | No | No | Rfc.* | |||||
| \\\ | J | 20 | 20 | 20 | 20 | Decorative stitching | 4.0 (3/16) | 0.0–7.0 (□-□/□) | 2.5 (3/32) | 1.0–4.0 (1/16–3/16) | Yes** (J) | No | Rfc.* | |||||
| XXXXX | J | 21 | 21 | 21 | – | Decorative stitching | 5.5 (7/32) | 0.0–7.0 (□-□/□) | 1.6 (1/16) | 1.0–4.0 (1/16–3/16) | Yes** (J) | No | Rfc.* | |||||
| ~ | N | 22 | 22 | 22 | 21 | Decorative stitching and elastic-attaching | 5.0 (3/16) | 1.5–7.0 (1/64–1/4) | 1.0 (1/16) | 0.2–4.0 (1/64–3/16) | Yes** (J) | No | Rfc.* | |||||
| N | 23 | 23 | 23 | 22 | Lace sewing, decorative hemming, heirloom stitching, etc. | 3.5 (1/8) | 1.5–7.0 (1/16–1/4) | 2.5 (3/32) | 1.6–4.0 (1/16–3/16) | No | No | Rfc.* | ||||||
| *** | N | 24 | 24 | 24 | 23 | Decorative hemming, heirloom stitching, etc. | 6.0 (15/64) | 1.5–7.0 (1/16–1/4) | 3.0 (1/8) | 1.5–4.0 (1/16–3/16) | No | No | Rfc.* | |||||
| \\\ | N | 25 | 25 | 25 | – | Decorative hemming on thin, medium weight and plain weave fabrics, heirloom stitching, etc. | 5.0 (3/16) | 1.5–7.0 (1/16–1/4) | 3.5 (1/8) | 1.5–4.0 (1/16–3/16) | No | No | Rfc.* |
*Rfc.: Reinforcement
**Select a stitch width of 5.0 mm (3/16 inch) or less.
53
APPENDIX
| Stitch Name | Pattern | Presser Foot | Pattern No. | Application | Stitch Width [mm (inch.)] | Stitch Length [mm (inch.)] | Twin Needle | Walking Foot | Reverse/ Reinforcement Stitching | |||||
|---|---|---|---|---|---|---|---|---|---|---|---|---|---|---|
| 70 stitches model | 60 stitches model | 50 stitches model | 40 stitches model | Auto | Manual | Auto | Manual | |||||||
| Decorative stitch | □□□ | N | 26 | 26 | 26 | 24 | Decorative hemming on thin, medium weight and plain weave fabrics, heirloom stitching, etc. | 5.0 (□/□□) | 1.5-7.0 (1/16-1/4) | 4.0 (□/□□) | 1.5-4.0 (1/16-3/16) | Yes*** (J) | No | Rfc.* |
| □□□ | N | 27 | 27 | 27 | – | Decorative hemming on thin, medium weight and plain weave fabrics, heirloom stitching, etc. | 5.0 (□/□□) | 1.5-7.0 (1/16-1/4) | 2.5 (3/32) | 1.5-4.0 (1/16-3/16) | Yes*** (J) | No | Rfc.* | |
| □□□ | N | 28 | 28 | 28 | – | Decorative hemming on thin, medium weight and plain weave fabrics, heirloom stitching, etc. | 5.0 (□/□□) | 1.5-7.0 (1/16-1/4) | 2.0 (1/16) | 1.5-4.0 (1/16-3/16) | Yes*** (J) | No | Rfc.* | |
| Buttonhole stitch | □□□ | A | 29 | 29 | 29 | 25 | Horizontal buttonholes on thin and medium weight fabrics | 5.0 (3/16) | 3.0-5.0 (1/8-3/16) | 0.4 (1/64) | 0.2-1.0 (1/64-1/16) | No | No | Auto** Rfc. |
| □□□ | A | 30 | 30 | 30 | 26 | Secured buttonholes for fabrics that have backings | 5.0 (3/16) | 3.0–5.0 (1/8-3/16) | 0.4 (1/64) | 0.2–1.0 (1/64-1/16) | No | No | Auto** Rfc. | |
| □□□ | A | 31 | 31 | 31 | 27 | Buttonholes for stretch or knit fabrics | 6.0 (15/64) | 3.0–6.0 (1/8-15/64) | 1.0 (1/16) | 0.5–2.0 (1/32-1/16) | No | No | Auto** Rfc. | |
| □□□ | A | 32 | 32 | 32 | 28 | Buttonholes for stretch fabrics | 6.0 (15/64) | 3.0–6.0 (1/8-15/64) | 1.5 (1/16) | 1.0–3.0 (1/16-1/8) | No | No | Auto** Rfc. | |
| □□□ | A | 33 | 33 | 33 | 29 | Keyhole buttonholes for thick or furry fabrics | 7.0 (□/□) | 3.0–7.0 (1/8-1/4) | 0.5 (1/32) | 0.3–1.0 (1/64-1/16) | No | No | Auto** Rfc. | |
| □□□ | A | 34 | 34 | – | – | Keyhole buttonholes for medium weight and thick fabrics | 7.0 (□/□) | 3.0–7.0 (1/8-1/4) | 0.5 (1/32) | 0.3–1.0 (1/64-1/16) | No | No | Auto** Rfc. | |
| □□□ | A | 35 | 35 | – | – | Keyhole buttonholes for thick or furry fabrics | 7.0 (□/□) | 3.0–7.0 (1/8-1/4) | 0.5 (1/32) | 0.3–1.0 (1/64-1/16) | No | No | Auto** Rfc. | |
| Bar tack stitch | □□□ | A | 36 | 36 | 34 | 30 | Reinforcing openings and areas where the seam easily comes loose | 2.0 (1/16) | 1.0–3.0 (1/16-1/8) | 0.4 (1/64) | 0.3–1.0 (1/64-1/16) | No | No | Auto** Rfc. |
| Piecing straight stitch | □□□ | J | 37 | 37 | - | - | Piecing straight stitching (with a seam allowance of 6.5mm from the right edge of the presser foot) | 5.5 (7/32) | 0.0–7.0 (0–□/□) | 1.6 (1/16) | 0.2–5.0 (1/64–3/16) | No | Yes | Rfc.* |
| □□□ | J | 38 | 38 | - | - | Piecing straight stitching (with a seam allowance of 6.5mm from the right edge of the presser foot) | 1.5 (1/16) | 0.0–7.0 (0–1/4) | 1.6 (1/16) | 0.2–5.0 (1/64–3/16) | No | Yes | Rfc.* | |
| Hand-look quilting | □□□ | J | 39 | 39 | 35 | 31 | Straight stitch quilting that looks hand-sewn | 0.0 (0) | 0.0–7.0 (0–1/4) | 2.5 (3/32) | 1.0–4.0 (1/16–3/16) | No | No | Rfc.* |
| Zigzag stitch (for quilting) | □□□ | J | 40 | 40 | - | - | Appliqué quilting, free-motion quilting, satin stitching, button sewing | 3.5 (1/8) | 0.0–7.0 (0–1/4) | 1.4 (1/16) | 0.0–4.0 (0–3/16) | No | Yes | Rfc.* |
*Rfc.: Reinforcement
**Auto Rfc.: Automatic Reinforcement
***Select a stitch width of 5.0 mm (3/16 inch) or less.
54
| Stitch Name | Pattern | Presser Foot | Pattern No. | Application | Stitch Width [mm (inch.)] | Stitch Length [mm (inch.)] | Twin Needle | Walking Foot | Reverse/ Reinforcement Stitching | |||||
|---|---|---|---|---|---|---|---|---|---|---|---|---|---|---|
| 70 stitches model | 60 stitches model | 50 stitches model | 40 stitches model | Auto | Manual | Auto | Manual | |||||||
| Appliqué stitch (for quilting) | J | 41 | 41 | - | - | Attaching appliqués and binding | 1.5 (1/16) | 0.5–5.0 (1/32–3/16) | 1.2 (1/16) | 1.0–4.0 (1/16–3/16) | No | No | Rfc.* | |
| J | 42 | 42 | - | - | Attaching appliqués and binding | 1.5 (1/16) | 0.5–5.0 (1/32–3/16) | 1.2 (1/16) | 1.0–4.0 (1/16–3/16) | No | No | Rfc.* | ||
| Quilting stippling | J | 43 | 43 | - | - | Quilting background stitching (stippling) | 7.0 (1/4) | 1.0–7.0 (1/16–1/4) | 1.6 (1/16) | 1.0–4.0 (1/16–3/16) | No | No | Rfc.* | |
| Decorative stitch | N | 44 | 44 | 36 | 32 | For decoration, etc. | 7.0 (1/4) | 0.0–7.0 (0–1/4) | 2.5 (3/32) | 0.2–4.0 (1/64–3/16) | No | No | Rfc.* | |
| N | 45 | 45 | 37 | 33 | For decoration, etc. | 7.0 (1/4) | 0.0–7.0 (0–1/4) | 2.0 (1/16) | 0.2–4.0 (1/64–3/16) | No | No | Rfc.* | ||
| N | 46 | 46 | 38 | - | For decoration, etc. | 7.0 (1/4) | 0.0–7.0 (0–1/4) | 2.5 (3/32) | 0.2–4.0 (1/64–3/16) | No | No | Rfc.* | ||
| N | 47 | - | - | - | For decoration, etc. | 7.0 (1/4) | 0.0–7.0 (0–1/4) | 2.5 (3/32) | 0.2–4.0 (1/64–3/16) | No | No | Rfc.* | ||
| N | 48 | 47 | 39 | - | For decoration, etc. | 7.0 (1/4) | 0.0–7.0 (0–1/4) | 2.0 (1/16) | 0.2–4.0 (1/64–3/16) | No | No | Rfc.* | ||
| N | 49 | 48 | 40 | - | For decoration, etc. | 7.0 (1/4) | 0.0–7.0 (0–1/4) | 2.0 (1/16) | 0.2–4.0 (1/64–3/16) | No | No | Rfc.* | ||
| N | 50 | - | - | - | For decoration, etc. | 7.0 (1/4) | 0.0–7.0 (0–1/4) | 1.6 (1/16) | 0.2–4.0 (1/64–3/16) | No | No | Rfc.* | ||
| N | 51 | 49 | 41 | 34 | For decoration, etc. | 7.0 (1/4) | 0.0–7.0 (0–1/4) | 2.5 (3/32) | 0.2–4.0 (1/64–3/16) | No | No | Rfc.* | ||
| N | 52 | - | - | - | For decoration, etc. | 7.0 (1/4) | 0.0–7.0 (0–1/4) | 2.0 (1/16) | 0.2–4.0 (1/64–3/16) | No | No | Rfc.* | ||
| N | 53 | - | - | - | For decoration, etc. | 5.0 (3/16) | 0.0–7.0 (0–1/4) | 2.0 (1/16) | 0.2–4.0 (1/64–3/16) | No | No | Rfc.* | ||
| N | 54 | - | - | - | For decoration, etc. | 7.0 (1/4) | 0.0–7.0 (0–1/4) | 2.5 (3/32) | 0.2–4.0 (1/64–3/16) | No | No | Rfc.* | ||
| N | 55 | 50 | - | - | For decoration, etc. | 7.0 (1/4) | 0.0–7.0 (0–1/4) | 1.6 (1/16) | 0.2–4.0 (1/64–3/16) | No | No | Rfc.* | ||
| N | 56 | 51 | - | - | For decoration, etc. | 7.0 (1/4) | 0.0–7.0 (0–1/4) | 1.4 (1/16) | 0.2–4.0 (1/64–3/16) | No | No | Rfc.* |
*Rfc.: Reinforcement
APPENDIX
\begin{tabular}{|l|c|c|c|c|c|c|c|c|c|c|c|c|c|} \hline \multirow{2}{}{Stitch Name} & \multirow{2}{}{Pattern} & \multirow{2}{}{Presser Foot} & \multicolumn{4}{c|}{Pattern No.} & \multirow{2}{}{Application} & \multicolumn{2}{c|}{Stitch Width [mm (inch.)]} & \multicolumn{2}{c|}{Stitch Length [mm (inch.)]} & \multirow{2}{}{Twin Needle} & \multirow{2}{}{Walking Foot} & \multirow{2}{}{Reverse/ Reinforcement Stitching} \ \cline{4-7}\cline{9-12} & & & 70 stitches model & 60 stitches model & 50 stitches model & 40 stitches model & & Auto & Manual & Auto & Manual & & & \ \hline \multirow{8}{}{Satin stitches} & N & N & 57 & 52 & 42 & - & For decoration, etc. & 7.0 (1/4) & 2.5–7.0 (3/32–1/4) & 0.4 (1/64) & 0.1–1.0 (1/64–1/16) & Yes** (J) & No & Rfc.* \ \hline & N & N & 58 & - & - & - & For decoration, etc. & 7.0 (1/4) & 2.5–7.0 (3/32–1/4) & 0.4 (1/64) & 0.1–1.0 (1/64–1/16) & Yes** (J) & No & Rfc.* \ \hline & N & N & 59 & 53 & 43 & 35 & For decoration, etc. & 7.0 (1/4) & 2.5–7.0 (3/32–1/4) & 0.4 (1/64) & 0.1–1.0 (1/64–1/16) & Yes** (J) & No & Rfc.* \ \hline & N & N & 60 & 54 & 44 & 36 & For decoration, etc. & 7.0 (1/4) & 2.5–7.0 (3/32–1/4) & 0.4 (1/64) & 0.1–1.0 (1/64–1/16) & Yes** (J) & No & Rfc.* \ \hline & N & N & 61 & 55 & 45 & - & For decoration, etc. & 7.0 (1/4) & 2.5–7.0 (3/32–1/4) & 0.4 (1/64) & 0.1–1.0 (1/64–1/16) & Yes** (J) & No & Rfc.* \ \hline & N & N & 62 & 56 & 46 & 37 & For decoration, etc. & 7.0 (1/4) & 2.5–7.0 (3/32–1/4) & 0.4 (1/64) & 0.1–1.0 (1/64–1/16) & Yes** (J) & No & Rfc.* \ \hline & N & N & 63 & - & - & - & For decoration, etc. & 7.0 (1/4) & 2.5–7.0 (3/32–1/4) & 0.4 (1/64) & 0.1–1.0 (1/64–1/16) & Yes** (J) & No & Rfc.* \ \hline & N & N & 64 & - & - & - & For decoration, etc. & 7.0 (1/4) & 2.5–7.0 (3/32–1/4) & 0.4 (1/64) & 0.1–1.0 (1/64–1/16) & Yes** (J) & No & Rfc.* \ \hline \multirow{5}{}{Cross-stitches} & N & N & 65 & - & - & - & For decoration, etc. & 7.0 (1/4) & 0.0–7.0 (0–1/4) & 1.6 (1/16) & 0.2–4.0 (1/64–3/16) & No & No & Rfc. \ \hline & N & N & 66 & - & - & - & For decoration, etc. & 6.0 (15/64) & 0.0–7.0 (0–1/4) & 1.4 (1/16) & 0.2–4.0 (1/64–3/16) & No & No & Rfc.* \ \hline & N & N & 67 & 57 & 47 & 38 & For decoration, etc. & 6.0 (15/64) & 0.0–7.0 (0–1/4) & 2.5 (3/32) & 0.2–4.0 (1/64–3/16) & No & No & Rfc.* \ \hline & N & N & 68 & 58 & 48 & - & For decoration, etc. & 6.0 (15/64) & 0.0–7.0 (0–1/4) & 1.4 (1/16) & 0.2–4.0 (1/64–3/16) & No & No & Rfc.* \ \hline & N & N & 69 & 59 & 49 & 39 & For decoration, etc. & 6.0 (15/64) & 0.0–7.0 (0–1/4) & 1.4 (1/16) & 0.2–4.0 (1/64–3/16) & No & No & Rfc.* \ \hline \end{tabular}
*Rfc.: Reinforcement **Select a stitch width of 5.0 mm (3/16 inch) or less.
56
MAINTENANCE
Simple sewing machine maintenance operations are described below.
Cleaning the machine surface
If the surface of the machine is dirty, lightly soak a cloth in neutral detergent, squeeze it out firmly, and then wipe the surface of the machine. After cleaning it once with a wet cloth, wipe it again with a dry cloth.
CAUTION
- Unplug the power supply cord before cleaning the machine, otherwise injuries or an electric shock may occur.
Cleaning the bobbin case
Sewing performance will suffer if dust collects in the bobbin case; therefore, it should be cleaned periodically.
CAUTION
- Make sure you unplug the machine before you clean it. Otherwise, you may get an electric shock or be injured.
- Switch the machine off and unplug it.
- Raise the needle and the presser foot.
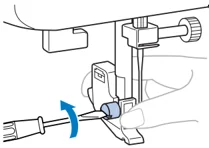
- Loosen the presser-foot screw and the needle clamp screw to remove the presser-foot holder and the needle.

- Grasp both sides of the needle plate cover, and then slide it toward you to remove the needle plate cover.
① Needle plate cover
57

APPENDIX
5 Remove the bobbin case. Grasp the bobbin case, and then pull it out.

① Bobbin case
6 Use the cleaning brush or a vacuum cleaner to remove any dust from the race and its surrounding area.

① Cleaning brush ② Race
• Do not put oil on the bobbin case.
7 Insert the bobbin case so that the ▲ mark on the bobbin case aligns with the ● mark on machine as shown below.

• Align the ▲ and ● marks.
① ▲mark ② ●mark ③ Bobbin case
• Make sure that the indicated points are aligned before installing the bobbin case.
CAUTION
- Never use a bobbin case that is scratched, otherwise the upper thread may become tangled, the needle may break or sewing performance may suffer. For a new bobbin case (part code: XE7560-001), contact your nearest authorized service center.
- Make sure that you fit the bobbin case properly, otherwise the needle may break.
8 Put the tabs on the needle plate cover into the needle plate, and then slide the cover back on.
TROUBLESHOOTING
If the machine stops working properly, check the following possible problems.
If the problem it still there, contact your retailer or the nearest authorised service center.
| Symptom | Possible cause | How to put it right | Reference |
|---|---|---|---|
| The sewing machine does not work. | The machine is not plugged in. | Plug the machine in. | page 9 |
| The main power switch is turned off. | Turn on the main power switch. | page 9 | |
| The bobbin winder shaft is pushed to the right. | Move the bobbin winder shaft to the left. | page 12, 13 | |
| You have not used the foot controller properly. | Use the foot controller properly. | page 10 | |
| The needle breaks. | The needle is not fitted properly. | Fit the needle properly. | page 21 |
| The needle clamp screw is loose. | Use the screwdriver to firmly tighten the screw. | page 22 | |
| The needle is bent or blunt. | Replace the needle. | page 21 | |
| You have not used the right combination of fabric, thread and needle. | Choose a thread and needle that are appropriate for the type of fabric. | page 20 | |
| The presser foot you are using is not appropriate for the type of stitch that you want to sew. | Attach the presser foot that is correct for the type of stitch that you want to sew. | page 52 | |
| The upper thread tension is too tight. | Loosen the upper thread tension. | page 29 | |
| You are pulling the fabric too much. | Lightly guide the fabric. | – | |
| The area around the hole in the needle plate is scratched. | Replace the needle plate. Contact your retailer or the nearest authorized service center. | – | |
| The area around the hole in the presser foot is scratched. | Replace the presser foot. Contact your retailer or the nearest authorized service center. | – | |
| The bobbin case is scratched. | Replace the bobbin case. Contact your retailer or the nearest authorized service center. | – | |
| You have not used a bobbin that has been designed for this machine. | Incorrect bobbins will not work properly. Only use a bobbin that has been designed for this machine. | page 11 | |
| The upper thread breaks. | You have not threaded the upper thread properly. (for example, you have not fitted the spool properly, or the thread has come out of the guide above the needle.) | Correct the upper threading. | page 16 |
| There are knots or tangles in the thread. | Remove any knots or tangles. | – | |
| The needle is not appropriate for the thread you are using. | Choose a needle that is appropriate for the type of stitch. | page 20 | |
| The upper thread tension is too tight. | Loosen the upper thread tension. | page 29 | |
| The thread is tangled, for example, in the bobbin case. | Remove the tangle thread. If the thread is tangled in the bobbin case, clean the bobbin case. | page 57 | |
| The needle is bent or blunt. | Replace the needle. | page 21 |
59
APPENDIX
| Symptom | Possible cause | How to put it right | Reference |
|---|---|---|---|
| The upper thread breaks. | You have not inserted the needle properly. | Insert the needle properly. | page 21 |
| The area around the hole in the needle plate is scratched. | Replace the needle plate. Contact your retailer or the nearest authorised service center. | – | |
| The area around the hole in the presser foot is scratched. | Replace the presser foot. Contact your retailer or the nearest authorised service center. | – | |
| The bobbin case is scratched, or has a burr on it. | Replace the bobbin case. Contact your retailer or the nearest authorised service center. | – | |
| You have not used a bobbin that has been designed for this machine. | Incorrect bobbins will not work properly. Only use a bobbin that has been designed for this machine. | page 11 | |
| The lower thread is tangled or breaks. | You have not wound the bobbin thread properly. | Wind the bobbin thread properly. | page 11 |
| The bobbin is scratched or does not turn smoothly. | Replace the bobbin. | – | |
| The thread is tangled. | Remove the tangled thread and clean the bobbin case. | page 57 | |
| You have not used a bobbin that has been designed for this machine. | Incorrect bobbins will not work properly. Only use a bobbin that has been designed for this machine. | page 11 | |
| Bobbin is set incorrectly. | Reset the bobbin thread correctly. | page 14, 15 | |
| The thread tension is incorrect. | You have not threaded the upper thread properly. | Correct the upper threading. | page 16 |
| You have not wound the bobbin thread properly. | Wind the bobbin thread properly. | page 11 | |
| You have not threaded the right combination of thread and needle for the fabric you are using. | Choose a thread and needle that are appropriate for the type of fabric. | page 20 | |
| You have not attached the presser-foot holder properly. | Attach the presser-foot holder properly. | page 25 | |
| The thread tension is incorrect. | Adjust the tension of the upper thread. | page 29 | |
| You have not used a bobbin that has been designed for this machine. | Incorrect bobbins will not work properly. Only use a bobbin that has been designed for this machine. | page 11 | |
| Bobbin is set incorrectly. | Reset the bobbin thread correctly. | page 14, 15 | |
| The fabric is wrinkled. | You have not threaded the upper thread properly or fitted the bobbin properly. | Thread the upper thread and wind the bobbin thread properly. | page 14, 15, 16 |
| You have not fitted the spool properly. | Fit the spool properly. | – | |
| You have not used the right combination of fabric, thread and needle. | Choose a thread and needle that are appropriate for the type of fabric. | page 20 | |
| The needle is bent or blunt. | Replace the needle. | page 21 | |
| If you are sewing thin fabric, the stitch is too thick. | Sew with stabiliser material under the fabric. | page 31 | |
| The thread tension is incorrect. | Adjust the tension of the upper thread. | page 29 |
60
| Symptom | Possible cause | How to put it right | Reference |
|---|---|---|---|
| Stitches are skipped. | You have not threaded the upper thread properly. | Correct the upper threading. | page 16 |
| You have not used the right combination of fabric, thread and needle. | Choose a thread and needle that are appropriate for the type of fabric. | page 20 | |
| The needle is bent or blunt. | Replace the needle. | ||
| You have not inserted the needle properly. | Insert the needle properly. | page 21 | |
| Dust has accumulated under the needle plate or in the bobbin case. | Remove the needle plate cover and clean the plate and the bobbin case. | page 57 | |
| There is a high-pitched noise while sewing. | Dust has built up in the feed dogs or in the bobbin case. | Clean the bobbin case. | page 57 |
| You have not threaded the upper thread properly. | Correct the upper threading. | page 16 | |
| The bobbin case is scratched. | Replace the bobbin case. Contact your retailer or the nearest authorized service center. | – | |
| You have not used bobbin that has been designed for this machine. | Incorrect bobbins will not work properly. Only use a bobbin that has been designed for this machine. | page 11 | |
| The needle threader can not be used. | You have not moved the needle holder to its highest position. | Raise the needle either by turning the handwheel toward you (counterclockwise) so that the mark on the wheel points up or by pressing □ (needle position button) once or twice. | page 16 |
| You have not inserted the needle properly. | Insert the needle properly. | page 21 | |
| The stitch is not sewn correctly. | The presser foot that you are using is not correct for the type of stitch. | Attach the presser foot that is correct for the type of stitch that you want to sew. | page 52 |
| The thread tension is incorrect. | Adjust the tension of the upper thread. | page 29 | |
| The thread is tangled, for example, in the bobbin case. | Remove the tangle thread. If the thread is tangled in the bobbin case, clean the bobbin case. | page 57 | |
| The fabric does not feed. | The feed dogs are lowered. | Slide the feed dog position lever to ▲▲. | page 38, 45 |
| The stitch is too fine. | Lengthen the stitch length. | page 27 | |
| You have not used the right combination of fabric, thread and needle. | Choose a thread and needle that are appropriate for the type of fabric. | page 20 | |
| The thread is tangled, for example, in the bobbin case. | Remove the tangle thread. If the thread is tangled in the bobbin case, clean the bobbin case. | page 57 | |
| The sewing light bulb does not come on. | The sewing lamp is damaged. | Contact your retailer or the nearest authorized service center. | – |
ERROR MESSAGES
If an operation is performed incorrectly before the sewing machine is set up, an error message appears on the operation panel. Follow the instructions indicated in the table.
If you press the stitch selection key or do the operation correctly while the error message is displayed, the message disappears.
| Error Message | Probable Cause | Solution |
|---|---|---|
| E1 | The foot controller was pressed (or the start/stop button was pressed if the foot controller is not connected) and the reverse/reinforcement stitch button was pressed while the presser foot is raised. | Lower the presser foot lever before continuing the operation. |
| E2 | A stitch other than the buttonhole or bar tack stitch was selected and the foot controller was pressed (or the start/stop button was pressed if the foot controller is not connected) while the buttonhole lever is lowered. | Raise the buttonhole lever before continuing the operation. |
| E3 | The buttonhole or bar tack stitch was selected and the foot controller was pressed (or the start/stop button was pressed if the foot controller is not connected) while the buttonhole lever is raised. | Lower the buttonhole lever before continuing the operation. |
| E4 | The reverse/reinforcement stitch button or needle position button was pressed while the bobbin winder shaft is moved to the right. | Move the bobbin winder shaft to the left before continuing the operation. |
| E5 | The start/stop button was pressed while the foot controller was connected. | Disconnect the foot controller, and then press the start/stop button. Otherwise, operate the machine by using the foot controller. |
| E6 | The motor locked up because the thread is tangled. | Remove the tangled thread before continuing the operation. |
Note
- If error message “F1” through “F8” appears in the LCD while the sewing machine is being used, the machine may be malfunctioning. Contact your nearest authorized service center.
Operation beep (for models equipped with the operation beep)
Each time a key is pressed you will hear one beep. If a non-functioning key is pressed or an incorrect operation is performed you will hear two or four beeps (only for models equipped with the operation beep).
-
If a key is pressed (correct operation)
One beep sounds. -
If an incorrect operation is performed or a non-functioning key is pressed
Two or four beeps sound. -
If the machine locks up, for example, because the thread is tangled
The sewing machine beeps for four seconds and the machine automatically stops. Be sure to check for the cause of the error, and correct it before continuing to sew.

INDEX
Numerics
- 3-point zigzag stitch ........ 32
A
- accessories ........ 8
- appliqués ........ 42
B
- bar tack ........ 46
- basic stitching ........ 33
- blind hem stitching ........ 34
- bobbin ........ 14
- bobbin case ........ 14, 57
- bobbin cover ........ 6, 14
- bobbin winder ........ 11, 59, 62
- button sewing ........ 38
- buttonhole foot ........ 36
- buttonhole lever ........ 6, 37, 47
- buttonhole sewing ........ 35
C
- crazy quilt stitching ........ 43
D
- Daming ........ 32, 41
E
- elastic tape ........ 41
- error messages ........ 62
- extra spool pin ........ 23
- eyelet punch ........ 37
F
- fagoting ........ 49
- fast bobbin winding ........ 12
- feed dog position lever ........ 45
- feed dogs ........ 6, 45
- flat bed attachment ........ 7, 31
- foot controller ........ 8, 28
- free-arm style ........ 31
- free-motion quilting ........ 45
H
- handwheel ........ 5
- heirloom stitching ........ 51
J
- joining ........ 51
- joining stitch ........ 42, 48
L
- LCD ........ 7
M
- main parts ........ 5
- main power switch ........ 9
- monogramming ........ 49, 51
N
- needle ........ 20
- needle bar thread guide ........ 6
- needle clamp screw ........ 6, 22
- needle plate ........ 6
- needle plate cover ........ 57
- needle position ........ 33
- needle position button ........ 6
- needle threader ........ 17
O
- openings ........ 46
- operation beep ........ 62
- operation buttons ........ 6
- operation panel ........ 7
- optional accessories ........ 8
- overcasting stitches ........ 32
P
- patchwork stitching ........ 43
- piecing ........ 43
- pocket corners ........ 46
- presser foot ........ 6, 24
- presser foot holder ........ 6, 25
- presser foot lever ........ 6, 16
- pre-tension disk ........ 11
Q
- quick-set bobbin ........ 6, 15
- quilting ........ 44
- quilting foot ........ 45
- quilting guide ........ 44
R
- reinforcement stitching ........ 46
- reverse/reinforcement stitch button ........ 6
S
- scallop stitching ........ 49
- seam ripper ........ 37
- sewing machine needles ........ 20
- sewing speed controller ........ 6
- sleeve holes ........ 46
- smocking ........ 50
- spool pin ........ 11, 16
- start/stop button ........ 6, 28
- stitch length ........ 27
- stitch selection key ........ 7
- stitch settings ........ 52
- stitch width ........ 27
- straight stitch ........ 33
- stretch fabrics ........ 31
63
T
- thick fabrics ........ 30
- thin fabrics ........ 31
- thread cutter ........ 29
- thread guide ........ 16
- thread tension ........ 29
- trial sewing ........ 30
- triple stretch stitch ........ 33
- troubleshooting ........ 59
- twin needle ........ 22
U
- upper tension-control dial ........ 29
- upper threading ........ 16
W
- walking foot ........ 44
- wing needle ........ 51
Z
- zigzag stitch ........ 30, 32, 42
- zipper foot ........ 40
- zipper Insertion ........ 40
64
This page is blank.
ncbc_brother_cover_Eng PANTONE 285 K
brother®
1 KNOWING YOUR SEWING MACHINE
2 SEWING BASICS
3 UTILITY STITCHES
4 APPENDIX
Computerized Sewing Machine Operation Manual
English 885-S33/S34/S36/S37 XC8835-821① Printed in China