HANDBOOK FOR COMPACT
OVERLOCK MACHINE
MANUAL DE INSTRUCCIONES DE LA
MAQUINA COMPACTA OVERLOCK
"IMPORTANT SAFETY INSTRUCTIONS"
When using the sewing machine, basic safety precautions should always be followed, including the following.
"Read all instructions before using."
DANGER — To reduce the risk of electric shock.
- The sewing machine should never be left unattended when plugged in. Always unplug this sewing machine from the electrical outlet immediately after using and before cleaning.
- Always unplug before relamping. Replace bulb with same type rated 15 watts.
WARNING — To reduce the risk of burns, fire, electric shock, or injury to persons.
- Do not allow to be used as a toy. Close attention is necessary when the sewing machine is used by or near children.
- Use this sewing machine only for its intended use as described in this manual. Use only accessories recommended by the manufacturer as contained in this manual.
- Never operate this sewing machine if it has a damaged cord or plug, if it is not working properly, if it has been dropped or damaged, or dropped into water. Return the sewing machine to the nearest authorized dealer or service center for examination, repair, electrical or mechanical adjustment.
- Never operate the sewing machine with any air openings blocked. Keep ventilation openings of the sewing machine and foot controller free from the accumulation of lint, dust, and loose cloth.
- Never drop or insert any object into any openings.
- Do not use outdoors.
- Do not operate where aerosol (spray) products are being used or where oxygen is being administered.
- To disconnect, turn the main switch to the symbol "O" position which represents off, then remove plug from outlet.
- Do not unplug by pulling on cord. To unplug, grasp the plug, not the cord.
- Keep fingers away from all moving parts. Special care is required around the sewing machine needle.
- Always use the proper needle plate. The wrong plate can cause the needle to break.
- Do not use bent needles.
- Do not pull or push fabric while stitching. It may deflect the needle causing it to break.
- Switch the sewing machine to the symbol "O" position when making any adjustments in the needle area, such as threading needle, changing needle, or changing presser foot, and the like.
- Always unplug the sewing machine from the electrical outlet when removing covers, lubricating, or when making any other user servicing adjustments mentioned in the instruction manual.
- This sewing machine is not intended for use by young children or infirm persons without supervision.
- Young children should be supervised to ensure that they do not play with this sewing machine.
CAUTION — This appliance has a polarized plug (one blade wider than the other) to reduce the risk of electric shock, this plug is intended to fit in a polarized outlet only one way.
If the plug does not fit fully in the outlet, reverse the plug. If it still does not fit. Contact a qualified electrician to install the proper outlet. Do not modify the plug in any way.
"SAVE THESE INSTRUCTIONS"
"This sewing machine is intended for household."
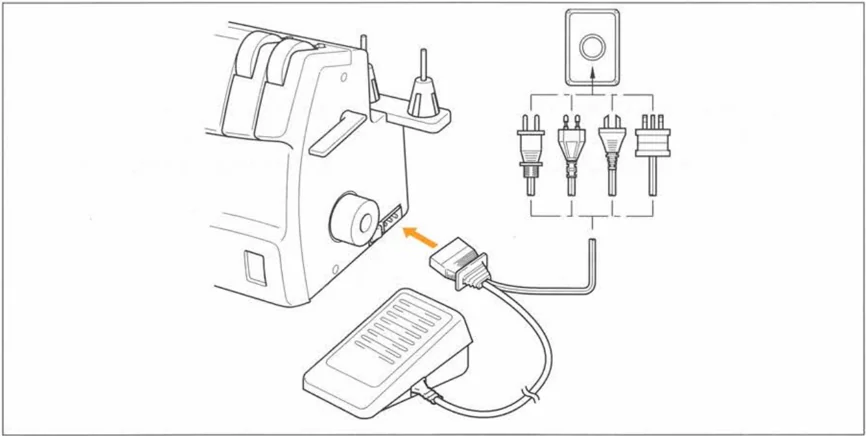
- When leaving this sewing machine unattended, the main switch of the machine must be switched off or the plug must be removed from the socket-outlet.
- When servicing the sewing machine, or when removing covers or changing lamps, the machine or the electrical set must be disconnected from the supply by removing the plug from the socket-outlet.
FOR USERS IN THE UK, EIRE, MALTA AND CYPRUS ONLY.
If your sewing machine is fitted with a 3 pin non rewireable BS plug then please read the following.
IMPORTANT
If the available socket outlet is not suitable for the plug supplied with this equipment, it should be cut off and an appropriate three pin plug fitted. With alternative plugs an approved fuse must be fitted in the plug.
NOTE: The plug severed from the mains lead must be destroyed as a plug with bared flexible cords is hazardous if engaged in a live socket outlet. In the event of replacing the plug fuse, use a fuse approved by ASTA to BS 1362, i.e. carrying the mark, rating as marked on plug.
Always replace the fuse cover, never use plugs with the fuse cover omitted.
WARNING: DO NOT CONNECT EITHER WIRE TO THE EARTH TERMINAL WHICH IS MARKED WITH THE LETTER 'E', BY THE EARTH SYMBOL OR COLOURED GREEN OR GREEN AND YELLOW.
The wires in this mains lead are coloured in accordance with the following code:
Blue Neutral Brown Live
As the colours of the wiring in the mains lead of this appliance may not correspond with the coloured markings identifying the terminals in your plug, proceed as follows.
The wire which is coloured blue must be connected to the terminal which is marked with the letter 'N' or coloured black or blue.
The wire which is coloured brown must be connected to the terminal which is marked with the letter 'L' or coloured red or brown.
CONGRATULATIONS ON CHOOSING THIS COMPACT OVERLOCK MACHINE
Your machine is a high quality, easy-to-use product. To fully enjoy all the features, we suggest that you study this booklet. If you need more information regarding the use of your machine, your nearest authorized dealer is always happy to be of service. Enjoy yourself!
FELICITACIONES POR HABER ELEGIDO ESTA COMPACTA MAQUINA OVERLOCK
Su máquina es de una eficacia y calidad excelentes; así pues, a fin de disfrutar completamente de todas las características incorporadas, le sugerimo estudie el manual. Si se necesitara mayor información sobre el uso de esta máquina, el proveedor autorizado más cercano estará encantado de ofrecerle sus servicios.
CAUTION!
WHEN THREADING, REPLACING NEEDLE OR LIGHT BULB, BE SURE TO TURN OFF THE MAIN POWER SWITCH OF THE MACHINE. WHEN THE MACHINE IS NOT IN USE, IT IS RECOMMENDED THAT THE ELECTRIC SUPPLY PLUG IS DISCONNECTED FROM THE WALL SOCKET TO AVOID ANY POSSIBLE HAZARDS.
¡PRECAUCION!
ASEGURARSE DE QUE EL INTERRUPTOR GENERAL DE LA MAQUINA ESTE APAGADO CUANDO SE ENHEBRE, REEMPLACE LA AGUJA O CAMBIE LA LAMPARITA. CUANDO NO SE UTILICE LA MAQUINA, SE RECOMIENDA QUE EL ENCHUFE ESTE DES-CONECTADO DE LA RED DE LA CORRIENTE, A FIN DE EVITAR CUALQUIER PELIGRO.
Notes on the motor
- The normal operating speed of this sewing machine is 1,300 stitches per minute, which is quite fast compared to the normal operating speed of 300 to 800 stitches per minute for the ordinary foot-operated sewing machine.
- The bearings in the motor are made of a special sintered, oil-impregnated alloy mounted in oil-soaked felt to withstand long hours of continuous operation.
- Continuous operation of the sewing machine can cause heat to build in the motor area, but not enough to adversely affect its performance. It is important to keep fabric and paper away from the ventilating holes on the back and sides of the machine so air can get to these holes.
- When the motor is running, sparks can be seen through the ventilating hole in the motor bracket on the side opposite the hand wheel. These sparks are produced by the carbon brushes and the commutator, and are part of the machines normal operation.
CAUTION
WHEN THREADING THE MACHINE, REPLACING A NEEDLE, OR WHEN THE MACHINE IS NOT IN USE, WE RECOMMEND DISCONNECTING THE ELECTRIC SUPPLY PLUG TO AVOID ANY POSSIBLE HAZARDS.
NOTAS SOBRE EL MOTOR
- La velocidad normal de funcionamiento de esta máquina de coser es de 1.300 puntadas por minuto, lo que resulta bastante rápido comparado con la velocidad normal de 300 a 800 puntadas por minuto de las máquinas de coser normales que funcionan con pedal.
- Los cojinetes del motor están hechos de una aleación especial impregnada en aceite sintético y montada en un fieltro impregnado en aceite, para poder funcionar continuamente durante muchas horas.
- Un funcionamiento continuo de la máquina puede contribuir a calentar algo la máquina en la zona del motor, pero no lo suficiente como para alterar su rendimiento y funcionamiento. Sin embargo, es menester mantener los orificios de ventilación de la parte trasera y en los lados de la máquina sin tapar con tejido o papel durante el uso, para que el aire pueda circular por los orificios.
- Durante el funcionamiento del motor, se pueden ver chispas a través del orificio de ventilación de la abrazadera del motor, en el lado contrario a la ruedecilla. Estas chispas son producidas por las escobillas de carbón que entran en contacto con el conmutador, y forman parte del funcionamiento normal de la máquina.
PRECAUCION
Al enhebrar la máquina, cambiar una aguja o al dejar la máquina sin usar, le recomendamos desenchufar la máquina para evitar cualquier peligro de corto circuito.
TABLE OF CONTENTS
-
Chapter 1 Names of parts and their functions ........ 1
-
Accessories included with your serger ........ 3
-
Needle ........ 5
-
Turning direction of motor ........ 7
-
Opening and closing the front cover ........ 7
-
Chapter 2 Operating ........ 8
-
Powering the machine ........ 8
-
Removing the Bed Extension for Free-Arm Sewing ........ 9
-
Removing the bed extension ........ 9
-
Chapter 3 Stitch Length ........ 10
-
Stitch Width ........ 10
Chapter 4 Instructions for the Differential Feed Mechanism
-
(Models with Differential Feed) ........ 11
-
Chapter 5 Before Threading ........ 14
-
Preparation before threading ........ 14
-
How to use the thread spool cap ........ 15
-
How to use the thread net ........ 15
-
Tension release button ........ 15
-
Before threading ........ 16
-
Threading the upperlooper ........ 17
-
Threading the lowerlooper ........ 19
-
Threading the right needle (on Two-needle models) ........ 21
-
Threading the left needle ........ 23
-
Chapter 6 Comparison Chart of Sewing Materials, Threads and Needles ........ 25
-
Chapter 7 Thread Tension ........ 27
-
Chapter 8 Chart of Thread Tension Adjustment ........ 29
-
Chapter 9 Test-sewing ........ 33
-
Chaining-off ........ 34
-
Chapter 10 Sewing ........ 35
-
To start sewing ........ 35
-
To remove work ........ 36
-
If threads break during sewing ........ 36
-
To sew heavy materials ........ 37
-
To sew fine materials ........ 37
-
Presser foot pressure ........ 38
-
Chapter 11 Troubleshooting ........ 39
-
Chapter 12 Stitch Selection ........ 41
-
Narrow overlock stitch/rolled edge stitch ........ 42
-
Chapter 13 Chart of Narrow Overlock/Rolled Edge Stitch ........ 45
-
Chapter 14 Examples of Sewing Applications for this Serger ........ 47
-
Blind stitching with blind stitch presser foot ........ 48
-
Flatlock stitching with blind stitch presser foot ........ 50
-
Pin tuck stitching with blind stitch presser foot ........ 52
-
Decorative stitching ........ 54
-
Chapter 15 Upper Knife and Lower Knife ........ 55
-
Retracting upper knife ........ 55
-
Replacing the knives ........ 56
-
Chapter 16 Oiling ........ 57
-
Chapter 17 Changing the Light Bulb ........ 58
-
Chapter 18 Machine Specifications ........ 59
INDICE
-
Capítulo 1 Nombres de las partes y sus funciones ........ 1
-
Accesorios incluidos con la máquina de coser ........ 3
-
Aguja ........ 5
-
Para cambiar la dirección del motor ........ 7
-
Abre y cierre de la tapa delantera ........ 7
-
Capítulo 2 Funcionamiento ........ 8
-
Encendido de la máquina ........ 8
-
Extraiga el suplemento para la mesa para realizar la costura sin brazo ........ 9
-
Extraiga el suplemento para la mesa ........ 9
-
Capítulo 3 Largo de puntada ........ 10
-
Ancho de puntada ........ 10
Capítulo 4 Instrucciones para el mecanismo de alimentación con diferencial
-
(Modelos con alimentador diferencial) ........ 11
-
Capítulo 5 Antes del enhebrado ........ 14
-
Preparación antes del enhebrado ........ 14
-
Como utilizar el tope del carrete ........ 15
-
Como utilizar la malla para hilo ........ 15
-
Botón de liberación de la tensión ........ 15
-
Antes de enhebrar ........ 16
-
Enhebrado del áncora superior ........ 17
-
Enhebrado del áncora inferior ........ 19
-
Enhebrado de la aguja derecha (los modelos de dos agujas) ........ 21
-
Enhebrado de la aguja izquierda ........ 23
-
Capítulo 6 Tabla de relación entre los distintos tejidos, hilos y agujas ........ 26
-
Capítulo 7 Tensión del hilo ........ 27
-
Capítulo 8 Tabla de ajuste de tensión de los hilos ........ 29
-
Capítulo 9 Costura de prueba ........ 33
-
Cadeneta ........ 34
-
Capítulo 10 Costura ........ 35
-
Para empezar a coser ........ 35
-
Para retirar el trabajo ........ 36
-
Si el hilo se rompe al coser ........ 36
-
Para coser tejidos gruesos ........ 37
-
Para coser tejidos finos ........ 37
-
Presión del prensatelas ........ 38
-
Capítulo 11 Guía de localización de fallas ........ 40
-
Capítulo 12 Selección de las distintas puntadas ........ 41
-
Puntada overlock estrecha/puntada de borde enrollado ........ 42
-
Capítulo 13 Tabla para puntadas overlock estrechas/de borde enrollado ........ 46
-
Capítulo 14 Ejemplos de aplicaciones de costuras para estas máquinas de coser ........ 47
-
Puntadas invisibles con prensatelas multipropósito ........ 48
-
Costura Overlock plana con prensatelas multipropósito ........ 50
-
Costuras de pliegues pequeños con prensatelas multipropósito ........ 52
-
Puntadas decorativas ........ 54
-
Capítulo 15 Cuchillas superior e inferior ........ 55
-
Meter la cuchilla superior ........ 55
-
Cambio de las cuchillas ........ 56
-
Capítulo 16 Engrasado ........ 57
-
Capítulo 17 Cambio de la bombilla de luz ........ 58
-
Capítulo 18 Especificaciones técnicas de la máquina ........ 59
Names of parts and their functions
Nombres de las partes y sus funciones
1
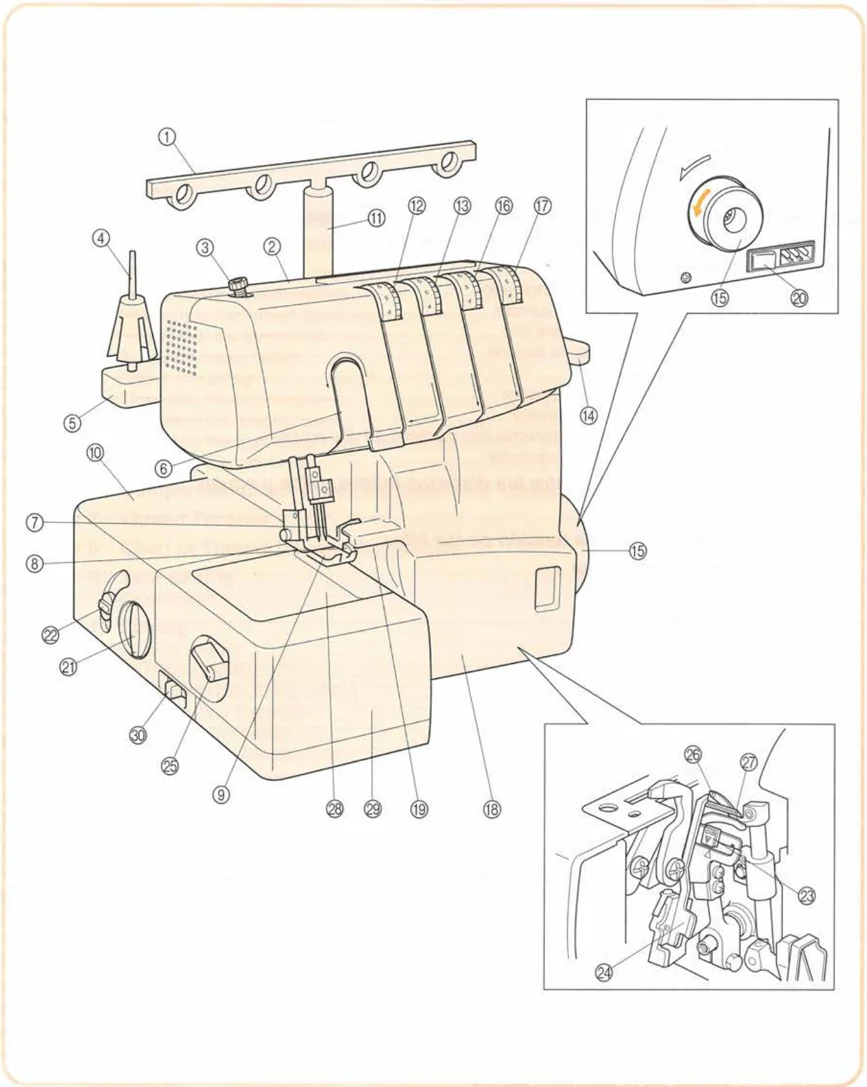
① Thread tree ② Handle ③ Presser foot pressure adjustment screw ④ Spool pin ⑤ Spool support ⑥ Thread take-up cover ⑦ Needles ⑧ Upper knife ⑨ Presser foot ⑩ Material plate cover ⑪ Spool stand (thread tree support) ⑫ Left needle thread tension dial ⑬ Right needle thread tension dial ⑭ Presser foot lifting lever ⑮ Hand wheel ⑯ Upperlooper thread tension dial ⑰ Lowerlooper thread tension dial ⑱ Front cover ⑲ Material slide plate (for overlock stitch) ⑳ Main power switch and light switch ㉑ Stitch length adjustment dial ㉒ Differential feed ratio adjustment lever ㉓ Lowerlooper threading lever ㉔ Stitch finger ㉕ Stitch width lever ㉖ Upperlooper ㉗ Lowerlooper ㉘ Free-arm cover ㉙ Bed extension ㉚ Knife lever
① Arbol del hilo ② Asa ③ Tornillo de ajuste de la presión del prensatelas ④ Portabobina ⑤ Soporte de la bobina ⑥ Tapa de toma de hilo ⑦ Agujas ⑧ Cuchilla superior ⑨ Prensatelas ⑩ Tapa de tejido ⑪ Filete para la canilla (soporte del árbol del hilo) ⑫ Disco de tensión del hilo de la aguja izquierda ⑬ Disco de tensión del hilo de la aguja derecha ⑭ Palanca de levantamiento del prensatelas ⑮ Ruedecilla ⑯ Disco de tensión del hilo del áncora superior ⑰ Disco de tensión del hilo del áncora inferior ⑱ Tapa delantera ⑲ Placa de deslice del tejido (para puntadas Overlock) ⑳ Interruptor de alimentación principal e interruptor de luz ㉑ Disco de ajuste del largo de las puntadas. ㉒ Palanca diferencial de ajuste de la velocidad de alimentación ㉓ Palanca de enhebrado del áncora inferior ㉔ Uñeta de puntadas ㉕ Palanca de anchura de las puntadas. ㉖ Ancora superior ㉗ Ancora inferior ㉘ Cubierta del brazo ㉙ Suplemento para la mesa ㉚ Palanca de cuchilla
2
Accessories included
with your serger
Accesorios incluidos con
la máquina de coser
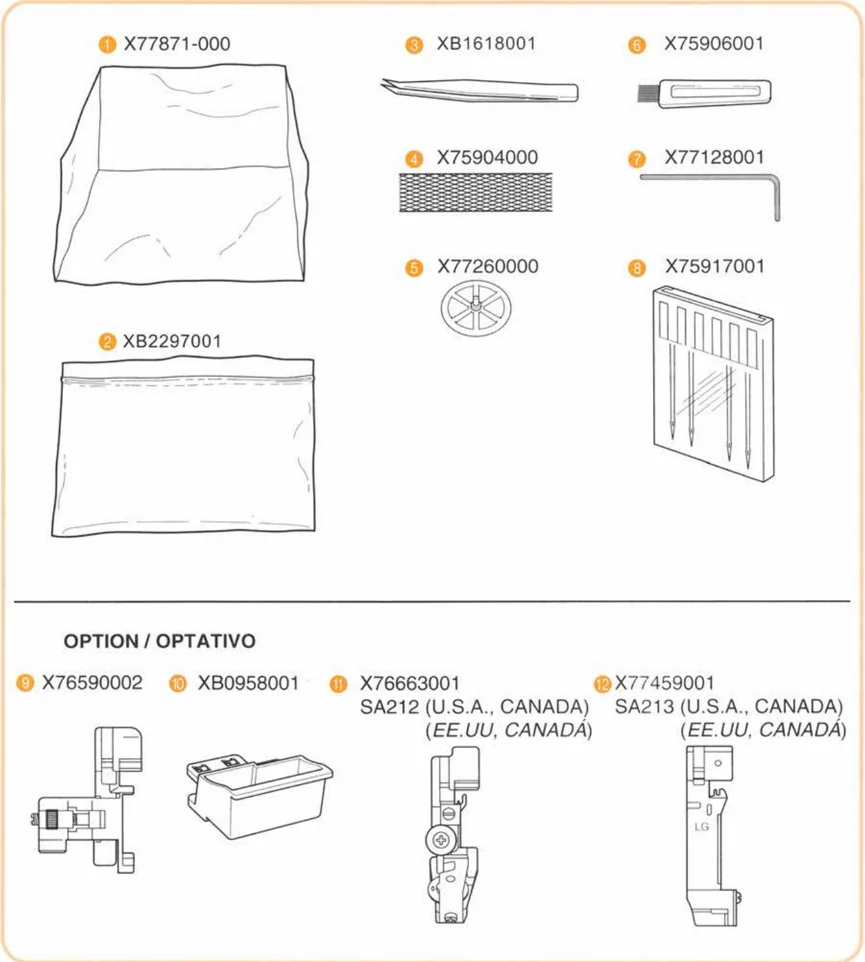
① X77871-000 ② XB2297001 ③ XB1618001 ④ X75904000 ⑤ X77260000 ⑥ X75906001 ⑦ X77128001 ⑧ X75917001
OPTION / OPTATIVO
⑨ X76590002 ⑩ XB0958001 ⑪ X76663001 SA212 (U.S.A., CANADA) (EE.UU, CANADÁ) ⑫ X77459001 SA213 (U.S.A., CANADA) (EE.UU, CANADÁ)
LG
⑨, , ⑪, OPTION ⑨, ⑩, ⑪, ⑫ OPTATIVO
3
The number represents the parts code ① Soft cover ② Accessory bag ③ Tweezers ④ Thread net Two-needle models (4) One-needle models (3) ⑤ Thread spool cap Two-needle models (4) One-needle models (3) ⑥ Cleaning brush ⑦ Hexagonal (Allen) wrench (on Two-needle models) ⑧ Needle set: SCHMETZ 130/705M 80/12: 2 pcs. 90/14: 2 pcs. ⑨ Blind stitch foot (Option) ⑩ Trim trap (Option) ⑪ Tape presser foot (Option) ⑫ Gathering foot (Option) Foot controller: XC7359021 (110/120V Area) XC7438421 (220/240V Area) XC7456421 (U.K.) XE0629001(Australia, New Zealand) XC7438421 (Germany)
Installing/Removing
the trim trap
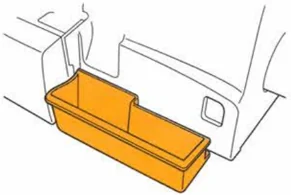
Installation Insert the trim trap in the direction indicated by the arrow until it contacts the front cover.
Removal Slightly lift up the sewing machine, and then pull out the trim trap in the opposite direction of that indicated by the arrow.
El número corresponde al código de los elementos ① Funda ② Bolsa de accesorios ③ Pinzas ④ Malla Modelos de dos agujas (4) Modelos de una aguja (3) ⑤ Tope del carrete Modelos de dos agujas (4) Modelos de una aguja (3) ⑥ Cepillo limpiador ⑦ Llave de tuerca hexagonal (Allen) (Modelos de das agujas) ⑧ Juego de agujas: SCHMETZ 130/705M 80/12: 2 unidades 90/14: 2 unidades ⑨ Prensatelas para puntadas invisibles (Optativo) ⑩ Orificio de corte (Optativo) ⑪ Prensatelas para cintas (Optativo) ⑫ Prensatelas fruncidor (Optativo) Pedal: XC7359021 (zona con 110/120V) XC7438421 (zona con 220/240V) XC7456421 (Reino Unido) XE0629001 (Australia, Nueva Zelanda) XC7438421 (Alemania)
Instalación/Desmontaje
del orificio de corte
Intalación Inserte el orificio de corte en la dirección indicada por la flecha hasta que toque la tapa delantera.
Desmontaje Levante ligeramente la máquina de coser, y después saque el orificio de corte tirando de él en la dirección opuesta a la indicada por la flecha.
 Front cover
Tapa delantera
After installation / Instrucción posterior
4
Needle
This machine uses a standard home sewing machine needle. The recommended needle is SCHMETZ 130/705H.
To remove the needle
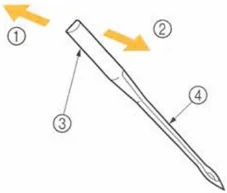
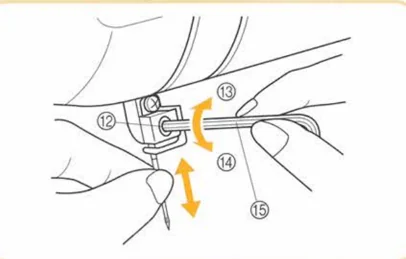
(1) Turn the main power switch to the OFF position. (2) Turn the hand wheel counter-clockwise by hand until the needle is at its highest position. (3) Loosen the needle set screw with hexagonal wrench and remove the needle. ① Back ② Front ③ Flat side ④ Groove
To insert the needle
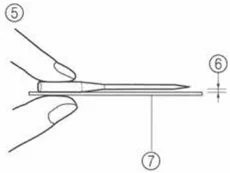
(1) Turn the main power switch to the OFF position. (2) Turn the hand wheel until the needle bar is at its highest position. (3) Hold the needle with its flat side away from you and insert it up as far as it will go. (4) Tighten the needle set screw securely with the hexagonal wrench. ⑤ Place the needle on its flat side and check to see if the space is parallel. ⑥ Flat side ⑦ (needle-plate, glass, etc.)
Aguja
Está máquina funciona con una aguja normal para máquinas domésticas. Así mismo, se recomienda el uso de una aguja SCHMETZ 130/705H.
Para sacar la aguja
(1) Apague el interruptor principal (posición OFF). (2) Gire la ruedecilla a mano, en contra de las manecillas del reloj hasta que la aguja alcance la posición más elevada. (3) Afloje el tornillo de instalación de la aguja con la llave hexagonal y saque la aguja. ① Parte trasera ② Parte delantera ③ Parte llana ④ Canal
Para introducir la aguja
(1) Apague el interruptor principal (póngalo en OFF). (2) Gire la ruedecilla hasta que la barra de la aguja alcance la posición más alta. (3) Sujete la aguja con la parte curvada de cara a Vd. e insértela hacia arriba hasta el tope. (4) Vuelva a apretar firmemente el tornillo de instalación de la aguja con la llave hexagonal. ⑤ Coloque la aguja en su parte llana y compruebe que el espacio sea paralelo. ⑥ Parte llana ⑦ Placa de aguja (Vidrio, etc.)
5
NOTE: Two-needle models
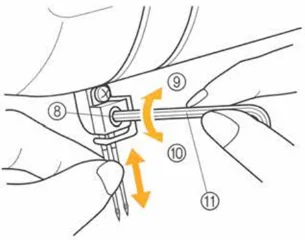
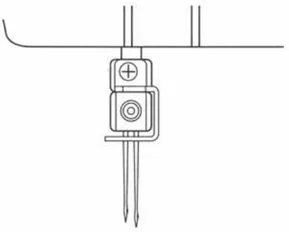
- On two-needle models, we suggest you hold the two needles with one hand and then insert them both at the same time.
- If the needles have been inserted correctly, the right needle should be set slightly lower than the left one.
CAUTION The needle set screw holds both needles. Keep this in mind when you loosen the set screw to exchange one or both needles.
⑧ Needle set screw ⑨ Tighten ⑩ Loosen ⑪ Hexagonal wrench
NOTA: Modelos de dos agujas
- En los modelos de dos agujas, le sugerimos sujetar ambas agujas en una sola mano e inser-tarlas simultáneamente.
- Si las agujas fueron introducidas correctamente, la aguja de derecha debería quedar un poco más abajo de la izquierda.
PRECAUCION El tornillo de instalación de las agujas sujeta ambas agujas. No se lo olvide al aflojar dicho tornillo para cambiar una o ambas agujas.
⑧ Tornillo de instalación de las agujas ⑨ Apretar ⑩ Aflojar ⑪ Llave de tuerca hexagonal
One-needle models ⑫ Needle set screw ⑬ Tighten ⑭ Loosen ⑮ Hexagonal wrench
Modelos de una aguja ⑫ Tornillo de instalación de las agujas ⑬ Apretar ⑭ Aflojar ⑮ Llave de tuerca hexagonal
6
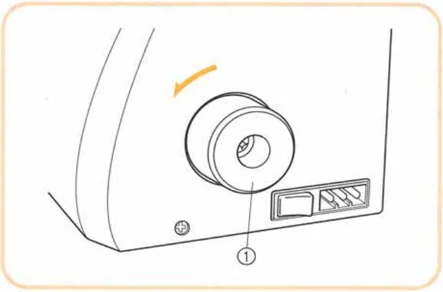
Turning direction of motor
- The motor and hand wheel of this machine turn in a counterclockwise direction (direction of arrow). This is the same direction as an ordinary home sewing machine. ① Hand wheel
Para cambiar la dirección del motor
- El motor y la ruedecilla de esta máquina funcionan en el sentido contrario al de las manecillas del reloj (dirección de la flecha), como es el caso con la mayoría de las máquinas de coser domésticas. ① Ruedecilla
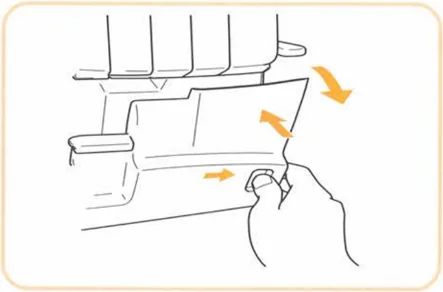
Opening and closing the front cover
It is necessary to open the front cover when threading this machine.
NOTE: For your safety, make sure that the front cover is closed when operating the machine.
Abre y cierre de la tapa delantera
Es necesario abrir la tapa delantera para enhebrar la máquina.
NOTA: Para su propia seguridad, averigue siempre que la tapa delantera esté bien cerrada antes de hacer funcionar la máquina.
7
Operating
Powering the machine
Preparation
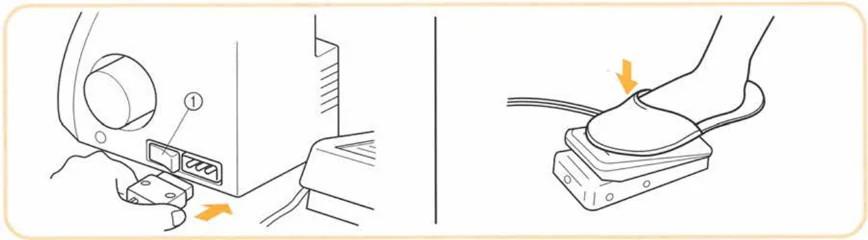
- Insert the three-pin plug into the socket on the bottom right side of the machine. Insert the power supply plug into a power outlet.
Main Power and Sewing Light Switch This switch turns the power and sewing light on or off. To turn on push toward "1" mark. To turn off push toward "0" mark. ① Main Power and Sewing Light Switch
Operation When the pedal is pressed lightly, the machine runs at a low speed. As the pedal is pressed further, the machine will increase speed. When the pedal is released, the machine stops.
Note (For U.S.A. only): Foot Controller: KD-1902 This foot controller can be used for sewing machine models 1034D, 1134DW, 1134D, DZ1234 and 1634D.
Funcionamiento
Encendido de la máquina
Preparación de la máquina
- Introduzca el zócalo de tres puntas en el enchufe que se encuentra abajo, en el lado derecho de la máquina e inserte el zócalo de alimentación en una toma de corriente.
Interruptor principal y de luz Este interruptor permite apagar y encender la máquina así como la luz. Para encender, empuje hacia la marca "1"; para apagar, póngalo en la marca "0". ① Interruptor principal y de luz
Funcionamiento Al oprimir ligeramente el pedal, la máquina funcionará a baja velocidad. A medida que se apriete más, la máquina incrementará su velocidad. La máquina se parará tan pronto como se suelte el pedal.
8
Removing the Bed Extension for Free-Arm Sewing
Removing the bed extension
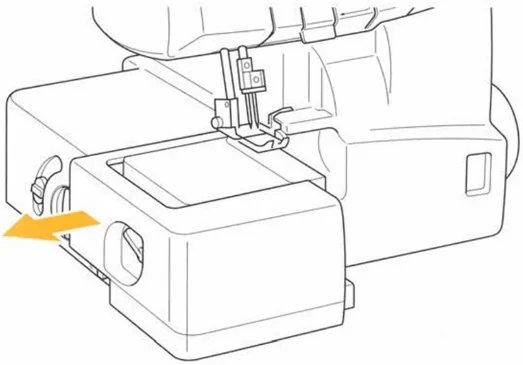
Free-arm sewing enables tubular pieces to be sewn more easily. For free-arm sewing, remove the bed extension and position the fabric as shown in the illustration.
Extraiga el suplemento para la mesa para realizar la costura sin brazo
Extraiga el suplemento para la mesa
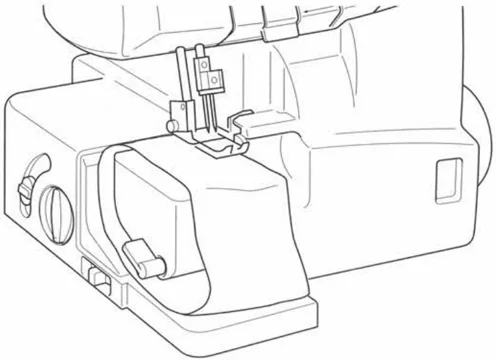
La costura sin brazo permite coser trozos tubulares de tejido de forma más sencilla. Para llevar a cabo la costura sin brazo, extraiga el suplemento para la mesa y coloque el tejido tal y como se indica en la ilustración.
9
Stitch Length
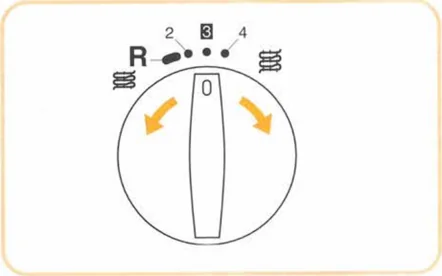
To change the stitch length, (1) Locate the stitch length adjustment dial on the left side of the machine. (2) Turn the stitch length adjustment dial forward to lengthen the stitch to a maximum of 4 mm (5/32 inch). Turn the stitch length adjustment dial backwards to shorten the stitch length to a minimum of 2 mm (1/8 inch). (3) The normal stitch length setting is 2.5 mm to 3 mm.
Largo de puntada
Para cambiar el largo de las puntada: (1) Busque el disco de ajuste del largo de las puntadas en al lado izquierdo de la máquina. (2) Gire el disco de ajuste del largo de las puntadas hacia adelante para alargar la puntada a un máximo de 4 mm. Gire el disco de ajuste del largo de las puntadas hacia atrás para acortar la longitud de puntada a un mínimo de 2 mm.
- Un ajuste normal para el largo de las puntadas se sitúa entre 2,5 y 3 mm.
Stitch Width
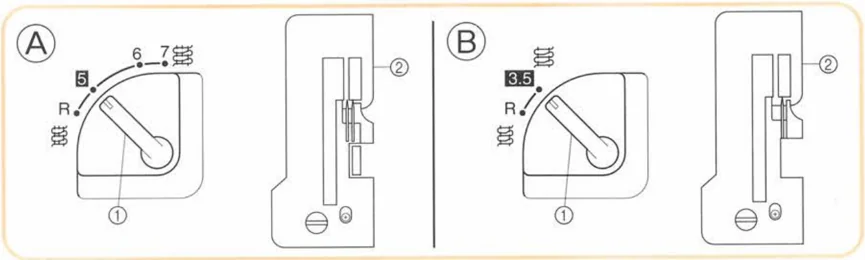
Two-needle models To change the stitch width. (1) Move the stitch width lever (located on the left side of the machine toward the front) up to reduce the stitch width or down to increase the width. The stitch width can be set between R4.5 mm (11/64 inch) and 7 mm (9/32 inch). The normal stitch width setting for regular overlock stitch is 5mm (13/64 inch).
One-needle models • The width is factory set to 3.5mm (9/64 inch). A Two-needle models B One-needle models ① Stitch width lever ② Regular needle plate
Ancho de puntada
Modelos de dos agujas. • Para cambiar el ancho de puntada. (1) Mueva la palanca de anchura de las puntadas (situada a la izquierda de la máquina, hacia adelante) hacia arriba para reducir el ancho de puntada, o hacia abajo para aumentar el ancho de puntada. Puede ajustar el ancho de puntada entre R4,5 mm y 7 mm. El ajuste normal del ancho de puntada para una puntada overlock corriente es de 5 mm.
Modelos de una aguja. • El ancho de las puntadas está establecido en la fábrica en 3,5 mm. A Modelos de dos agujas B Modelos de una aguja ① Palanca de anchura de las puntadas ② Place de aguja normal
10
Instructions for the Differential Feed Mechanism (Models with Differential Feed)
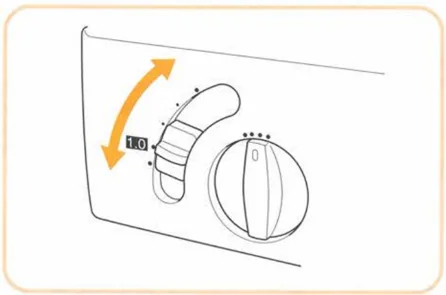
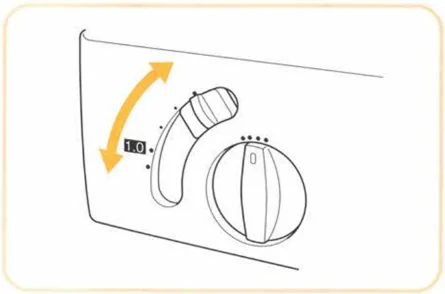
This serger is equipped with two sets of feed dogs under the presser foot to move the fabric through the machine. The differential feed controls the movement of both the front and the rear feed dogs. When set at 1, the feed dogs are moving at the same speed (ratio of 1). When the differential feed ratio is set at less than 1, the front feed dogs move slower than the rear feed dogs, stretching the fabric as it is sewn. This is effective on lightweight fabric that may pucker. When the differential feed ratio is set at greater than 1, the front feed dogs move faster than the back feed dogs, gathering the fabric as it is sewn. This function assists in removing the rippling when serging stretch fabrics.
- To adjust the differential feed. (1)Locate the differential feed adjustment lever on the left side of the machine. (2)The normal setting is 1.0 on the differential feed adjustment lever. (3)To set less than 1.0, move the lever back. (4)To set greater than 1.0, move the lever forward.
Instrucciones para el mecanismo de alimentación con diferencial (Modelos con alimentador diferencial)
Esta máquina de coser está provista de dos series de alimentadores debajo del prensatelas para guiar el tejido por la máquina. El alimentador con diferencial controla los movimientos de los alimentadores delanteros y traseros. Al ajustarlo en 1, los alimentadores se desplazarán a una velocidad idéntica (relación de 1). Al ajustar la relación del alimentador con diferencial en menos de 1, los alimentadores delanteros van a moverse más despacio que los traseros, estirando el tejido a medida que se cuese. Esta operación resulta muy eficiente al coser materiales finos que pueden arrugarse.
Cuando el alimentador con diferencial esté ajustado en un valor superior a 1, los alimentadores delanteros van a moverse más rápido que los alimentadores traseros, juntando el tejido al coserlo. Esta función permite quitar las arrugas al coser tejidos que se estiran.
- Para ajustar el alimentador diferencial. (1)Busque la palanca de ajuste del alimentador diferencial en al lado izquierdo de la máquina. (2)El ajuste normal es de 1,0 en la palanca de ajuste del alimentador diferencial. (3)Para ajustar menos de 1,0, mueva la palanca hacia atrás. (4)Para ajustar más de 1,0, mueva la palanca hacia adelante.
11
| Feed ratio | Main feed (rear) | Differential feed (front) | Effect | Application |
|---|---|---|---|---|
| 0.7 – 1.0 | Material is pulled tight. | Prevents thin materials from puckering | ||
| 1.0 | Without differential feed. | Normal sewing | ||
| 1.0 – 2.0 | Material is gathered or pushed together. | Prevents stretch materials from stretching or puckering |
| Velocidad de alimentación | Alimentador principal (detrás). | Alimentador con diferencial (delante). | Efecto. | Uso. |
|---|---|---|---|---|
| 0,7 – 1,0 | El tejido se estira | Impide que los tejidos finos frunzan. | ||
| 1,0 | Sin alimentación con diferencial. | Costura normal. | ||
| 1,0 – 2,0 | El tejido se contrae o se junta. | Impide que los tejidos extensibles se estiren o frunzan. |
• An example where adjustment is required
When stretch material is sewn without using the differential feed, the edge will be wavy.
• Ejemplo en que se requiere ajuste
Al coser tejidos extensibles sin utilizar una alimentación con diferencial, su borde va a ser oleado.
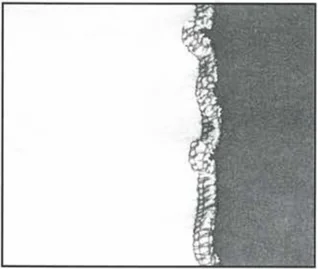
To make the edge more smooth, adjust the feed ratio from 1.0 toward 2.0. (The feed ratio required depends on the elasticity of the material.)
The more elastic the material, the further toward 2.0 the differential feed ratio should be set. Test sew with a scrap of the fabric to find the correct adjustment.
Para remediar al problema y mejorar la apariencia del borde, ajuste la velocidad de alimentación de 1,0 hacia 2,0. (El ajuste de la velocidad de alimentación depende de la elasticidad del material).
Cuanto más elástico el tejido, más hacia 2 se debe poner el ajuste de la velocidad de alimentación con diferencial. Haga una prueba con un poco de tejido para encontrar el ajuste correcto.
CAUTION When sewing thick non-stretchable material such as denim, do not use the differential feed as it may damage the fabric.
PRECAUCION Si debe coser tejidos gruesos que no son elásticos, tales como eltejano, no trabaje con el alimentador diferencial, para no deteriorar el material.
13
Before Threading
Preparation before threading
Raise the telescoping thread tree to its highest position. Make sure that the thread holders are in alignment above the spool pins as illustrated below. ① Thread holder on thread tree ② Spool pin ③ On Two-needle models ④ Correct position
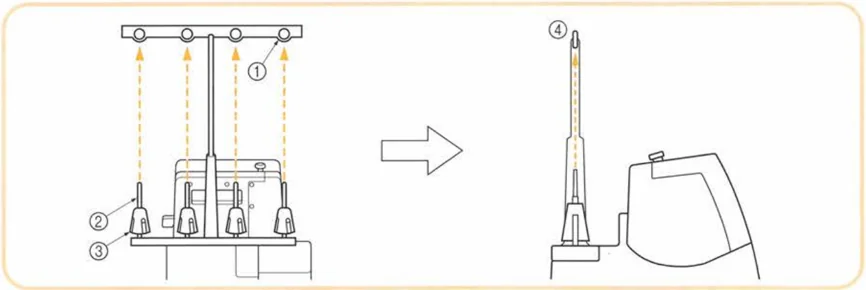
CAUTION When threading, always thread in this order: upperlooper, lowerlooper, right needle and then the left needle.
Antes del enhebrado
Preparación antes del enhebrado
Levante el árbol telescópico del hilo hasta su posición más alta. Compruebe que los corchetes de hilos quedan alineados sobre los portabobinas como se ilustra a continuación. ① Portahilos en el árbol del hilo ② Portabobina ③ En los modelos de dos agujas ④ Posición correcta
PRECAUCION Cuando haga el enhebrado, enhebre siempre en este orden: áncora superior, áncora inferior, aguja derecha y luego aguja izquierda.
14
How to use the thread spool cap
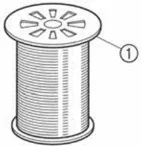
When using sewing thread spools, the thread spool cap should be used as illustrated below. Make sure that the spool notch is on the bottom. (See fig. A) ① Thread spool cap
Como utilizar el tope del carrete
Cuando utilice carretes de hilo de coses, el tope del carrete debe emplearse tal como se ilustra abajo. Asegúrese de que la muesca del carrete quede hacia abajo. (Véase fig. A) ① Tope del carrete
How to use the thread net
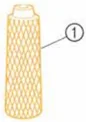
If you are sewing with loosely spun nylon thread, we recommend that you cover the spool with the net supplied to prevent the thread from slipping off the spool. Adapt the net to the shape of the spool. (See fig. B) ① Net
Como utilizar la malla para hilo
Si está cosiendo con un hilo de hilvanar, le recomendamos cubrir el carrete con la malla provista para que el hilo no se deslice del carrete. Adapte la malla a la forma del carrete. (Véase fig. B) ① Malla
Tension release button
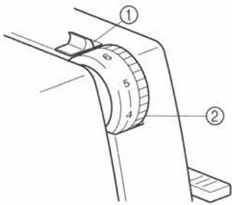
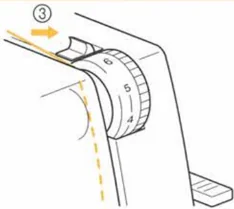
This serger is equipped with a thread tension release button. When threading, be sure to: (1) Hold the tension release button directly above the tension adjustment wheel to the right. (2) Pass the thread through the tension disc which is in the channel next to the tension adjustment dial. (3) Release the button. ① Thread tension release button ② Thread tension dial ③ Slide to the right.
Botón de liberación de la tensión
Esta máquina está equipada con un botón de liberación de la tensión del hilo. Cuando haga en hebrado, asegúrese de: (1) Retener el botón liberación de la tensión directamente encima de la rueda de ajuste de la tensión de la derecha. (2) Pase el hilo por le disco de tensión, que está en el canal al lado del disco de ajuste de la tensión. (3) Libere el botón. ① Botón de liberación de la tensión del hilo ② Disco de tensión del hilo ③ Deslícela hacia la derecha.
15
Before threading
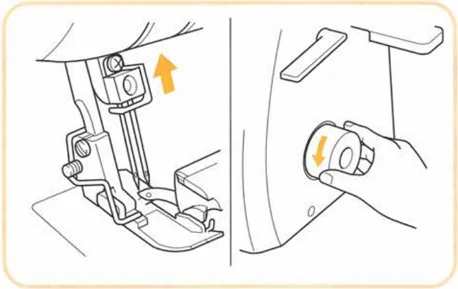
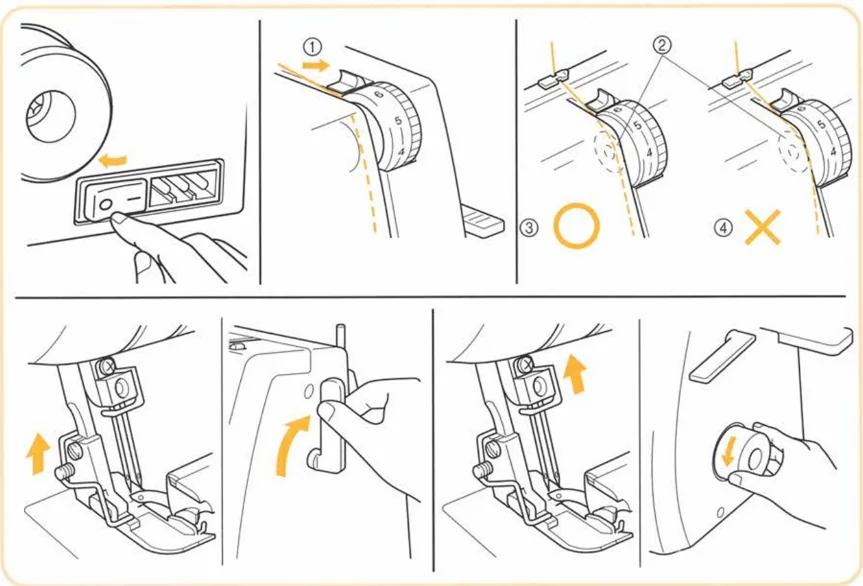
(1) Turn off the main power switch for safety. (2) Raise the presser foot using presser foot lever.
CAUTION When threading the needle, always be sure to lift the presser foot lever, and also take care to thread in the proper order.
(3) Set the needle bar in its highest position by turning the handwheel toward you. Turn the handwheel to find the easiest position for threading, and then thread the upperlooper thread, lowerlooper thread, right needle thread and then the left needle thread. The proper threading order for this serger is upperlooper, lowerlooper, right needle, and then the left needle. ① Slide to the right ② Thread tension discs ③ Correct ④ Wrong
Antes de enhebrar
(1) Apagar el interruptor principal por seguridad. (2) Levantar el prensatelas con la palanca.
PRECAUCION Al enhebrar la aguja, se debe asegurar de levantar la palanca del prensatelas, y también de enhebrar en el orden correcto.
(3) Colocar la aguja en la posición más alta, girando la polea hacia afuera. Girar la perilla hasta encontrar la posición más fácil para enhebrar, y luego enhebrar el hilo del áncora superior, él del áncora inferior, él de la aguja derecha y él de la aguja izquierda o él de la aguja de puntada de doble cadeneta (sólo en el modelo de 5 hilos), en ese orden. El orden de enhebrado correcto de esta máquina es el siguiente: áncora superior, áncora inferior, agujas derechas y luego aguja izquierda. ① Deslice hacia la derecha ② Discos de tensión de hilo ③ Correcto ④ Incorrecto
16
Threading the upperlooper
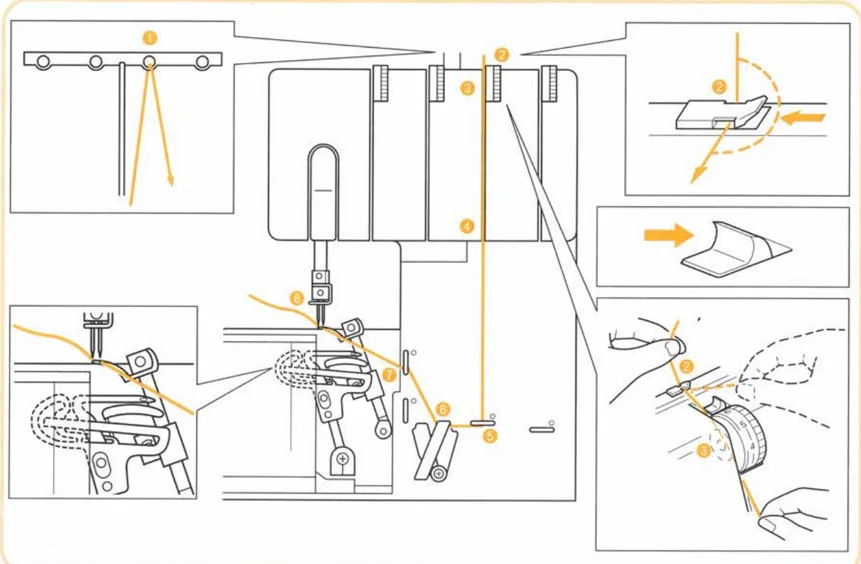
- Run the thread in the sequence illustrated, following the green color and the numbers next to each threading point.
- Open the front cover by sliding to the right and guiding the top toward you.
- Pull the thread off the spool and directly up through the thread guide on the thread tree from back to front.
- Pull the thread about an extra 15cm (6 inches) through the front of the thread tree.
- Pass the thread through the proper thread guide.
- Slide and hold the thread tension release button to the right, then pass the thread through the tension disc which is in the channel next to the green tension adjustment dial. Release the button.
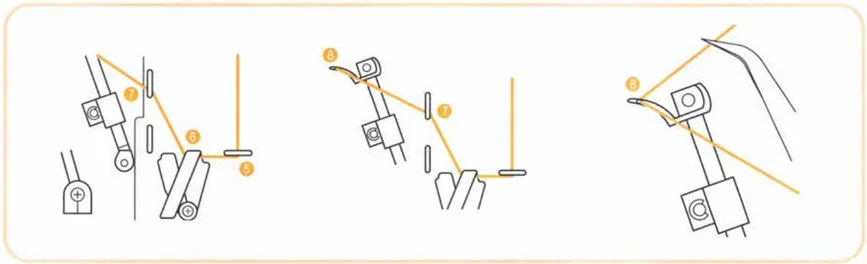
- Guide the thread down the channel and pass the thread through the threading points next to the green color marks following the numerical order in the accompanying illustration.
Enhebrado del áncora superior
- Enhebre el hilo según ilustrado en la secuencia, siguiendo el color verde y los números inscritos al lado de cada punto de enhebrado.
- Abra la tapa delantera deslizándola hacia la derecha y guiando la parte superior hacia usted.
- Saque el hilo del carrete y póngalo directamente por la guía de enhebrado del árbol de enhebrado desde detrás a delante.
- Tire del hilo otros 15 cm aproximadamente por la parte delantera del árbol de enhebrado.
- Pase el hilo por la guía de hilo correspondiente.
- Deslice y retenga el botón de liberación de la tensión del hilo hacia la derecha, y pase el hilo por el disco de tensión que es el canal situado al lado del disco de ajuste de la tensión verde. Suelte el botón.
- Guíe el hilo por el canal y pase el hilo por los puntos de enhebrado al lado de las marcas de color verde siguiendo el orden numérico de la ilustración.
17
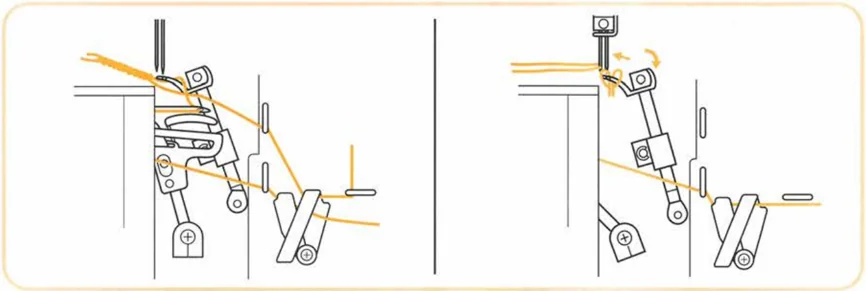
NOTE: If the upperlooper thread breaks during sewing This may be caused by the lowerlooper thread getting caught on the upperlooper. If this happens, lower the upperlooper by turning the hand wheel, remove the lowerlooper thread from the upperlooper, and re-thread the upperlooper from at least the tension disc.
NOTA: Si el hilo del áncora superior se rompe al coser. El hilo del áncora inferior se engancha a veces con el hilo del áncora superior. En este caso, baje el áncora superior girando la ruedecilla, saque el hilo del áncora inferior y vuelva a enhebrar el áncora superior por lo menos hasta el disco de tensión.
18