Epson Stylus® Photo RX500
User's Guide
Copyright Notice
All rights reserved. No part of this publication may be reproduced, stored in a retrieval system, or transmitted in any form or by any means, electronic, mechanical, photocopying, recording, or otherwise, without the prior written permission of Seiko Epson Corporation. The information contained herein is designed only for use with this Epson product. Epson is not responsible for any use of this information as applied to other equipment.
Neither Seiko Epson Corporation or its affiliates shall be liable to the purchaser of this product or third parties for damages, losses, costs, or expenses incurred by purchaser or third parties as a result of: accident, misuse, or abuse of this product or unauthorized modifications, repairs, or alterations to this product, or (excluding the U.S.) failure to strictly comply with Seiko Epson Corporation’s operating and maintenance instructions.
Seiko Epson Corporation shall not be liable for any damages or problems arising from the use of any options or any consumable products other than those designated as Original Epson Products or Epson Approved Products by Seiko Epson Corporation.
Responsible Use of Copyrighted Materials
Digital cameras, scanners, and ink jet printers, like conventional photocopiers and cameras, can be misused by improper copying or printing of copyrighted material. While some countries’ laws permit limited copying of copyrighted material in certain circumstances, those circumstances may not be as broad as some people assume. Epson encourages each user to be responsible and respectful of the copyright laws when using digital cameras, scanners, and ink jet printers.
Trademarks
Epson, Epson Stylus, and Epson Photo Stickers are registered trademarks and Epson Smart Panel, PRINT Image Matching, and the PRINT Image Matching logo are trademarks of Seiko Epson Corporation.
ColorLife, RPM, and BorderFree are registered trademarks; PremierArt, PhotoEnhance, and Resolution Performance Management are trademarks; and Epson Connection, Epson Store, and SoundAdvice are service marks of Epson America, Inc.
General Notice: Other product names used herein are for identification purposes only and may be trademarks of their respective owners. Epson disclaims any and all rights in those marks.
© 2004 Epson America, Inc. 6/04
CPD-16982R2
2
Contents
- Welcome! . . . . . . . . . . . . . . . . . . . . . . . . . . . . . . . . . . . . . . . . . . . . . . . . . . . . . . . . . . . . . . . . . . . . . . . . . . . . . . . . . . . . . . . . . . . . . . . . . . . . . . . . . . . . . . . . . . . . ........ 7
- What Your RX500 Can Do . . . . . . . . . . . . . . . . . . . . . . . . . . . . . . . . . . . . . . . . . . . . . . . . . . . . . . . . . . . . . . . . . . . . . . . . . . . . . . . . . . . . . . . . . . . . . . . . . . . . . . . . . . . . . . . . ........ 8 About Your Documentation . . . . . . . . . . . . . . . . . . . . . . . . . . . . . . . . . . . . . . . . . . . . . . . . . . . . . . . . . . . . . . . . . . . . . . . . . . . . . . . . . . . . . . . . . . . . . . . . . . . . . . . . . . . . . . . . .10 Warnings, Cautions, Notes, and Tips . . . . . . . . . . . . . . . . . . . . . . . . . . . . . . . . . . . . . . . . . . . . . . . . . . . . . . . . . . . . . . . . . . . . . . . . . . . . . . . . . . . . . . . . . . . . . . . . . . . .10 About Your Software . . . . . . . . . . . . . . . . . . . . . . . . . . . . . . . . . . . . . . . . . . . . . . . . . . . . . . . . . . . . . . . . . . . . . . . . . . . . . . . . . . . . . . . . . . . . . . . . . . . . . . . . . . . . . . . . . . . . .11
Loading Paper . . . . . . . . . . . . . . . . . . . . . . . . . . . . . . . . . . . . . . . . . . . . . . . . . . . . . . . . . . . . . . . . . . . . . . . . . . . . . . . . . . . . . . . . . . . . . . . . . . . . . . . . . . . . . . . . . . . . . . . . . .13 Loading Single Sheets . . . . . . . . . . . . . . . . . . . . . . . . . . . . . . . . . . . . . . . . . . . . . . . . . . . . . . . . . . . . . . . . . . . . . . . . . . . . . . . . . . . . . . . . . . . . . . . . . . . . . . . . . . . . . . . . . . .13 Loading Envelopes . . . . . . . . . . . . . . . . . . . . . . . . . . . . . . . . . . . . . . . . . . . . . . . . . . . . . . . . . . . . . . . . . . . . . . . . . . . . . . . . . . . . . . . . . . . . . . . . . . . . . . . . . . . . . . . . . . . . . . .17
- Copying . . . . . . . . . . . . . . . . . . . . . . . . . . . . . . . . . . . . . . . . . . . . . . . . . . . . . . . . . . . . . . . . . . . . . . . . . . . . . . . . . . . . . . . . . . . . . . . . . . . . . . . . . . . . . . . . . . . . . . . . . . . . . . . . ........
Customizing Macintosh Print Settings . . . . . . . . . . . . . . . . . . . . . . . . . . 49 Customizing OS X Print Settings . . . . . . . . . . . . . . . . . . . . . . . . . . . . . 49 Customizing OS 8.6 to 9.x Print Settings . . . . . . . . . . . . . . . . . . . . . . 50 Printing Photos on a Macintosh . . . . . . . . . . . . . . . . . . . . . . . . . . . . . 51 Printing Photos With OS X . . . . . . . . . . . . . . . . . . . . . . . . . . . . . . . . 52 Printing Photos With OS 8.6 to 9.x . . . . . . . . . . . . . . . . . . . . . . . . . . 53 Selecting Your Paper Type . . . . . . . . . . . . . . . . . . . . . . . . . . . . . . . . 54
Scanning to a Computer . . . . . . . . . . . . . . . . . . . . . . . . . . . . . . . . 57 Using Epson Smart Panel . . . . . . . . . . . . . . . . . . . . . . . . . . . . . . . . . 58 Scanning to a File . . . . . . . . . . . . . . . . . . . . . . . . . . . . . . . . . . . . . 60 Scanning From a Program . . . . . . . . . . . . . . . . . . . . . . . . . . . . . . . . 63 Adjusting the Scan Area (Marquee) . . . . . . . . . . . . . . . . . . . . . . . . . 67 Restoring Color to Old Photographs . . . . . . . . . . . . . . . . . . . . . . . . . 68 Placing Your Photo and Loading Paper . . . . . . . . . . . . . . . . . . . . . . . 68 Restoring and Saving Photos to Your Computer . . . . . . . . . . . . . . . . . 70 Restoring and Printing Photos . . . . . . . . . . . . . . . . . . . . . . . . . . . . . 73 Scanning Slides and Film . . . . . . . . . . . . . . . . . . . . . . . . . . . . . . . . 74 Scanning Using the RX500 Buttons . . . . . . . . . . . . . . . . . . . . . . . . . . 79 Scanning to Your Computer . . . . . . . . . . . . . . . . . . . . . . . . . . . . . . . 79 Scanning to E-Mail . . . . . . . . . . . . . . . . . . . . . . . . . . . . . . . . . . . . 81
Using Memory Cards . . . . . . . . . . . . . . . . . . . . . . . . . . . . . . . . . . 83 Compatible Memory Cards . . . . . . . . . . . . . . . . . . . . . . . . . . . . . . . . 83 Inserting and Removing Cards . . . . . . . . . . . . . . . . . . . . . . . . . . . . . 84 Copying Photos to Your Computer . . . . . . . . . . . . . . . . . . . . . . . . . . 85 Windows and OS 8.6 to 9.x . . . . . . . . . . . . . . . . . . . . . . . . . . . . . . . 86 Macintosh OS X . . . . . . . . . . . . . . . . . . . . . . . . . . . . . . . . . . . . . . 87
4 Contents
Printing From a Memory Card . . . . . . . . . . . . . . . . . . . . . . . 89 Printing an Index Form . . . . . . . . . . . . . . . . . . . . . . . 89 Selecting Photos To Print . . . . . . . . . . . . . . . . . . . . . 92 Printing With DPOF . . . . . . . . . . . . . . . . . . . . . . . . . 94 Choosing Print Settings . . . . . . . . . . . . . . . . . . . . . . 96 Scanning a Photo to a Memory Card . . . . . . . . . . . . . . . . . 105
Maintaining the RX500 . . . . . . . . . . . . . . . . . . . . . . 109 Cleaning the Print Head . . . . . . . . . . . . . . . . . . . . . . . 109 Replacing Ink Cartridges . . . . . . . . . . . . . . . . . . . . . . 111 Installing New Cartridges . . . . . . . . . . . . . . . . . . . . 111 Aligning the Print Head . . . . . . . . . . . . . . . . . . . . . . 115 Transporting the RX500 . . . . . . . . . . . . . . . . . . . . . . . 118
Solving Problems . . . . . . . . . . . . . . . . . . . . . . . . 121 Problems and Solutions . . . . . . . . . . . . . . . . . . . . . . 121 Copying Problems . . . . . . . . . . . . . . . . . . . . . . . . 121 Paper Feeding Problems . . . . . . . . . . . . . . . . . . . . 122 Copy Quality Problems . . . . . . . . . . . . . . . . . . . . . 122 Where To Get Help . . . . . . . . . . . . . . . . . . . . . . . . . 123 Epson Support . . . . . . . . . . . . . . . . . . . . . . . . . 123 Other Software Technical Support . . . . . . . . . . . . . . . 124
Contents 5
Requirements and Notices . . . . . . . . . . . . . . . . . . . . . . . . . . . . . . . . . . . . . 125 Windows System Requirements . . . . . . . . . . . . . . . . . . . . . . . . . . . . . . . . . . . . . 125 Macintosh System Requirements . . . . . . . . . . . . . . . . . . . . . . . . . . . . . . . . . . . . 125 Important Safety Instructions . . . . . . . . . . . . . . . . . . . . . . . . . . . . . . . . . . . . . . 126 Ink Cartridge Safety Instructions . . . . . . . . . . . . . . . . . . . . . . . . . . . . . . . . . . . . 127 LCD Panel Safety Instructions . . . . . . . . . . . . . . . . . . . . . . . . . . . . . . . . . . . . . . 128 Legal Notices . . . . . . . . . . . . . . . . . . . . . . . . . . . . . . . . . . . . . . . . . . . . . . . . . . . 129 FCC Compliance Statement . . . . . . . . . . . . . . . . . . . . . . . . . . . . . . . . . . . . . . . . 129 Declaration of Conformity . . . . . . . . . . . . . . . . . . . . . . . . . . . . . . . . . . . . . . . . 130 ENERGY STAR Compliance . . . . . . . . . . . . . . . . . . . . . . . . . . . . . . . . . . . . . . . . . 130 Epson America, Inc. Limited Warranty . . . . . . . . . . . . . . . . . . . . . . . . . . . . . . . . 131
Index . . . . . . . . . . . . . . . . . . . . . . . . . . . . . . . . . . . . . . . . . . . . . . . . . . . . . . . . . . . . . . . . . 133
6 Contents
Welcome!
The Epson Stylus® Photo RX500 combines the convenience of scanning and stand-alone copying with true photo print quality. It includes these features:
- Lets you print directly from your memory card, without even turning on your computer.
Three built-in memory card slots support CompactFlash™ Type I and II, SD (Secure Digital), miniSD, MMC (MultiMediaCard), xD-Picture Card, SmartMedia,™ Sony® Memory Stick,® Memory Stick PRO, Memory Stick Duo,™ MagicGate™ Memory Stick, and IBM® Microdrive.™
- Serves as an external card reader that lets you copy images from the memory card to your computer, or vice versa.
- Includes photo restoration features to restore faded color photos to their original brilliance.
- Includes a built-in transparency unit and film holder so you can transform your slides and 35 mm film into beautiful photographs.
- Supports DPOF (Digital Print Order Format) technology, so you can pre-select the photos you want to print while your memory card is still in the camera. (Your digital camera must also support DPOF.)
- Includes software that lets you scan and edit text, or scan a photo and attach it to an e-mail. You can also upload photographs, free of charge, to Epson’s photo-sharing web site.
- Supports Epson’s BorderFree® print technology, which lets you print without borders on a variety of popular paper sizes.
- Supports Epson’s PRINT Image Matching™ technology and the Exif (Exchangeable Image File) Print format. With both technologies, your digital camera saves specific printing information, such as gamma level and color saturation, with each JPEG or TIFF image file. Your RX500 detects that information and uses it to optimize your print.
You can print P.I.M. or Exif images directly from your memory card using the RX500’s buttons, or you can use ArcSoft® PhotoImpression,™ one of the bonus applications that comes with your RX500.
What Your RX500 Can Do
You can do a lot with your RX500! Look at the table below to find information on many of the available features.
| Original | Equipment | What you can do |
|---|---|---|
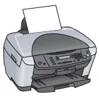
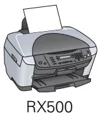
| Text document- Print text- Copy text- Scan textText Documents | RX500 | Copy: Use the RX500 as a copy machine to create duplicates of black and white or color documents. See page 19. |
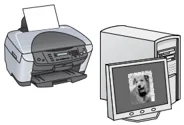
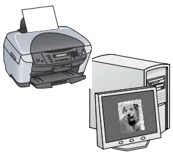
| RX500 + Computer | Copy: Use Epson Smart Panel™ Copy Center to create copies. See page 28.Print: See page 36 (Windows®) or page 43 (Macintosh®).Scan: See page 57. To scan editable text, see Smart Panel Help. | |
| Photos | RX500 | Copy: Use the RX500 as a copy machine to create duplicate photos. See page 19.Scan to memory card: Scan photos and save the image files on a memory card. See page 105. |
| RX500 + Computer | Copy: Use Epson Smart Panel Copy Center to create copies. See page 28.Print: See page 36 (Windows) or page 43 (Macintosh).Scan: See page 57.Scan to computer or e-mail: Scan using the RX500 buttons. See page 79. |
8 Welcome!
| Original | Equipment | What you can do |
|---|---|---|
| Film and Slides | RX500 + Computer | Scan: Scan film or slides with Epson® Scan. See page 60.Print photos: Scan and print photos from film using the Reprint Photos option in Epson Smart Panel. See Smart Panel Help. |
| Memory Card Photos | RX500 | Print: See page 89. |
| RX500 + Computer | Use the RX500 as a card reader: Save backups of memory card photos when you insert a memory card in the RX500 and connect it to your computer. See page 85. | |
| Faded Photos, Film, and Slides | RX500 + Computer | Scan and restore color: Restore color and fix other flaws using Epson Scan. See page 68.Print and restore color: Restore color when scanning and printing with the Reprint Photos option. See page 73. |
| Fax | RX500 + Computer | Fax: Use Epson Smart Panel and your own fax software. See Smart Panel Help. |
What Your RX500 Can Do 9
About Your Documentation
To set up your RX500 and install its software, see the Start Here sheet.
For easy instructions on how to copy a 4 × 6-inch photo or print images from your digital camera’s memory card, see the How to Copy and Print guide.
This book contains system requirements, important safety information, your warranty, and instructions on:
■ Loading paper
■ Copying with and without a computer
■ Using the printer software for basic and advanced printing, including instructions for creating borderless prints
■ Using the scanning software to produce high-quality scans of all your photos and documents
■ Using a memory card, including supported cards and the correct way to insert and remove a card
■ Maintaining the RX500
■ Solving basic problems
At the end of the book, you’ll find an index.
For specifications and more detailed instructions on using and maintaining the RX500, see your on-screen Reference Guide. To view it, just double-click its icon on your desktop.
Warnings, Cautions, Notes, and Tips
Please follow these guidelines:
Warnings must be followed carefully to avoid bodily injury.
Cautions must be observed to avoid damage to your equipment.
Notes contain important information about your RX500.
Tips contain hints for better copying, scanning, and printing.
10 Welcome!
About Your Software
Your Epson CD-ROM includes all the software you need to scan, copy, or print from your computer. See the Start Here sheet for installation instructions.
- Your printer driver runs your printer and lets you control how your documents look. You can't print from your computer without it.
- Your scanner software (Epson Scan) runs your scanner and lets you control how your scans look. You can't scan from your computer without it.
Tip: It's a good idea to check Epson's support website periodically for free updates to your printer and scanner software. Visit http://support.epson.com. Download instructions are posted for your convenience.
- Your on-screen Reference Guide gives you complete information about your RX500. To view the on-screen Reference Guide, you need a browser, such as Microsoft® Internet Explorer® 4.0 or later, Netscape Navigator® 3.0 or later, or Safari™ 1.0 or later. If you're using a different browser, the pages may not display correctly. (A browser is not included on the Epson CD-ROM.)
Note: You can view the Reference Guide by double-clicking the SP RX500 Reference Guide icon on your desktop.
- Your Epson CD-ROM also includes these great tools:
- Epson Smart Panel, an easy, step-by-step program for scanning, copying, printing, and more.
- ArcSoft® PhotoImpression®, an easy-to-use photo management program that lets you edit, retouch, and enhance images, or print your images with templates, frames, and borders.
About Your Software 11
12 Welcome!
Loading Paper
Follow the guidelines below to load single sheets in the RX500. For a list of Epson papers and ordering information, see the inside back cover of this manual.
Loading Single Sheets
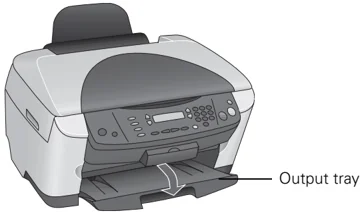
- Open the output tray.
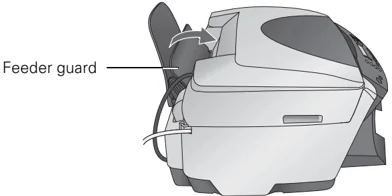
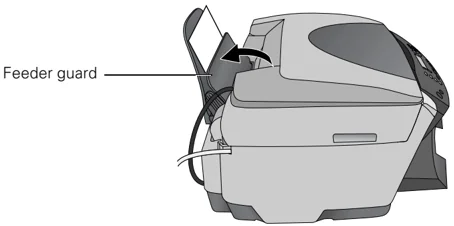
- Flip the feeder guard forward.
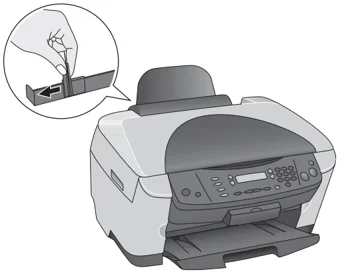
- Pinch the sides of the left edge guide together as you slide the guide all the way to the left.
-
Insert your paper against the right edge of the sheet feeder, behind the tab. Don’t place the paper in front of the feeder guard.
-
Press the sides of the left edge guide together and slide against the paper (but not too tightly).
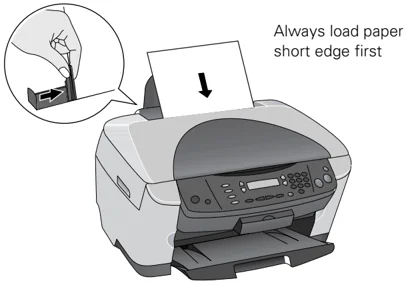
Always load paper short edge first
14 Loading Paper
- Flip the feeder guard back over the paper.
Also be sure to:
- Load all paper with the printable side up. It’s usually brighter or whiter.
- Always load the short edge first, even when printing on 4 × 6-inch paper.
- Don’t load paper above the arrow on the left edge guide.
- Load letterhead or preprinted paper top edge first.
- Don’t load paper above the arrow on the left edge guide.
To load Epson ink jet papers, follow the guidelines below. Check the paper package for additional instructions.
| Paper type | Loading capacity |
|---|---|
| Epson Premium Bright White PaperEpson Photo Quality Ink Jet Paper | 80 sheets |
| Epson Photo Quality Ink Jet Cards | 30 cards |
| Epson Ink Jet Transparencies | 30 sheets |
Loading Single Sheets 15
| Paper type | Loading capacity |
|---|---|
| Epson Matte Paper Heavyweight | 20 sheets |
| PremierArt™ Matte Scrapbook Photo Paper for Epson | |
| Epson Photo Paper | |
| Epson All-Purpose Glossy Photo Paper | |
| Epson Glossy Photo Paper | |
| Epson Premium Glossy Photo Paper | |
| Epson Premium Semigloss Photo Paper | |
| Epson Semigloss Scrapbook Photo Paper | |
| Epson Glossy Photo Greeting Cards | 10 cards |
| Epson Iron-On Transfer Paper | 1 sheet |
| Epson Photo Quality Self Adhesive Sheets | |
| Epson Double-Sided Matte Paper | |
| Epson Premium Luster Photo Paper | |
| Epson ColorLife® Photo Paper | |
| Epson Photo Stickers® |
16 Loading Paper
Loading Envelopes
- Open the output tray.
 Output tray
- Flip the feeder guard forward.
 Feeder guard
- Load up to 10 envelopes at a time against the right edge of the sheet feeder, beneath the tab. Always load envelopes short edge first, with the flap edge to the left and the printable side up.
Don't place the envelopes in front of the feeder guard.
Loading Envelopes 17
- Press the sides of the left edge guide together and slide it against the envelopes (but not too tightly).
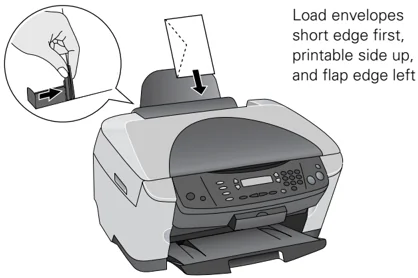
Load envelopes short edge first, printable side up, and flap edge left
Note: For best results, press each envelope flat before loading, or load one envelope at a time. Avoid envelopes that are too thin; they may curl during printing.
Select the following settings when printing on envelopes:
- Plain paper as the Type (Windows) or Media Type (Macintosh) setting
- Landscape as the Orientation setting
- The correct envelope size as the Size (Windows) or Paper Size (Macintosh) setting
For instructions on selecting these settings, see:
- “Printing in Windows” on page 36
- “Printing on a Macintosh” on page 43
18 Loading Paper
Copying
Follow the instructions in this chapter to use your RX500 as a photocopier, or to copy with a computer using the Epson Smart Panel software.
■ “Copying Without a Computer” below
■ “Copying With a Computer” on page 28
Copying Without a Computer
-
Open the scanner lid.
-
Place your photo or document face down on the glass, in the upper left corner. Move your document about 0.1 inch from the top and side edge so your entire document is scanned.
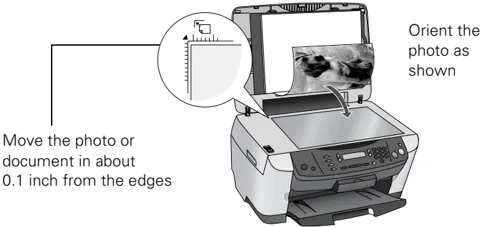
Move the photo or document in about 0.1 inch from the edges
Orient the photo as shown
If you place your photo flush against the guides, the edges next to the guides may not be copied.
19
- Close the scanner lid.
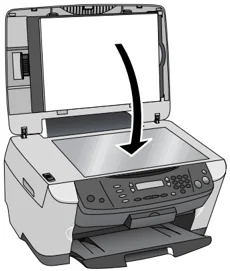
To copy a thick document such as a book, you can remove the scanner lid. Open the scanner lid completely. Then disconnect the cord from the TPU connector and pull the lid straight up. Turn on the RX500 and gently press down the original to keep it flat on the scanner glass as you scan. When you’re finished, be sure to turn off the RX500 before replacing the scanner lid and plugging in the connector.
- Open the output tray.
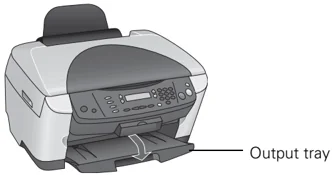
Output tray
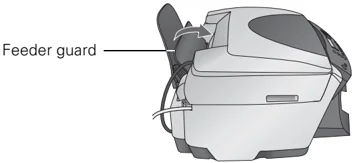
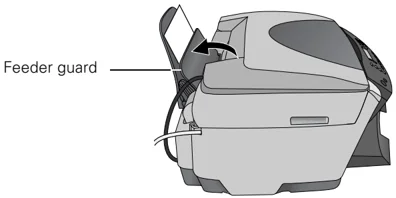
- Flip the feeder guard forward.
Feeder guard
20 Copying
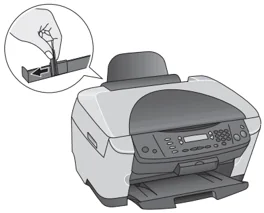
- Pinch the sides of the left edge guide together as you slide the guide all the way to the left.
-
Insert your paper against the right edge of the sheet feeder, behind the tab. Don’t place the paper in front of the feeder guard.
-
Press the sides of the left edge guide together and slide against the paper (but not too tightly.
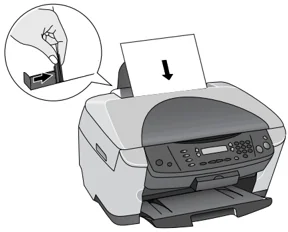
- Flip the feeder guard back over the paper.
Feeder guard
- Press the Copy button to set the RX500 to copy mode.
Copying Without a Computer 21
- Make sure you see Standard at the top of the LCD screen. This prints a photo or document with borders. If you want to select a different setting, such as a photo with no borders, press the Menu button, then see “Changing the Copy Layout” on page 24.
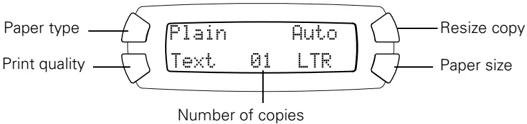
After a few seconds, the current copy settings display on the LCD screen:
-
Use the RX500 numeric keypad to select the number of copies you want to print.
-
Press the top left button to choose your paper type:
| Use this paper type | When you’ve loaded |
|---|---|
| Plain | Plain paperEpson Premium Bright White PaperEpson Photo Quality Ink Jet PaperEpson Photo Quality Ink Jet CardsEpson Iron-on Transfer PaperEpson Photo Quality Self Adhesive Sheets |
| Glossy | Epson Glossy Photo PaperEpson Photo PaperEpson All-Purpose Glossy PaperEpson Glossy Photo Greeting Cards |
| Prem. Glossy | Epson Premium Glossy Photo PaperEpson Premium Semigloss Photo PaperEpson Photo Stickers |
| Prem. Luster | Epson Premium Luster Photo Paper |
| Matte | Epson Matte Paper HeavyweightEpson Double-Sided Matte PaperPremierArt Matte Scrapbook Photo Paper for Epson |
| ColorLife | Epson ColorLife Photo PaperEpson Semigloss Scrapbook Photo Paper |
22 Copying
- Press the bottom left button to choose print quality.
| Choose this quality setting | When you want to |
|---|---|
| Draft | Make copies quickly, and copy quality isn’t important |
| Text | Print text and line art |
| Photo | Print photos at high resolution |
| Best | Print photos and other documents at highest resolution |
- Press the top right button to set the size of your printed copy.
| Choose this setting | When you want to |
|---|---|
| Actual | Print the image at its original size |
| Auto Fit Page | Reduce or enlarge the image to fit the selected paper size |
| Letter → 4 × 64 × 6 → LetterLetter → 5 × 75 × 7 → Letter4 × 6 → 8 × 108 × 10 → 5 × 7 | Convert the original document size (to the left of the arrow) to the finished copy size (to the right of the arrow) |
- Press the bottom right button to select the size of the paper you loaded.
| Choose this setting | When you’ve loaded paper this size |
|---|---|
| LTR | Letter |
| 4 × 6 | 4 × 6-inch |
| 5 × 7 | 5 × 7-inch |
| 8 × 10 | 8 × 10-inch |
- Press the ◇ Color button (for color copies) or ◇ B&W button (for black and white copies). Your photo or document is copied.
Never open the scanner lid while copying, or your copies might not look right.
Copying Without a Computer 23
To cancel a copy job in progress, press the ⊗ Stop button. Canceling appears on the LCD screen and your page is ejected.
Changing the Copy Layout
The RX500 offers you several layouts for copying.
- Press the Menu button to display the Copy Menu on the LCD screen.
Note: This menu is only available in Copy mode. If you don’t see Copy Menu on the screen, press the Copy button, then press the Menu button.
-
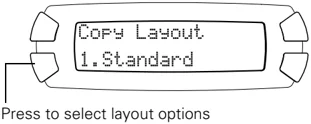
Press the OK button. You see this screen:
-
Press the bottom left button (next to Standard) to select one of the options in the table below.
-
After you choose your copy layout, press OK.
Press to select layout options
24 Copying
| Copy Layout setting | Result |
|---|---|
| RepeatPrints an image multiple times on one sheet; select 4, 9, or 16 images per sheet, or Auto to print your image as many times as it will fit (prints full-size; best for photos with small margins) | |
| PosterPrints the original image on separate sheets (4, 9, or 16) that you can paste together to make a large poster. | |
| 2-upCopies two originals onto one sheet | |
| 4-upCopies four originals onto one sheet | |
| MirrorCopies a mirror image of your photo onto transfer paper so that you can iron it onto a shirt or other cloth article | |
| Wallet PhotoPrints nine wallet-size copies of the photo on the page |
- BorderFree is only available on selected Epson photo papers.
-
- If you notice reduced print quality at the bottom of your copy, use the standard setting.
Copying Without a Computer 25