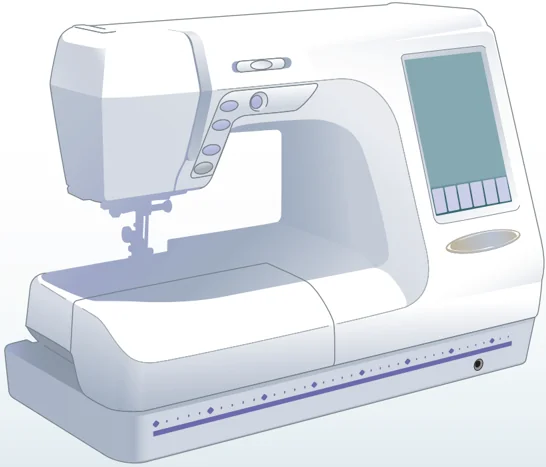
Memory Craft 10001
Instruction book
JANOME

Table of Contents
-
GETTING READY TO SEW ........ 2
-
Name of Parts ........ 2
-
Standard Accessories and Storage ........ 4
-
Detachable Extension Table ........ 6
-
Connecting the Power Supply ........ 7
-
Machine Operating Buttons ........ 8
-
Winding the Bobbin ........ 10
-
Threading the Machine ........ 14
-
Drawing Up the Bobbin Thread ........ 17
-
Changing Needles ........ 18
-
Raising the Presser Foot ........ 20
-
Knee Lifter ........ 20
-
Removing and Attaching the Presser Foot ........ 21
-
Attaching the Presser Foot ........ 21
-
Various Presser Feet and Their Uses ........ 22
-
Pressure Dial ........ 24
-
To Lower or Raise the Feed Dog ........ 24
-
MACHINE SETTINGS ........ 25
-
Common Setting Mode ........ 26
-
Ordinary Sewing Setting Mode ........ 28
-
Professional Mode Setting ........ 29
-
Mode Selection Keys ........ 31
-
ORDINARY SEWING ........ 32
-
Utility Stitches ........ 33
-
Straight Stitches ........ 33
-
Zigzag Sewing ........ 48
-
Buttonholes ........ 56
-
Sensor buttonholes ........ 58
-
Corded buttonhole ........ 62
-
Welted buttonhole ........ 64 Automatic
GETTING READY TO SEW
Name of Parts
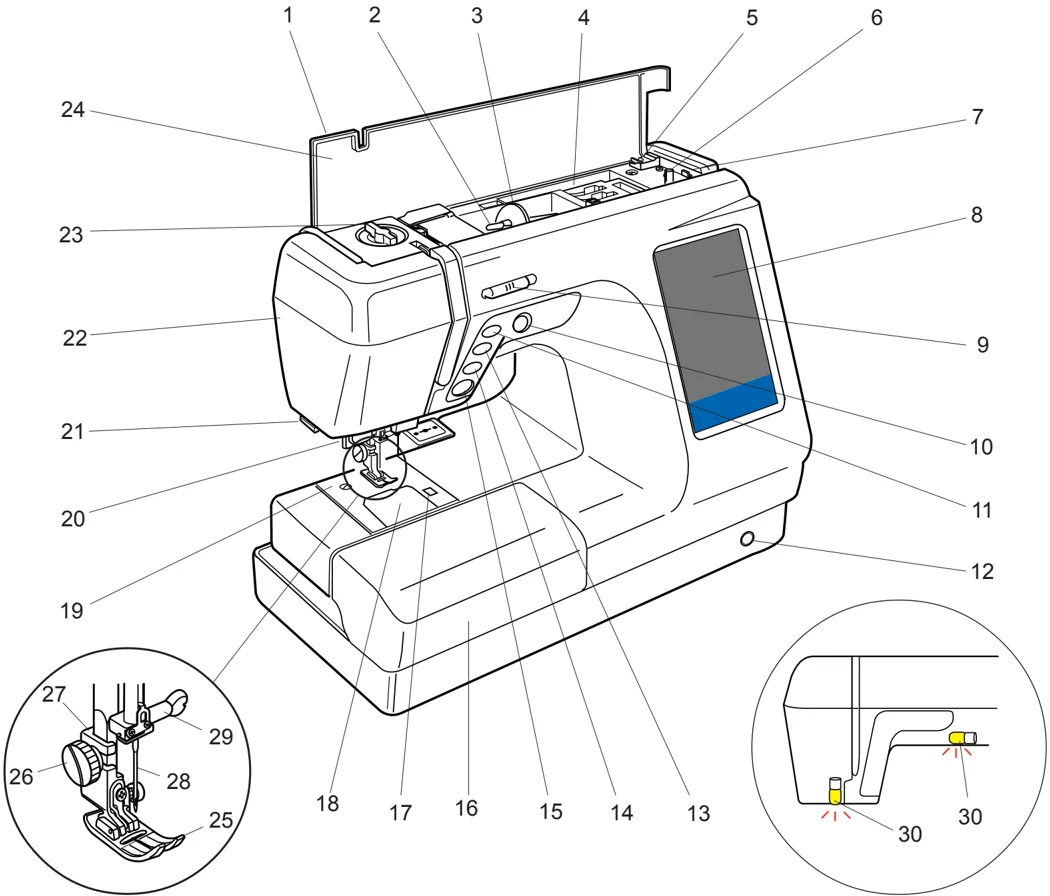
1 Top Cover 2 Spool Pin 3 Spool Holder (Large) 4 Foot Storage Compartment 5 Bobbin Thread Cutter 6 Bobbin Winder Spindle 7 Bobbin Winder Stopper 8 Visual Touch Screen 9 Speed Control Lever 10 Auto Needle Threader Button 11 Up/Down Needle Button 12 Knee Lifter Socket 13 Auto-Lock Button 14 Reverse Button 15 Start/Stop Button 16 Extension Table (Accessory Box) 17 Hook Cover Plate Release Button 18 Hook Cover Plate 19 Needle Plate 20 Automatic Needle Threader 21 Thread Cutter & Thread Holder 22 Face Plate 23 Pressure Dial 24 Flip-Top Quick Reference Chart 25 Zigzag Foot A 26 Thumbscrew 27 Foot Holder 28 Needle 29 Needle Clamp Screw 30 Dual Sewing Lights
2
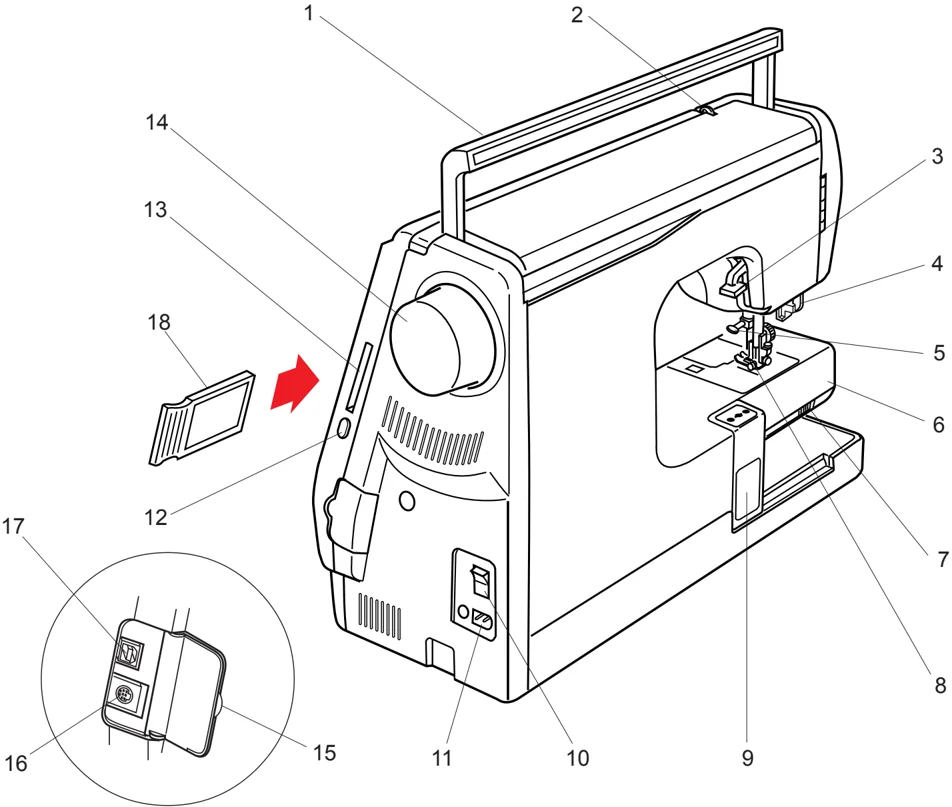
1 Carrying Handle 2 Thread Take-Up Lever 3 Presser Foot Lifter 4 Buttonhole Lever 5 Needle Clamp Screw 6 Free Arm 7 Drop Feed Lever 8 Presser Foot and Holder 9 Carriage (For Embroidery) 10 Power Switch 11 Machine Socket 12 Card Eject Button 13 PC Card Slot 14 Handwheel 15 Connector Cover 16 RS-232C Connector 17 USB Connector 18 PC Design Card (Optional item)
3
Standard Accessories and Storage
1 Embroidery Hoop (A) (With Template) 2 Embroidery Hoop (B) (With Template) 3 Foot Control 4 Knee Lifter 5 Template Sheets (for Built-in Designs) 6 Power Supply Cord
7 Hard Cover (Carrying Case)
8 Automatic Buttonhole Foot R 9 Satin Stitch Foot F 10 Embroidery Foot P 11 Zigzag Foot A (comes attached to the machine) 12 Blind Hem Foot G 13 Overedge Foot C 14 Foot Holder (comes attached to the machine)
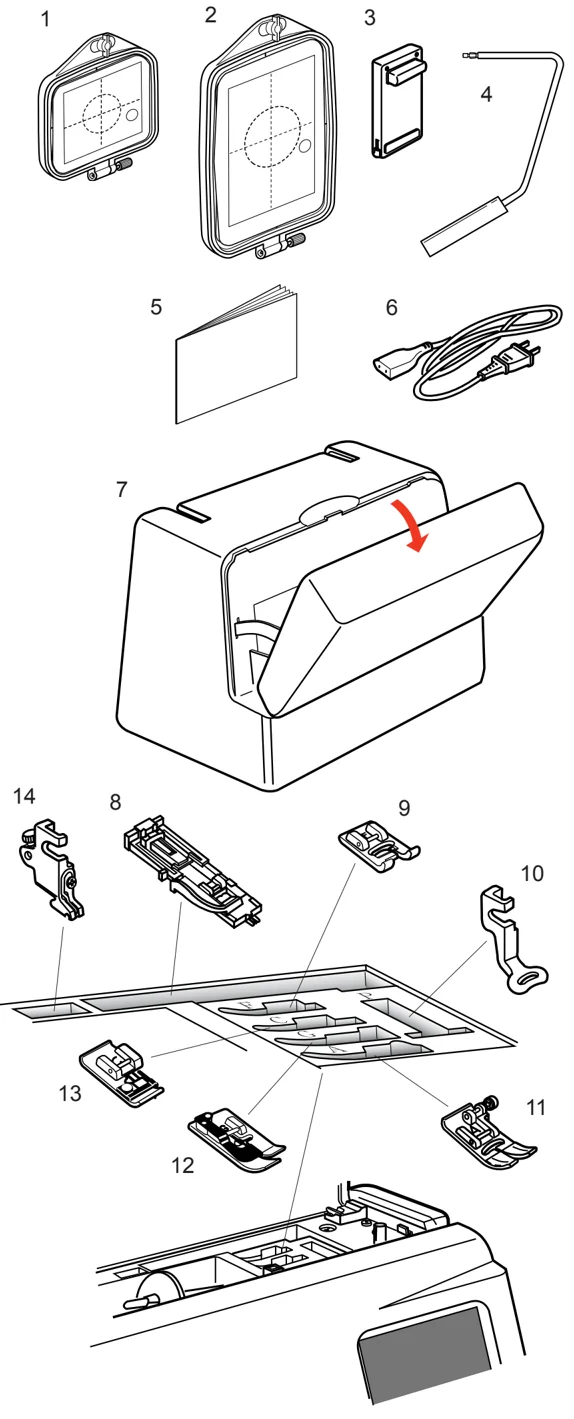
1 1/4" Seam Foot O 2 Cording Foot H 3 Rolled Hem Foot D 4 Zipper Foot E 5 Overcasting Foot M 6 Button Sewing Foot T 7 Walking Foot 8 Screwdriver 9 Set of Needles 10 Quilting Bar for Walking Foot 11 Scissors 12 Spool Pin Felt 13 Lint Brush 14 Additional Spool Pin 15 Seam Ripper 16 Spool Holder (Small) 17 Bobbins 18 Button Shank Plate 19 Cloth Guide 20 Basting/Darning Foot P-2 21 Quilting Bar 22 Instruction Book 23 Instructional Movie CD-ROM
 Extension Table For Accessory Storage
Sewing accessories are stored in the Extension Table. To open, lift the cover toward you as illustrated.
5
Detachable Extension Table
For Free Arm sewing
To remove, lift out the Extension Table toward you as illustrated. 1 Extension Table
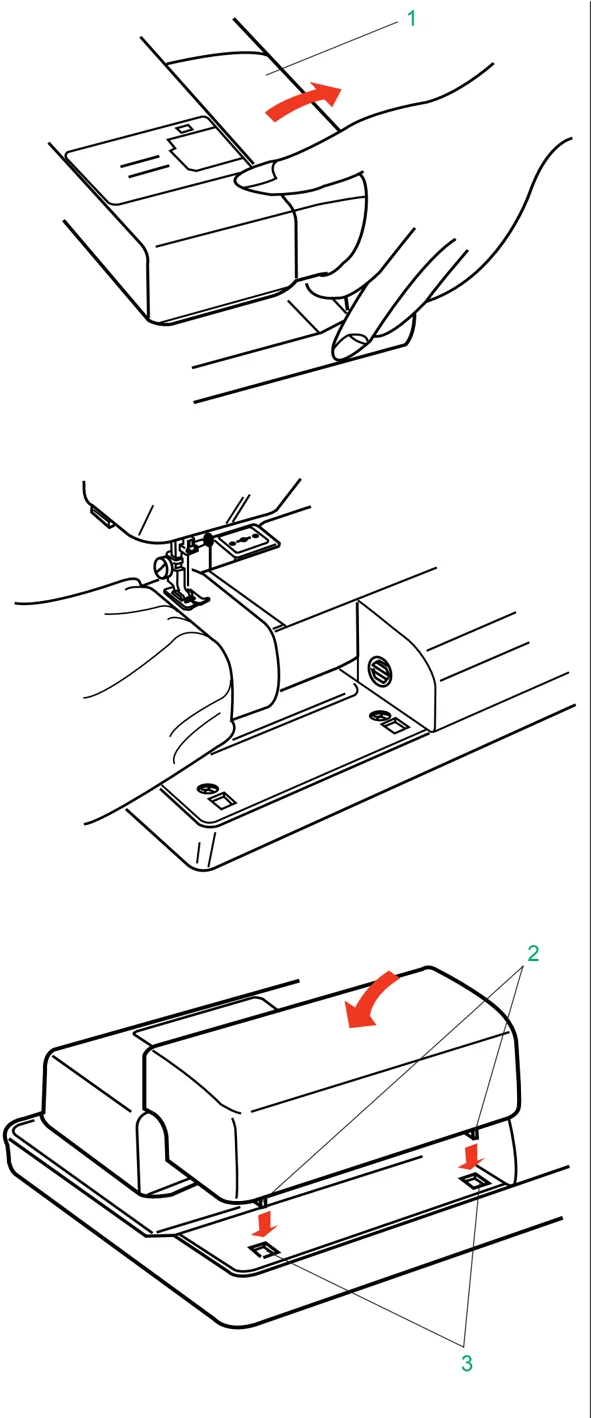
Free Arm sewing can be used for:
- stitching sleeves, waistbands, pants legs or any tubular garment area.
- darning socks or mending knees, elbows or children’s wear.
For Flat-bed sewing
Position the Tabs on the Base Tab Holes and push down gently. 2 Tabs 3 Base Tab Holes
6
Connecting the Power Supply
The Memory Craft 10001 is equipped with an auto voltage system, which automatically adjusts the equipment to any local power supply voltage between 100 and 240V, 50/60Hz.
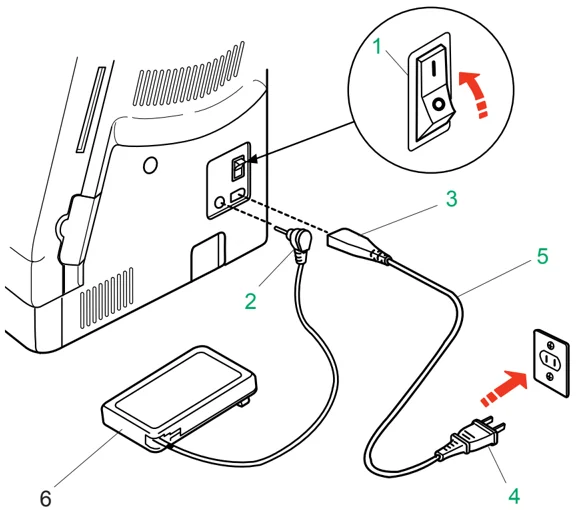
Turn off the Power Switch, insert the Foot Control Plug and Machine Plug into the machine, then Power Supply Plug into the wall outlet in this order. Turn on the Power Switch.
1 Power Switch 2 Foot Control Plug 3 Machine Plug 4 Power Supply Plug 5 Power Supply Cord 6 Foot Control
NOTES:
- Make sure to use the Power Supply Cord that came with the machine.
- If you turn off the power switch, wait 5 seconds before turning it on again.
- The Foot Control cannot be used in Embroidery Mode.
For Your Safety:
- While in operation, always keep your eyes on the sewing area, and do not touch any moving parts such as the thread take-up lever, handwheel or needle.
- Always turn off the Power Switch and unplug from the power supply:
- when leaving the machine unattended.
- when attaching or removing parts.
- when cleaning the machine.
- Do not place anything on the Foot Control.
Operating Instructions:
- The symbol "O" of a switch indicates the "off" position of a switch.
- For appliances with a polarized plug (one blade wider than the other). To reduce the risk of electric shock, this plug is intended to fit in a polarized outlet only one way. If it does not fit fully in the outlet, reverse the plug. If it still does not fit, contact a qualified electrician to install the proper outlet. Do not modify the plug in any way.
7
Machine Operating Buttons
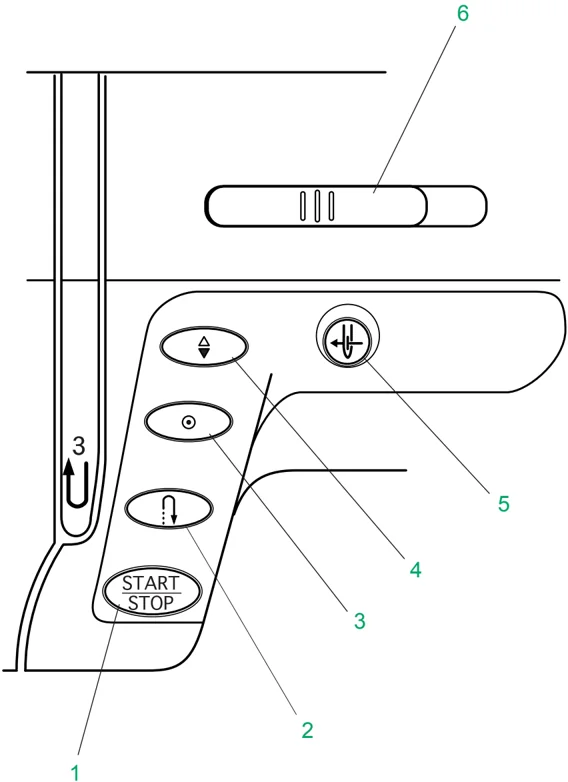
1 Start/Stop Button
Press this button to start or stop the machine. This button can be used either in Ordinary Sewing Mode or Embroidery Mode. In Ordinary Sewing Mode, the machine starts running slowly for the first few stitches, it then runs at the speed set by the Speed Control Lever.
NOTE:
- The Start/Stop Button cannot be used when the foot control is connected to the machine.
2 Reverse Button
Patterns 1, 2, 8 and 9: The machine will sew in reverse while the Reverse Button is pressed. All other patterns: The machine will immediately sew locking stitches and automatically stop when the Reverse Button is pressed.
3 Auto-Lock Button
Patterns 1, 2, 8 and 9: The machine will immediately sew locking stitches and automatically stop when the Auto-Lock Button is pressed. All other patterns: The machine will sew locking stitches at the end of the current pattern and automatically stop when the Auto-Lock Button is pressed.
4 Up/Down Needle Button
Press this button to bring the needle up or down.
5 Auto Needle Threader Button
Press this button to thread the needle, and simply follow the step-by-step instruction diagrams displayed on the Visual Touch Screen.
6 Speed Control Lever
Sewing speed can be controlled by the Speed Control Lever.
8
 Controlling Sewing Speed
Speed Control Lever
You can limit the sewing speed by the Speed Control Lever according to your sewing needs. To increase sewing speed, slide the lever to the right. To decrease sewing speed, slide the lever to the left.
 Foot Control
Sewing speed can be varied by pressing on the Foot Control. The harder you press the Foot Control, the faster the machine runs.
NOTE:
- The machine runs at the maximum speed set by the Speed Control Lever when the foot control is being fully depressed.
Operating Instructions:
Foot controller Model 21371 is for use with sewing machine model MC10001.
Warning
- Is something stuck in machine?
- Is cloth too thick?
- Is needle bent?
Check the above and restart
NOTE:
- The Memory Craft 10001 is equipped with an automatic shutdown safety feature to prevent overheating. Follow safety instructions that appear on the Visual Touch Screen.
9
Winding the Bobbin
Removing the bobbin
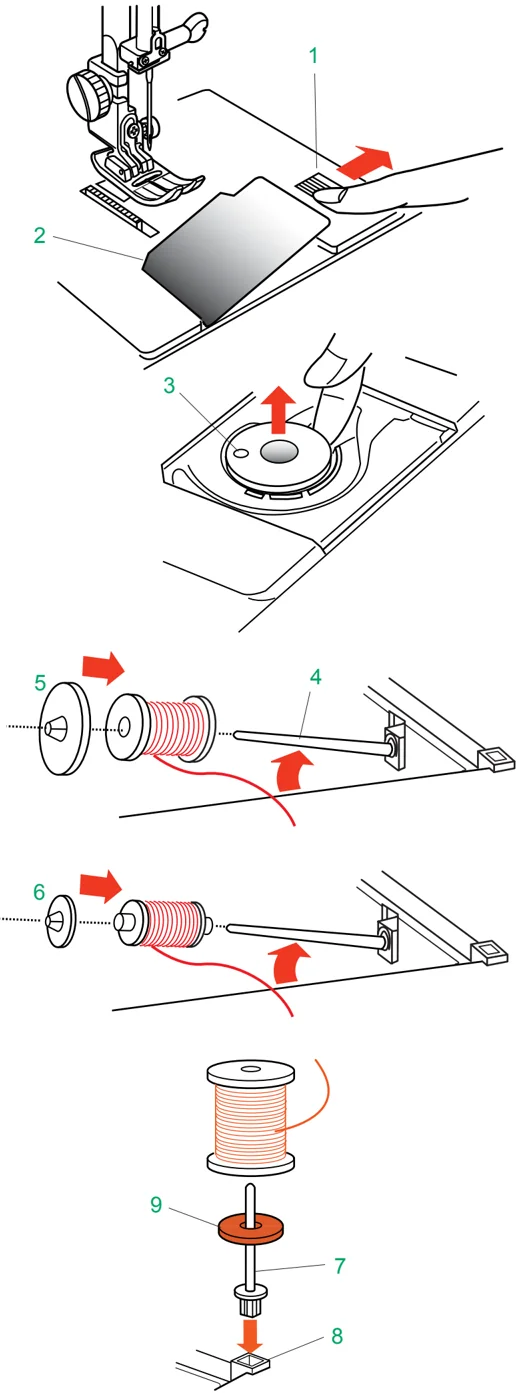
Slide the Hook Cover Plate Release Button to the right, and remove the Hook Cover Plate. Lift out the Bobbin from the Bobbin Holder.
1 Hook Cover Plate Release Button 2 Hook Cover Plate 3 Bobbin
Setting the spool of thread
Lift up the Spool Pin. Place the spool of thread on the Spool Pin with the thread coming off the spool as shown. Attach the Large Spool Holder, and press it firmly against the spool of thread.
NOTE:
- Use the Small Spool Holder to hold narrow or small spools of thread.
4 Spool Pin 5 Large Spool Holder 6 Small Spool Holder
Additional spool pin
Use the Additional Spool Pin when you need to wind the bobbin without unthreading the machine while working on a sewing project. The Additional Spool Pin is also used for twin needle sewing.
Insert the Additional Spool Pin into the Hole beside the horizontal spool pin. Place the Felt on the spool pin and place a spool of thread on it as shown.
7 Additional Spool Pin 8 Hole 9 Felt
10
Threading for Bobbin Winding
Hold the upper thread with both hands and place it downward into the Slit. Guide the thread around the Thread Guide following the dashed blue line as shown in the diagram.
1 Slit 2 Thread Guide
Thread through the hole in the Bobbin from the inside to the outside. Put the Bobbin on the Bobbin Winder Spindle, and push it to the right.
3 Bobbin 4 Bobbin Winder Spindle
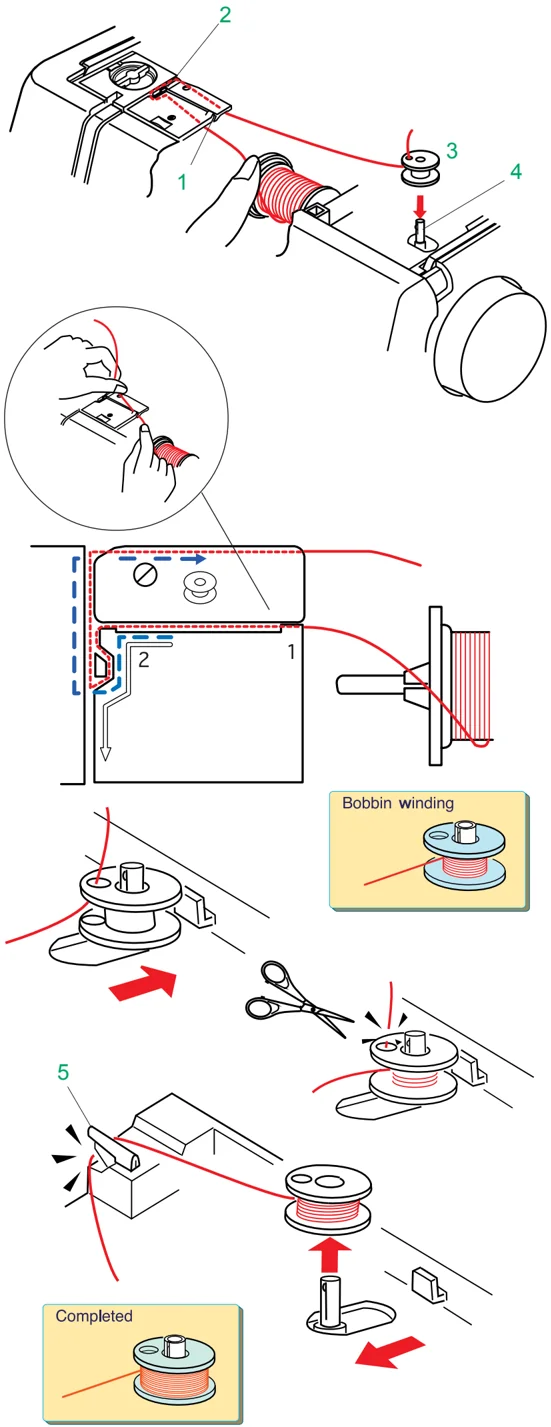
The Visual Touch Screen shows "Bobbin Winding". Hold the free end of the thread in your hand and depress the foot control.
Stop the machine after a few rotations have been made, and cut the thread close to the hole in the Bobbin. Depress the Foot Control again. When the Bobbin is fully wound, it will stop automatically.
Release the Foot Control and return the Bobbin Winder Spindle to its original position by moving the spindle to the left, and cut the thread with the Bobbin Thread Cutter as shown.
5 Bobbin Thread Cutter
NOTES:
- The machine will not sew until the spindle has been returned to the left position.
- You can use either the Foot Control or the Start/Stop Button to wind the Bobbin.
- The motor will stop automatically when the Bobbin is fully wound even if the Foot Control is still being depressed or if the Start/Stop Button has not been pressed again, in order to prevent any malfunction.
Inserting the bobbin
Place the Bobbin in the Bobbin Holder with the Thread running off in the counterclockwise direction.
1 Thread
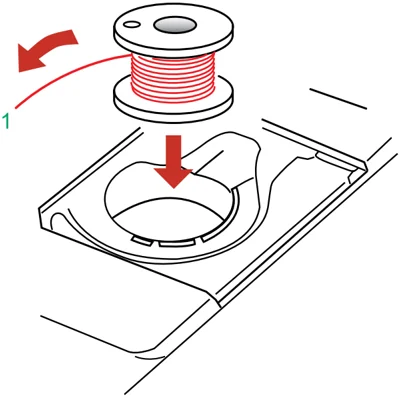
Guide the thread into Front Notch on the front of the Bobbin Holder. Draw the thread to the left, sliding it between the tension spring blades.
2 Front Notch
12
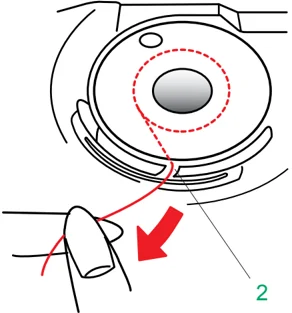
 Continue to draw the thread lightly until the thread slips into Side Notch.
1 Side Notch
Pull out about 10 cm (4") of thread to the rear.
Refer to the Threading Chart shown on the Hook Cover Plate. Reattach the Hook Cover Plate.
2 Threading Chart
13
Threading the Machine
Raise the Presser Foot Lifter. Press the Up/Down Needle Button to raise the needle to its highest position.
Hold the upper thread with both hands as shown and place it downward into the Slit.
Draw the thread around the Thread Guide following the solid yellow line as shown in the diagram.
1 Slit 2 Thread Guide
Then draw the thread down around the Check Spring Holder.
Firmly draw the thread up to the Take-up Lever and down into its eye from the right to the left.
3 Check Spring Holder 4 Take-up Lever
Then draw it down through the Lower Thread Guide.
Slide the thread behind the Needle Bar Thread Guide on the left.
5 Lower Thread Guide 6 Needle Bar Thread Guide
Thread the needle from front to back by hand or use the Automatic Needle Threader.
NOTES:
- Memory Craft 10001 is equipped with a thread breakage sensor. If the machine is run without thread, it automatically stops after about 10 strokes.
14
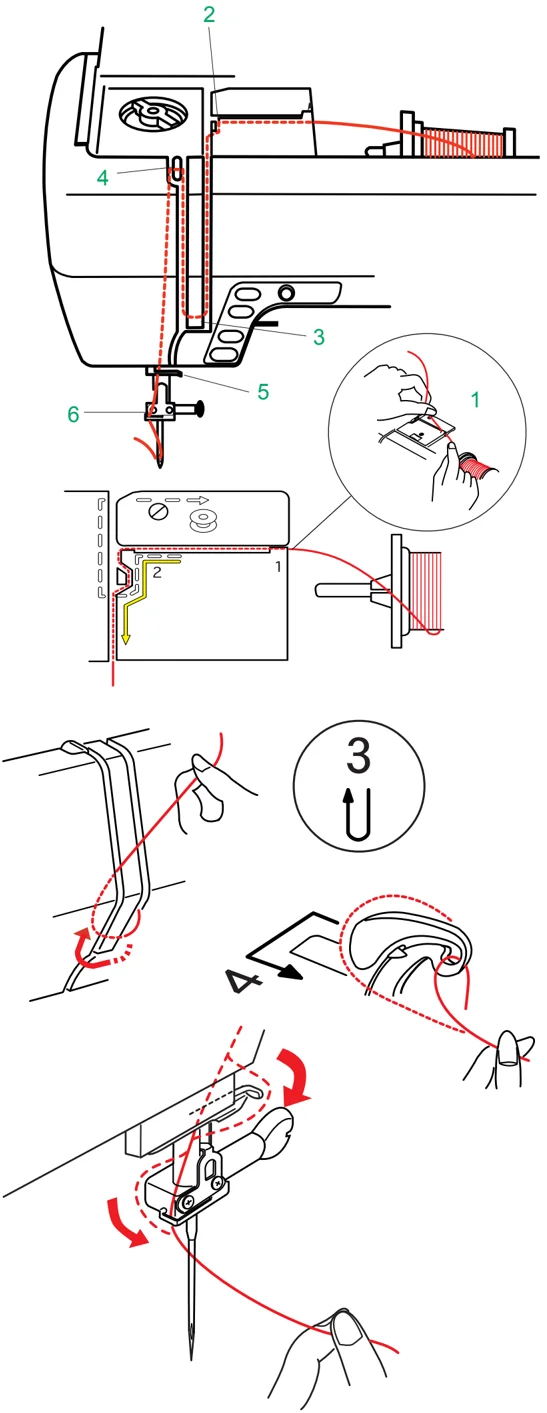
Using the Automatic Needle Threader
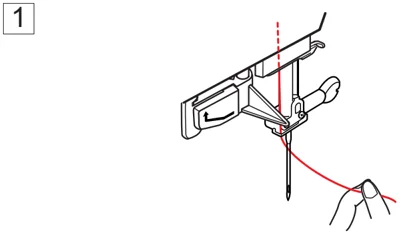
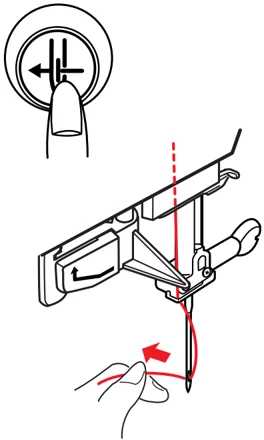
1 Hold the end of the needle thread gently.
NOTE:
- Make sure to raise the needle by pressing the Up/Down Needle Button.
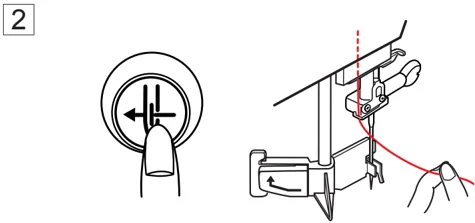
2 Press the Auto Needle Threader Button. The threader lowers automatically and the hook comes out through the needle eye from behind it.
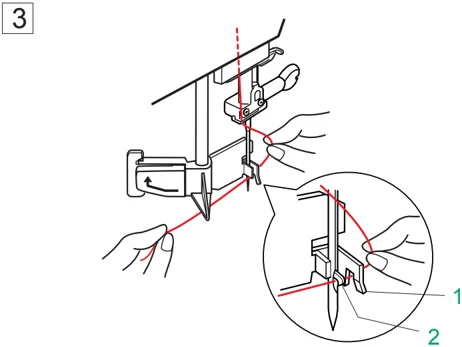
3 Pull the thread down around the Thread Guide, then pass the thread from the right and under the Hook as shown.
1 Thread Guide 2 Hook
NOTE:
- The Visual Touch Screen will show step-by-step instruction diagrams.
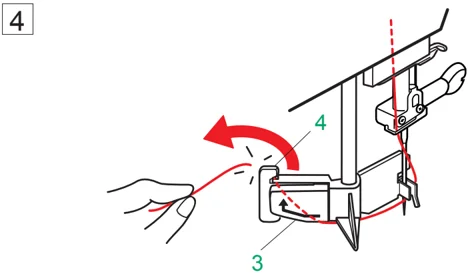
4 Draw the thread to the left and slip it into the slit of the Thread Holder from the bottom and cut the thread with the Thread Cutter as shown.
3 Thread Holder 4 Thread Cutter
NOTES:
- You may hold the thread end by your hand when threading certain kinds of threads.
- When threading filament thread, hang the thread end on the Thread Holder on the face plate.
5 Thread Holder
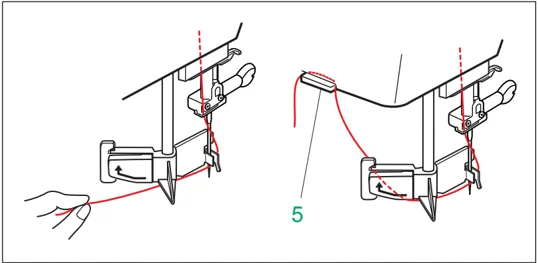
5

5 Press the Auto Threader Button again. The threader goes up automatically and pulls the thread out through the needle eye. Pull the loop of thread to the back.
NOTES:
- The Automatic Needle Threader works well on the needles Nos.11-14, sewing threads Nos.60-120 and Janome embroidery threads.
- Thick threads, Nos. 20 and 30, cannot be used.
CAUTION:
- To use the Automatic Needle Threader properly, always make sure to pay attention the following instructions.
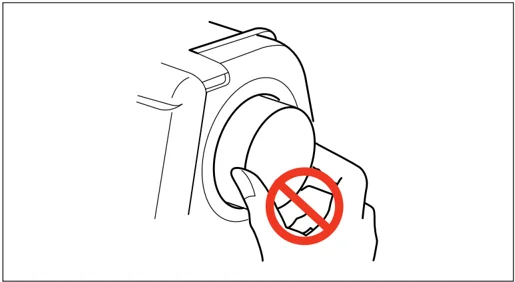
- Do not turn the handwheel while the Automatic Needle Threader is in the lowered position to prevent it from damage.
- Do not touch the Automatic Needle Threader while it is moving.
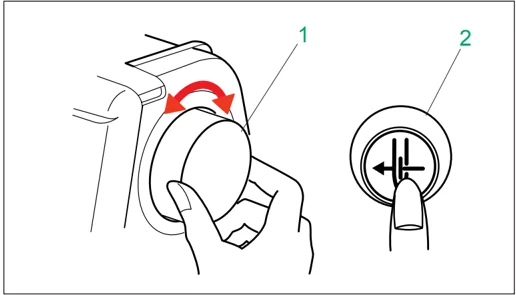
- If the Automatic Needle Threader is locked by accidentally turning the handwheel, release it as follows:
- Carefully turn the Handwheel to move the needle up or down a little, so that it frees the Automatic Needle Threader.
- Press the Auto Needle Threader Button to restore the Automatic Needle Threader to the up position.
1 Handwheel 2 Auto Needle Threader Button
- If the Automatic Needle Threader will not return to the up position by pressing the Auto Needle Threader Button, correct it as follows:
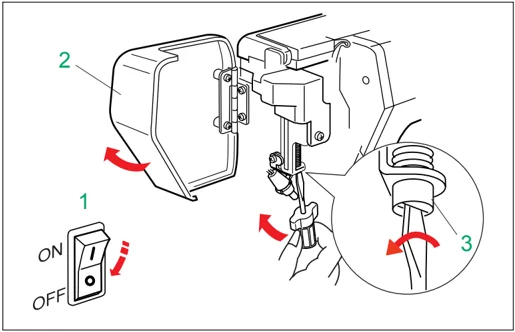
- Turn the Power Switch off.
- Open the Face Plate. Beware of the hot bulb.
- Turn the Threader Shaft counterclockwise to release the hook from the needle eye.
- Turn the Power Switch on and the Automatic Needle Threader will return to the up position.
- Close the Face Plate.
1 Power Switch 2 Face Plate 3 Threader Shaft
16
Drawing Up the Bobbin Thread
Raise the Presser Foot.
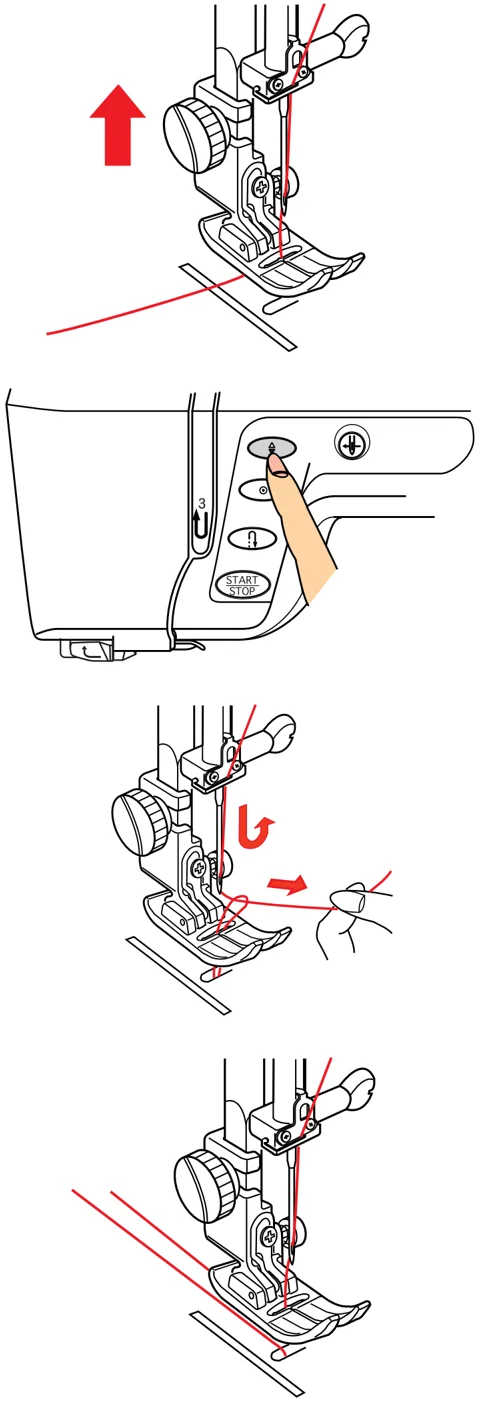
Hold the needle thread with your fingers and press the Up/Down Needle Button twice to pick up the bobbin thread.
Draw up the needle thread to bring up a loop of the bobbin thread.
Slide 10 cm (4") of both threads to the back under the Presser Foot.
17
Changing Needles
Raise the needle by pressing the Up/Down Needle Button and lower the Presser Foot. Turn off the Power Switch.
Loosen the Needle Clamp Screw by turning it counterclockwise.
Remove the Needle from the Needle Clamp.
1 Needle Clamp Screw 2 Needle 3 Needle Clamp
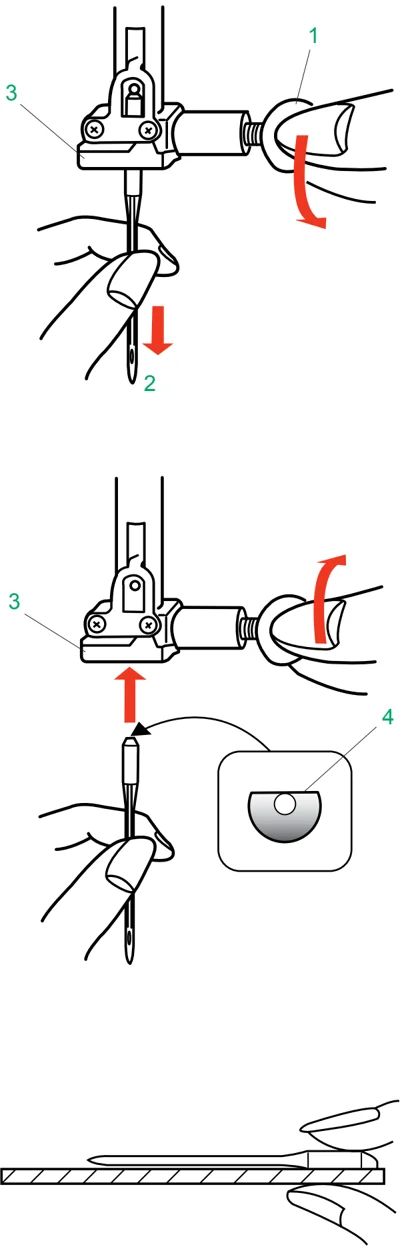
Insert a new needle into the Needle Clamp with the Flat Side of the Needle to the rear.
When inserting the Needle into the Needle Clamp, push it up as far as it will go and tighten the Needle Clamp Screw firmly.
4 Flat Side of the Needle
To check needle straightness, place the flat side of the needle onto something flat (a needle plate, glass etc.) The gap between the needle and the flat surface should be consistent. Never use a blunt needle.
18
Selecting a needle
For general sewing, use needle size 11 or 14. A fine thread and needle should be used for sewing lightweight fabrics, so the fabric will not be marred. Heavy fabrics require a needle large enough to pierce the fabric without fraying the needle thread.
In the needle case you will find one size 14, three blue tipped needles and one twin needle. Use a blue tipped needle to eliminate skipped stitches when sewing knits and synthetic fabrics.
There are also specialty needles available from your sewing machine dealer. A denim needle with a sharp tip is used to effectively pierce dense fabrics such as denim and canvas. For topstitching, a special topstitching needle with a larger eye accommodates heavier weight thread. Leather needles punch small holes in leather and suede allowing the thread to follow through the hole.
Check your needles frequently for rough or blunt tips. Snags and runs in knits, fine silks and silk-like fabrics are permanent and are often caused by damaged needles.
Always purchase a good quality thread. It should be strong, smooth and consistent in thickness.
| WEIGHT | FABRIC | TYPE of NEEDLE | NEEDLE SIZE |
|---|---|---|---|
| Very Light | Chiffon, Georgette, Fine Lace, Organdy Net, Tulle | Universal Ball Point | 9 (65) 9 (65) |
| Light | Batiste, Voile, Lawn, Pure Silk, Crepe de Chine, Sheer Crepe, Chambray, Handkerchief Linen, Gingham, Challis, Percale, Wool Crepe, Peau de Soie, Taffeta, Satin, Silk Surah, Satin-backed Crepe, Qiana | Blue Tipped Needle Universal | 11 (75) 11 (75) 12 (80) |
| Single Knits, Jersey, Swim wear, and Tricot | Blue Tipped Needle Ball Point | 11 (75) 11 (75) | |
| Leather Suede | Wedge Point Leather Needle | 11 (75) | |
| Medium | Flannel, Velour, Velvet, Muslin, Velveteen, Poplin, Corduroy, Broadcloth, Linen, Chintz, Gabardine, Felt, Terry, Burlap, Quilted Fabrics | Universal | 14 (90) |
| Double Knits, (synthetic and natural) Stretch Velour, Stretch Terry, Sweater Knits | Ball Point | 14 (90) | |
| Leather, Vinyl, Suede | Wedge Point Leather Needle | 14 (90) | |
| Heavy | Denim, Sailcloth, Ticking | Denim Needle | 16 (100) |
| Double Faced Wool, Heavy Coating, Fake Fur, Drapery Fabrics | Universal | 16 (100) | |
| Leather, Suede | Wedge Point Leather Needle | 16 (100) 18 (110) | |
| Very Heavy | Canvas, Duck, Upholstery Fabrics | Universal | 16 (100) |
| Topstitching for Special Finish | Topstitching Needle | 14 (90) |
19
Raising the Presser Foot
The Presser Foot Lifter raises and lowers the Presser Foot.
You can raise the Presser Foot higher than the normal up position exerting more pressure when lifting the Presser Foot Lifter. This allows for easy removal of the Presser Foot and helps you to place thick fabrics under it.
1 Presser Foot Lifter
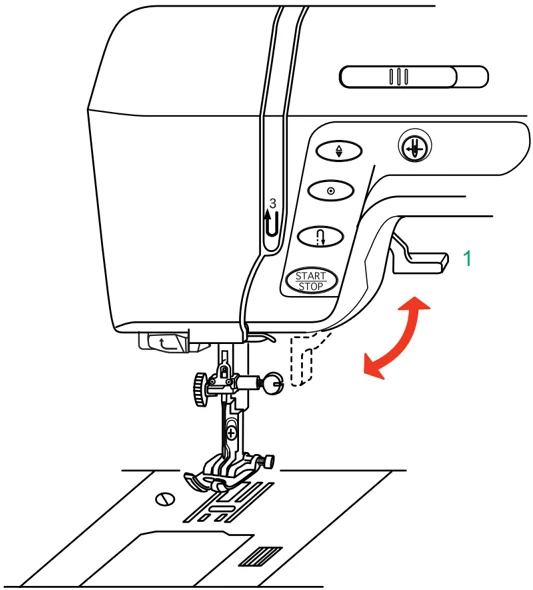
Knee Lifter
The Knee Lifter is extremely helpful when making patchworks, quilting etc, since it allows you to handle the fabric while your knee controls the presser foot.
Attaching the Knee Lifter
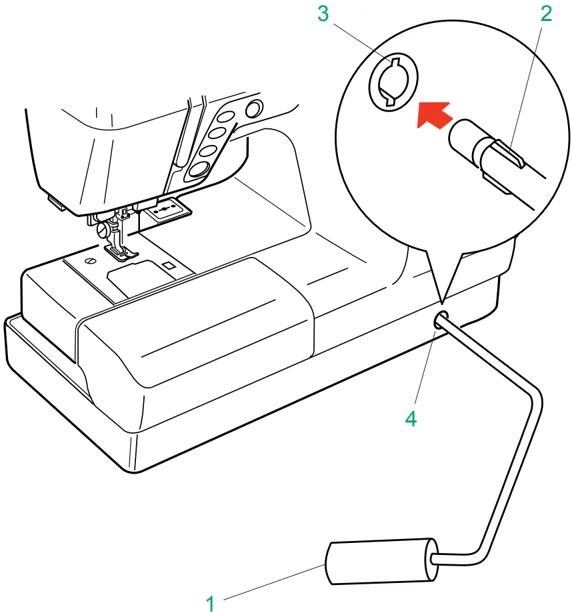
Match the Ribs on the Knee Lifter with the Notches in the Knee Lifter Socket and insert the Knee Lifter.
1 Knee Lifter 2 Ribs 3 Notches 4 Knee Lifter Socket
Using the Knee Lifter
Push the Knee Lifter with your knee to easily move the Presser Foot up and down. You can control how high the foot rises by the amount of knee pressure you use.
20
Removing and Attaching the Presser Foot
Press the Up/Down Needle Button to raise the needle to its highest position and raise the Presser Foot Lifter.
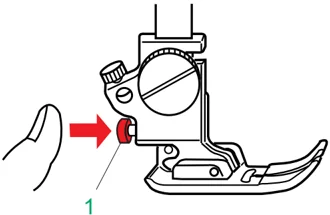
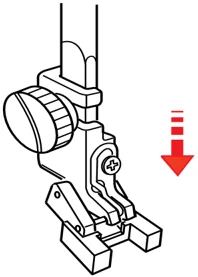
Press the Red Button on the back of the foot holder. The Presser Foot will drop off.
Attaching the presser foot
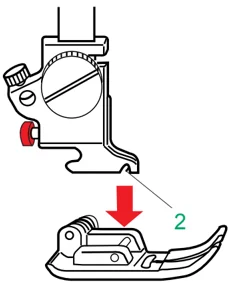
Place the selected Presser Foot so that the pin on the foot lies just under the Groove of the Foot Holder.
Lower the Presser Foot Lifter to lock the foot into place.
1 Red Button 2 Groove of the Foot Holder
Button Sewing Foot T
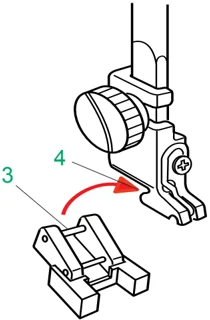
To attach: Insert the Rear Pi on the foot into theGroove of the Foot Holder.
Gently lower the presser foot lifter, holding the foot with your fingers.
3 Rear Pin 4 Groove of the Foot Holder
21
Various Presser Feet and Their Uses
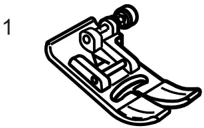
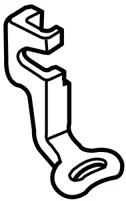
1 Zigzag Foot A: This is the most versatile foot. It can be used for various stitches including straight stitches and zigzag stitches. It is designed to achieve firm and neat seam results.
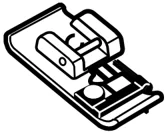
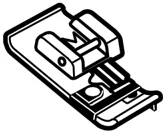
2 Overedge Foot C: This foot is exclusively for overedging. The brush on the foot effectively prevents skipped stitches on the raw edge of fabrics.
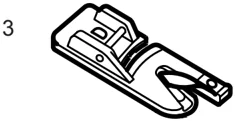
3 Rolled Hem Foot D: This special foot is for sewing a rolled hem. The curl of the foot helps to form a hem in a constant width.
4 Zipper Foot E: This foot is for sewing zippers. The zipper teeth are guided by the edges on the bottom of the foot.
5 Satin Stitch Foot F: This clear plastic foot is ideal for satin stitches and decorative stitches. The center groove on the bottom of the foot ensures smooth feeding of dense stitches.
6 Blind Hem Foot G: This foot is specially designed for blind hemming. The guide on the foot helps feed the fabric and sew a straight and nearly invisible blind-hem.
7 Cording Foot H: This foot is specially designed to hold one or three strands of cording to create attractive braiding.
22
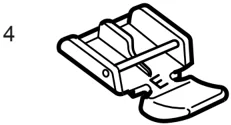
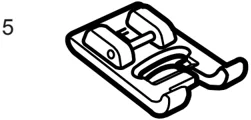
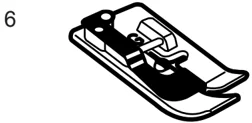
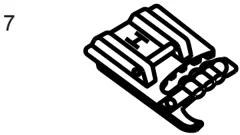
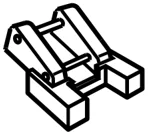
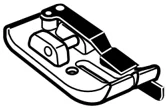
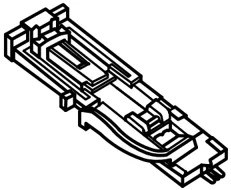
8 9 10 11 12 13 14
8 Overcasting Foot M: This foot is specially designed to simulate professional style overlocking. The wires on the foot effectively prevent the fabric edge from puckering or rolling.
9 Button Sewing Foot T: This foot is exclusively used for attaching a button. It holds a button securely in place and allows fine adjustment of button position.
10 1/4" Seam Foot O: This foot is useful for patchwork quilt. The guide on the foot maintains an exact 1/4" (0.7 cm) seam allowance.
11 Automatic Buttonhole Foot R: This foot is for sensor buttonhole and for darning. Place a button in the button holder in the rear of the foot. This automatically sets the buttonhole size.
12 Embroidery Foot P: This foot is a special attachment for Professional-Style Embroidery.
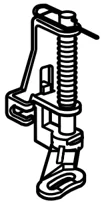
13 Basting/Darning Foot P-2: This is a special foot for basting. It holds fabrics while taking a stitch, synchronizing with the needle bar movement. This foot can also be used for freehand embroidery or quilting.
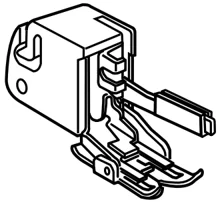
14 Walking Foot: This is a special attachment for hard-to-feed materials. This foot effectively prevents fabrics from shifting and puckering. It is great for quilting and matching plaids.
23
Pressure Dial
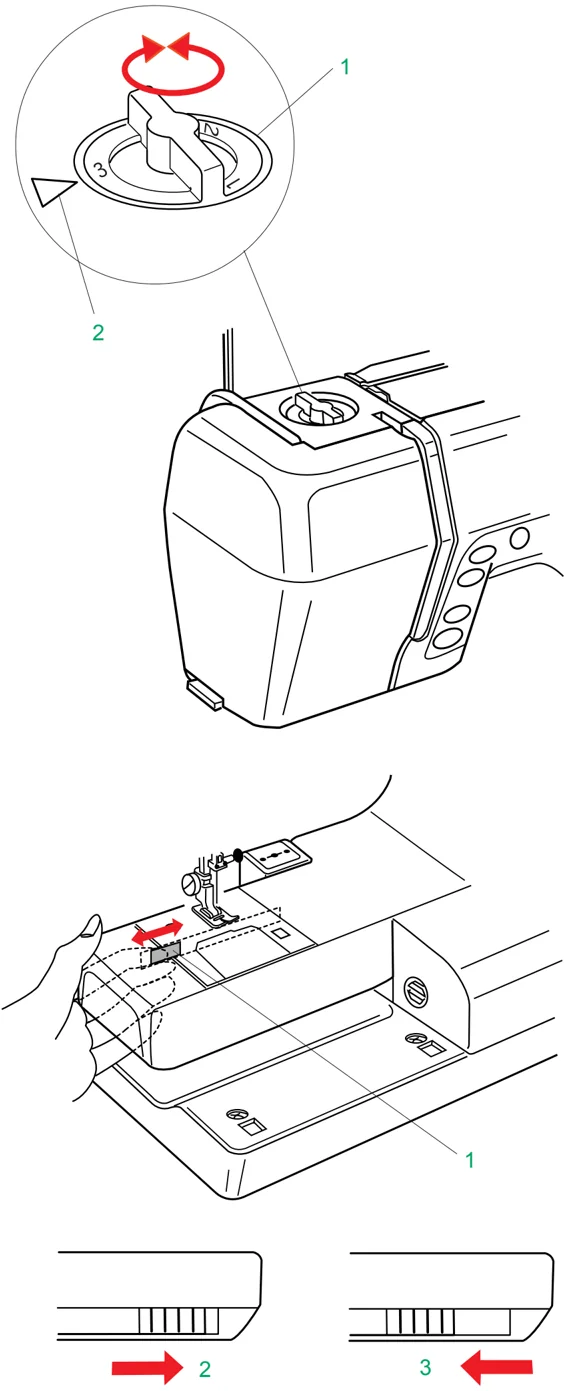
The Pressure Dial should be set at “3” for regular sewing.
Reduce the pressure to “2” for applique, cut work, drawn work, basting and embroidery.
Set the pressure to “1” when sewing chiffon, lace, organdy and other fine fabrics.
Velour and knits with a lot of stretch may also require a “1” setting.
Turn the Pressure Dial and set the desired number at the Setting Mark.
1 Pressure Dial 2 Setting Mark
To Lower or Raise the Feed Dog
Manually - Drop Feed Lever: To lower the Feed Dog, slide the Drop Feed Lever in the direction of Arrow.
To raise the Feed Dog, slide the Drop Feed Lever in the direction of Arrow. 1 Drop Feed Lever 2 Lowered Position 3 Raised Position
Automatic - My Setting: To lower the Feed Dog, press the SET key and Ordinary Sewing key, then press the [icon] key. (See page 28)
To raise the Feed Dog, press the SET key and Ordinary Sewing key, then press the [icon] key. (See page 28)
NOTE: • The Feed Dog lowers automatically when the Embroidery Mode is selected.
24
MACHINE SETTINGS
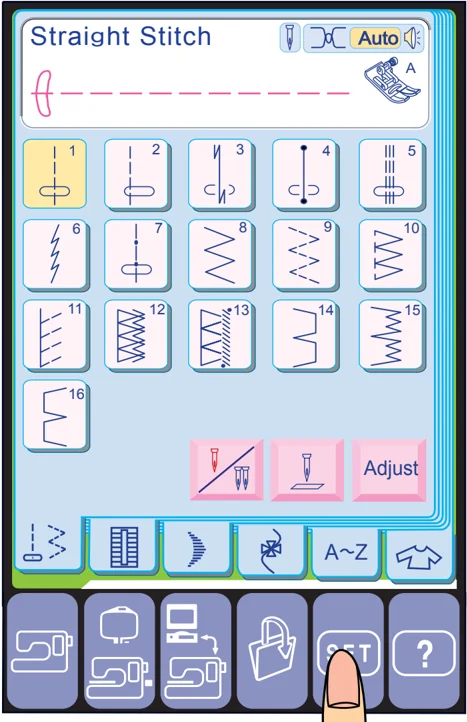
When you turn on the power switch, the Visual Touch Screen shows the opening “Welcome” window, then Ordinary Sewing Mode will appear after a few seconds, and the machine is set at straight stitch sewing.
SET Key - 4 Mode selections
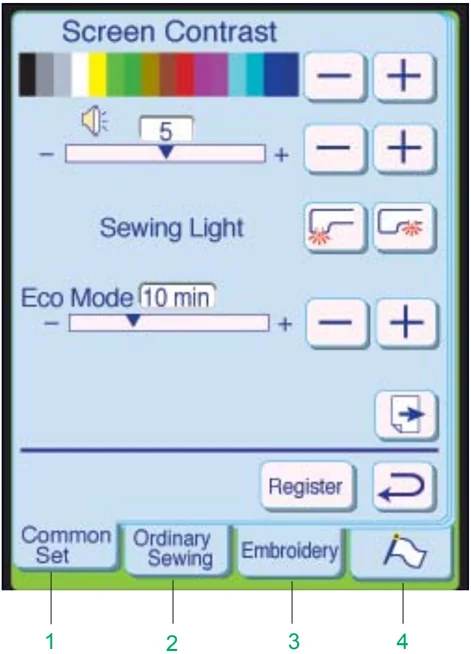
When you press the SET key, the following four mode keys will be displayed and you can adjust settings within each mode. You can select your desired mode by pressing the corresponding key.
1 Common Setting Mode
In this mode, machine operations and function (Screen Contrast, Sound, Sewing Light options etc.) can be adjusted and set for both Embroidery and Ordinary Sewing.
2 Ordinary Sewing Setting Mode
In this mode, sewing function (Feed Dog, Free Arm Length etc.) can be adjusted and set.
3 Embroidery Setting Mode
In this mode, sewing function for Embroidery can be adjusted and set.
4 Flag Mode-Language Selection
In this mode, you can select one of 10 languages for the Visual Touch Screen.
Common Setting Mode
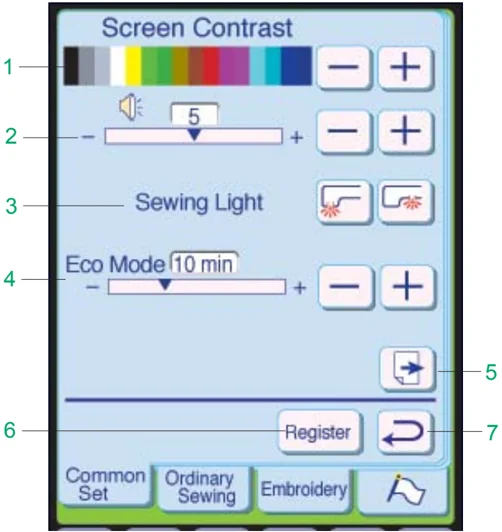
In this mode you can set the following machine functions, which are applicable to both Ordinary Sewing and Embroidery.
1 Screen Contrast The Visual Touch Screen contrast can be adjusted. Press the + key, to sharpen the screen color contrast. Press the - key, to fade the screen color contrast.
2 Sound Control The buzzer volume can be adjusted. The volume level can be set from 0 to 10 and the default setting is 5. Press the + key, to increase the buzzer volume. Press the - key, to decrease the buzzer volume. When you select 0 the buzzer turns off.
3 Sewing Light The dual sewing lights can be individually set "On" or "Off" depending upon your sewing needs. Press the [icon] key to light up the needle plate area. Press the [icon] key to light up the free arm area.
4 Eco Mode After turning on the power switch, if you have not used the machine after a while, the Visual Touch Screen will go dark and the sewing lights will turn off. Touching the screen will turn on the screen and sewing lights again. You can set the Eco Mode timer from one minute to 30 minutes. The default setting is 10 minutes. To set the Eco Mode timer: Press the + key to increase the timer setting. Press the - key to decrease the timer setting. If you wish to turn the Eco Mode off, press the + key until "OFF" shows in the box.
5 Page Key You can turn the pages by pressing the Page keys. Press [icon] key to view the next page. Press [icon] key to view the previous page.
6 Register key Press this key to register the settings and return to the previous screen.
7 Return key Press this key to return to the previous screen without registering the settings.
26