Machine test
Now is the time to test the machine.
- Close the doors. If you try to start the machine with the doors open, the machine will not start, as the safety switch is not engaged.
- Check that the foot break is in the fully up position. The machine will not start if the foot break is not fully up, as the safety switch will not be engaged.
- Check that the red safety switch is in the fully out position.
- Check that the machine is clear of all tools and other loose objects.
- Check that all the adjusting and locking handles are tight.
- Check that there is no blade fitted; it is far safer to test the machine without a blade fitted.
- Start the bandsaw by turning the start switch fully to the right, and once started release the switch.
- The lower flywheel is now turning.
- Now is the time to check that all the safety switches are functioning correctly before you fit a blade. Never complete the following tests with a blade fitted as it could cause injury.
- With the machine running [no blade fitted], operate the foot break. The motor should have the power removed and the lower wheel slowed down.
- With the machine running [no blade fitted], operate the red stop switch by pressing towards the machine. The motor should have the power removed and slowed down.
- With the machine running [no blade fitted], open the doors very slowly until the top door switch functions. The motor should have the power removed and slowed down. Close the door and wait for the flywheels to completely stop before you fully open the doors.
- If any of the safety switches fail to operate correctly, do not use the machine until the fault has been corrected.

Yellow ring showing
Stop switch in the on/out position (should see yellow ring)
No yellow ring showing
Stop switch in the off/in position
26

Adjusting the bandsaw
F itting a blade to the bandsaw
A lot of people do not like to change the blades and go to great lengths to avoid doing it. To use the bandsaw to its greatest advantage, you will have to use the appropriate blade and track it quickly. This is a habit that can be easily developed. If you use a step-by-step method of tracking, the procedure should only take a minute or two. Be careful when using blades, especially wide ones. Always use gloves and safety glasses.
I nstalling the blade
Disconnect the power to the bandsaw. Adjust the side guide and back guide out as far as they will go [both upper and lower guides]. This will ensure that they do not interfere with the blade while you are fitting, tracking and tensioning the blade.
- Uncoil the blade. Remember to use gloves and safety glasses. The blade may have dirt or oil on it so by using a clean rag, clean the blade and pull rearwards so that the cloth does not hook on the teeth.
- Inspect the teeth and the general condition of the blade. If the teeth are pointing in the wrong direction when you hold the blade up to the machine, you will have to turn it inside out. To do this, hold the blade with both hands and rotate. Remove the table pin.
- With the hinged guard on the guide support shaft open and the table insert removed, hold the blade with both hands with the teeth towards you. Slide it through the table slot and place it on the wheels. Hang the blade on the top wheel and then line it up with the lower wheel. If the top wheel needs to be lowered, rotate the tension handle wheel.
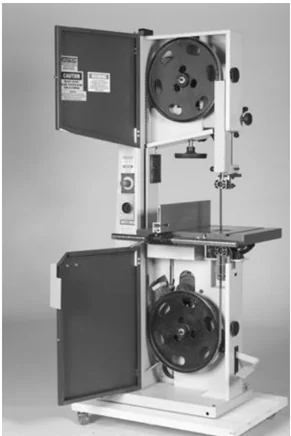
- Apply tension to the blade by adjusting the tension hand wheel. Do not fully tension the blade at this stage.
27

- Start rotating the wheels by hand in the normal direction. As you do this, watch the blade to determine where the blade wants to track. If the blade is tracking too far forward or backward, make small adjustments with the tracking adjustment knob located at the back of the bandsaw while still rotating the wheel. Once the blade is tracking in the correct position, fully tension the blade and re-track.

Note: The blade must be fully tensioned for final tracking. Note: Never track the blade with the saw running.
-
Lock the tracking adjustment handle.
-
Tensioning the blade The blade tension indicator [mounted on the vertical post of the bandsaw]; is used as a general guide, and the following tensioning procedure is recommended.


Looking at the top wheel, place your finger at the 9 o'clock position. Move your finger down 6" and using moderate pressure with your thumb, press on the flat of the blade. You should get 3/16" to 1/4" of deflection.
-
Note: If you are not using the bandsaw for extended periods of time [overnight], remove the tension on the blade. This will increase the life of your blade and the machine. If tension is left on the machine, flat spots or grooves can be formed in the rubber of the wheels which will detract from the performance of the machine and in extreme cases cause vibration when the machine is run.
-
Close the guard on the upper guide support post. Close the doors move the door blade guard up and lock in position. Replace the table insert, and check that the blade moves freely through the table insert. Replace the table pin. Check that all wrenches and loose parts are
28
removed from the machine. 10. Plug the machine into the power, turn the machine on for a second and switch off. Watch how the blade runs. If the blade tracks well, then run the machine at full power.
29
Removing the blade from the band saw
- Disconnect the power to the bandsaw.
- Remove the pin that aligns the two table halves.
- Open the upper-hinged blade guard.
- Remove the table insert.
- Remove the tension on the upper flywheel.
- Open the doors and remove the blade from the wheels [use gloves and eye protection], and gently slide the blade through the table slot.

Tracking position of the blade on the wheels
Tracking large blades. There has been a lot of discussion on the position that the blade should be on the wheels. One group of people recommends that with large blades you should track the blade so that the teeth hang just over the front edge of the rubber. The second group recommends that all blades regardless of their size should run in the center of the wheel. The advantage of running the large blades with the teeth not contacting the rubber of the wheel is that they cannot damage the tire. The disadvantage is that the wheel is crowned and the blade is not tensioned in the center of the band, which gives the blade a tendency to wobble or flutter. The advantage of running large blades on the center of the wheels is that they are tensioned in the center of the band and have fewer tendencies to wobble and flutter. The disadvantage is that blades with a large set on the teeth have a tendency to damage the rubber of the tire. This does not have a great effect on the performance of the bandsaw as all blades are running on the center section of the tire which is not affected. We recommend that you balance all blades on the center of the wheels for optimum performance and a smoother cut.
Adjusting the blade guides
I ntroduction
Welcome to a new era in bandsawing. You have purchased a bandsaw with a revolutionary blade guide system [patent pending] that is designed to give you years of safe, high quality bandsawing. Most blade guides are designed to support the blade on the sides and either above or below the side guides the back of the blade. This can allow the blade to twist as pressure from the wood
being cut pushes against the back blade guide. The Laguna Guide eliminates this by supporting the blade above and below the back blade guide, giving the blade unsurpassed stability. The Laguna Guide also incorporates patented ceramic as the blade support material. The advantage of this material is its ability to resist wear, and with care it should give years of safe service.
31
Please read the following notes, as they will assist you in getting the optimum performance from your Laguna guide system.
- As with the roller guide systems, the Laguna guide system will damage your blade if it is not adjusted correctly. The guide blocks must not come in con tact with the teeth of the blade. It is advisable to run the blade by hand with the guide blocks completely clear of the blade, and only when you are completely sure that the blade is running consistently in the correct position, then adjust the surround guide blocks as detailed in this manual.
- When fitting a new blade to your bandsaw, adjust the guide blocks and run the blade by hand through the guide blocks for at least 2 complete revolutions. Note: The weld on a new blade may not be perfectly aligned, and the misalignment could hit the ceramic blocks [side and back], causing damage to the blocks and or the blade. If the blade has a bad weld, return it to your blade supplier or side dress and file the back of the blade as needed.
- The back blade guide is manufactured from ceramic, so as the blade pushes against it, friction between the blade and the ceramic occurs. This action generates a certain amount of sparks. This is normal and will reduce with time as the back of the blade guide smoothes out the back of the blade.
- The back blade guide will slowly form a small grove as the blade is used [this is normal]. It is recommended that for approximately every 8 hours of use the guide be rotated 15 degrees. This will insure that the grove does not become too deep and will greatly extend the life of your guide.
- The Laguna guide system can be used with 1/4" to 1-1/4" blades.
- The Laguna guide system uses ceramic to support and guide the blade. This has many advantages, [very poor conductor of heat, very resistant to wear, etc.] The disadvantage is that it is very brittle, so the guides must never be dropped, exposed to hard knocks, hit with hard objects or used with badly welded blades. Any of the above actions may cause the ceramic to chip or break and will detract from the performance of the Laguna guide system. Any mistreatment of the guide system will render the warranty void.
- The side guide blocks must be tightened before running the machine to avoid jamming the blade and damaging the machine and/or guide blocks.
- When cutting gummy or green wood, the blade can become covered with resin. You will find that the surround guide system ceramic blocks remove
32
the resin as the blade is moved through the guide blocks and keep that part of the blade clean. For this reason it is recommended that the blocks be adjusted as close to the gullet as possible but the teeth must not come in contact with the blocks as they will become damaged. Although the Guide blocks clean the blade, some woods will gum the blade and the resin will have to be removed with solvent.
33
Adjusting the blade guides
The blade should run through the center of the rear blade guide, and the side guides should be parallel with the blade. If they have been moved out of adjustment, adjust as follows:
- Top upper side guides parallel adjustment. Loosen the clamp screw that attaches the guide to the vertical shaft and rotate the assembly until the side guide is parallel to the blade. Retighten the clamp screw. There is no adjustment on the lower guides.
- Centralizing the back guide to the blade. Loosen the 2 screws just above the 2 side guide blocks and move the assembly left or right so that the blade runs through the center of the back blade guide. Retighten the clamp screws. We are now ready to adjust the guides to the blade.
Top guide
- Rotate the blade by hand and ensure that it is tracking consistently in the correct position.
- Loosen the side guides.
- Loosen the 2 clamp screws that allow the guide assembly to move forward and back. Adjust so that the ceramic blocks are just behind the gullet of the tooth and retighten the clamp screws.
- Gently push one side guide so that it touches the blade and lock in position. Bring the other guide towards the blade so that there is minimal clearance between the blade and the guide. You can use a thin piece of paper to put between the blade and the guide to obtain the correct clearance until you gain experience. Tighten the clamp screws and remove the paper. Rotate the blade by hand ensuring that the weld of the blade does not hit the ceramic blocks, as this will cause damage. If the blade has a bad weld, dress the blade or return it to your supplier.
- Loosen the rear guide clamp screw and push the guide forward so that it just touches the back of the blade. Tighten the guide in position.
- Rotate the blade by hand and check that the back of the blade does not hit the blade guide with a bad weld. If the back of the blade hits the back blade guide at the weld, then dress the blade or, in excessive cases, return the blade to the supplier.

34

Lower blade guide
The lower blade guide is attached to a plate, which is slotted. The objective of the slots is to move the lower guide as close to the underside of the table as possible and give the blade maximum support. The shorter the distance that the blade is unsupported, the better the cut. If the bandsaw is operated with the table at an angle, the guide will have to be adjusted down as it could hit the table and reduce the amount of table movement.
- Rotate the blade by hand and ensure that is tracking consistently in the correct position.
- Loosen the side guides.
- Loosen the 2 clamp screws that allow the guide assembly to move forward and back. Adjust so that the ceramic blocks are just behind the gullet of the blade and retighten the clamp screws.
- Place a dollar bill or piece of paper of similar thickness between the guide blocks and the blade. Gently bring both side guides towards the blade so that slight pressure is exerted on the blade. Tighten the clamp screws and remove the paper. Rotate the blade by hand, ensuring that the weld of the blade does not hit the ceramic blocks, as this will cause damage. If the blade has a bad weld, dress the blade or return it to your supplier.
- Loosen the rear guide clamp screw and push the guide forward so that it just touches the back of the blade. Tighten the guide in position.
- Rotate the blade by hand and check that the back of the blade does not hit the blade guide with a bad weld. If the back of the blade hits the rear blade guide at the weld then dress the blade or in excessive cases return the blade to the supplier.

Note: Rotate the back guide by approximately 15 degrees after every 8 hours of use. This will greatly extend the life of the back blade guide, as it will even out the wear.
Fitting cool block guide system [Optional, not supplied with the machine].

36

Before you cut any wood, read the safety rules at the front of this manual
Using the bandsaw
Although the bandsaw is usually associated with cutting curves, a variety of straight cuts are easily made with the saw. In fact, it is often used to rip wood because it is much safer than a radial arm saw and also has a smaller saw cut, so wastes less wood. This becomes very important when using expensive wood where wastage must be kept to a minimum. The cut is safer because the force of the cut is straight down on the table, the work cannot be pulled back or kicked back which sometimes happens with table or radial arm saws.
The bandsaw can also cut very thick stock, which the radial arm, or table saw cannot do. The disadvantage of cutting with the bandsaw is that the surface finish of the cut is not as good as with the table or radial arm saw. This can be overcome to a great degree by using the Resaw king blade from Laguna. The blade has a lot of advantages such as superior surface finish to the cut, thin kerf [low wood wastage], can be re-sharpened, will cut hard woods and a long life.
Ripping
Ripping is a cut made with the grain of the wood. The four most common cuts made with the grain of the wood are rip, bevel, taper and resaw cuts.
There are two frequently used techniques for making straight bandsaw cuts. One technique is to use a single point to guide the work. The rational for using a single point is that the saw may tend to cut at a slight angle. This is called drift or lead. The single point allows the operator to compensate for the drift and cut the wood straight. With a little practice, you will obtain satisfactory results using this method. However, you own a real bandsaw, so this method is not recommended.
Another method is to use the rip fence as a guide. Once set up, this takes the guesswork out of cutting, reduces the stress on the operator and is a must for volume work. Once you have mastered the setup procedure, you will tend to use the single point method less and less.
37
Adjusting the fence
Method 1
- Make a straight pencil line on the edge of a board.
- Feed the wood into the blade cutting next to the pencil mark. If the blade is drifting, you will have to compensate by angling the wood to keep the cut straight.
- Stop the cut in the middle of the wood and mark [pencil] the angle on the table. This is the angle of drift and you will have to set the fence to the pencil line.
- To adjust the fence, loosen the clamp bolts that attach it to the cast-iron bracket. Move the fence so that it lines up with the pencil mark on the table and retighten the clamp screws.

Correct
Adjust
38
Method 2
- Set the fence parallel with the blade by loosening the clamp screws that hold it to the cast-iron bracket. It is not important that it is exact as you will be readjusting later in the procedure.
- Using a piece of scrap wood, make a cut while holding the wood against the fence. Stop the cut in the middle of the wood.
- Look at the position of the back of the blade within the saw cut. The back of the blade should be in the center of the slot, but you will probably find that it is closer to one side.
- Slightly loosen the clamp screws and adjust the fence to compensate.
- Repeat 2, 3 and 4 until the blade is centered. Note: you may have to do several fine adjustments, and it is better to do several small adjustments until you become skilled at the procedure. Once you have mastered the process, it should only take a minute to perform the adjustment.
Note: Each blade has a slightly different drift, and each time you change a blade, you must check and readjust if necessary.
Note: It is worth taking the time to set the fence accurately as it will save frustration and enhance the performance of your machine.
Fence positions
The aluminum fence can be used in two height positions [high and low] the low position is handy for cutting thin wood and is used were the fence in the high position would make it awkward to complete cuts. The fence in the high position is used for supporting tall work.

Changing the fence height
- Loosen the two clamp screws that are located on the cast-iron bracket.
- Slide the aluminum fence off the cast iron bracket.
- Slide the aluminum fence back onto the bracket using the second slot and retighten the clamp screws.

39
Resawing
Resawing is the process of cutting a board in half along its height. The bandsaw is perhaps the most creative tool in the shop because of its ability to cut thick or thin, straight or curved. The ability to cut thick stock such as re-sawing, making veneers, book matching or cutting flitches from small logs has great appeal to the woodworker. These capabilities greatly enhance the woodworker's design ability without the need for additional equipment. When a board is resawed and the two pieces are lying next to each other you will note that they are mirror images of each other. When these two boards are glued together, it is called book-matching.
Note: It is unsafe to cut wood that is unsupported by the table and should never be attempted. This is especially important to note when cutting round logs.

40
41
Blades
I ntroduction
The selection and use of blades is a very extensive subject and there have been many books written on the subject. This section of the manual is intended as a general guide only.
Selecting a blade
Using the correct blade is important, as it is the first step in attaining good bandsaw performance. The most frequently asked question is "How do I decide on the correct blade to use?" The answer is not simple, and we will explore it in this section of the manual. Firstly, there is NO ideal blade that will do everything. The blades that you choose will be determined by the type of work that you are doing. Large-tooth wide blades are selected for fast course cuts, and fine thin blades are used for intricate scrollwork. You will find that you will need a large selection of blades if you do a lot of varied work and fewer blades if you are concentrating on one section of band-sawing such as re-sawing. Using the wrong blade is the best way to abuse it. Using a blade for its intended purpose allows for maximum efficiency and is the best way to prolong its life.
Blade terms
Set
The amount that the teeth are wider than the thickness of the backing material. The larger the set the larger the saw cut and the smaller the radius that can be cut. This can also be an advantage if you are cutting a job that has a tendency to nip the blade. The smaller the set, the smaller the saw cut and the larger the radius that can be cut, but the wood that is wasted is less. On tipped blades [Resaw king] there is no set as the tip is wider than the backing material

Thickness
The thicker the blade, the stiffer the blade and the straighter the cut. The thicker the band the greater the tendency for the blade to break.
Pitch
The size of the teeth. This is usually quoted in teeth per inch [T.P.I.] The larger the tooth, the faster the cut because the tooth has a large gullet and has a greater capacity to transport large amounts of sawdust through the job. The larger the tooth, the courser the cut and the poorer the surface finish of the cut. The smaller the tooth, the slower the cut as the tooth has a small gullet and can not transport large amounts of sawdust through the job. The smaller the tooth, the finer the cut and the better the surface finish of the cut
Material Hardness
When choosing the blade with the proper pitch, one factor you should consider is the hardness of the material that is being cut: the harder the material, the finer the pitch that is required. For example, exotic hardwoods such as ebony and rosewood require blades with a finer pitch than American hardwoods such as oak or maple. Soft wood such as pine will quickly clog the blade, decreasing its ability to cut. Having a variety of tooth configurations in the same width will most likely give you an acceptable choice for a particular job.
There are certain things that indicate if a blade has a proper pitch, too fine a pitch or too coarse a pitch. Some are listed below:
Proper Pitch
· Blades cut quickly. · A minimum amount of heat is created when the blade cuts. · Minimum feeding pressure is required. · Minimum horsepower is required. · The blade makes quality cuts for a long period.
Pitch is Too Fine
The blade cuts slowly. There is excessive heat which causes premature breakage or rapid dulling. Unnecessarily high feeding pressure is required. Unnecessarily high horsepower is required. The blade wears excessively.
Pitch that is Too Coarse
The blade has a short cutting life. The teeth wear excessively. The bandsaw vibrates.
Width
The dimension from the back of the blade to the front of the teeth. The wider the blade, the stiffer the blade and the straighter the cut. This is usually called beam strength. But wide blades cannot cut small radiuses.
The narrower the blade, the more flexible the blade and the greater the tendency the blade has to wander. They have low-beam strength, but can cut small radiuses. Blades are available from 1/16" up for your machine, but for very narrow blades the normal guides have to be replaced with cool blocks [not supplied with the machine].
Kerf
The width of the saw cut.The larger the kerf, the smaller the radius that can be cut. But the greater the amount of wood the blade has to be removed by the blade and the greater the horse power that is needed as the blade is doing more work. The greater the kerf, the larger the amount of wood that is being wasted by the cut.
Hook or rake
The cutting angle or shape of the tooth. The greater the angle, the more aggressive the tooth and the faster the cut. But the faster the cut, the faster the tooth will blunt and the poorer the surface finish the cut will have. Aggressive blades are suitable for soft woods but will not last when cutting hard woods. The smaller the angle, the less aggressive the tooth, the slower the cut and the harder the wood that the blade is suitable to cut. Hook teeth have a progressive cutting angle and take the form of a progressive radius. They are used for fast cutting where finish is not important. Rake teeth have a flat cutting angle and are used for fine surface finish of the cut.
Gullet
The area for the sawdust to be transported through the wood in. The larger the tooth [pitch], the bigger the gullet.
Relief
The angle from the tip of the tooth back. The greater the angle, the more aggressive the tooth but the weaker the tooth.
Beam strength
This is the ability of the blade to resist bending backwards. The wider the blade the stronger the beam strength, therefore a 1" blade has far greater beam strength than a 1/8" blade and will cut straighter and is more suitable for re-sawing.
Blade selection
As you will have seen from the previous section there are a great number of variables. The blade selection that you will make will greatly depend on the type of work that you are doing or intend to do with your machine. If you have experience with the bandsaw, you will probably have a good idea of the blades that are suitable for you.
If you lack the experience or are unsure of the type of work you will be doing with your machine, we recommend that you purchase a selection similar to that listed below which is a good general selection and will tackle most jobs. As you gain experience, you will settle on the blades that suit you.
- 1/4" 6 T.P.I. This is a small aggressive blade that is suitable for tight curves and fast cutting where good surface finish of the cut is not important.
- 1/4" 14 T.P.I. This is a small fine blade suitable for reasonably tight cuts were the surface finish is important but speed of cut is less important.
- 1/2" 3 T.P.I. This is a general-purpose blade that can cut large radiuses and short sections of straight cuts. The cut is fast and the surface finish of the cut is poor.
- 3/4" 3 T.P.I. This is a general-purpose blade, which will be used for straight cuts and is suitable for large radiuses.
- 1" 2 T.P.I. This is a re-saw blade, which will be used for straight cuts and is suit able for processing veneers.
- If you are going to be cutting hard woods or require superb surface finish then you should consider purchasing a Resaw king blade from Laguna.
45
Rounding the back of the blade
With most guide systems it is recommended that the back of the blade be rounded with a stone. As the machine is supplied with Laguna ceramic guides, this is not imperative as the ceramic will round the back of the blade as it is used. However, if you decide that you want to round the back of the blade, below is a procedure.
A round blade back creates smooth interaction between the thrust bearing and the blade. If the blade rotates slightly, there is no sharp blade corner to dig into the thrust bearing; also, the rounding process smoothes the weld. A blade with a round back makes tight turns better because the round back has smooth interaction with saw kerfs. After the guides have been adjusted and the machine is running, hold the stone against the back corner of the blade for about a minute. Wear safety glasses when rounding the blade. Then, do the same thing on the opposite corner. Next, slowly move the stone to round the back. The more pressure you put on the back, the faster you will remove the metal. Be careful that the inside of the machine is free of sawdust because sparks could start a fire. On small blades such as a 1/8" blade, the pressure on the back of the blade may bring the blade forward off the front of the wheels. Therefore be careful not to put too much pressure on the stone. When doing this, it is also important that the upper guides are positioned right above the stone.
The blade has teeth and extreme caution must be exercized, as your hands will be very close to them.
Causes of Blade Breakage
• Excessive blade thickness in relation to the flywheel diameter. • Defective welding. • Incorrect tension, particularly if the blade is over tensioned, the tension spring no longer fulfills its function. • After use it is recommended to slacken the tension, especially overnight (placing a visible notice of this operation). • Misalignment of the flywheels. • Irregularity of flywheel surface, e.g. an accumulation of sawdust while cutting resinous materials. • You can correct these problems by readjusting the machining, changing the way you operate it, or by changing the blade. Try only one change at a time.
Causes of the blade dulling
- Poorly set side guides and/or rear thrust guide.
- Poor tracking.
- Wrong blade selection. If the blade is too narrow, it will flex more easily and decrease the quality of the cut. The blade should also have the correct pitch and width.
- The tooth pitch is too fine (too many teeth per inch).
- Certain woods will dull a steel blade very quickly, specially tropical hardwoods [teak, koa, etc]. Other woods with a high silicon content will also dull the blade quickly; even a cut as short as 6" will cause damage to the blade.
- On certain exotic woods the ends have been painted. This is done to control the drying. The paint is very abrasive and will dull the blade is you cut through it. It is recommended that you cut the painted ends off your wood.
47
Using a radius chart
Until you become well acquainted with your saw it is best to use the contour (radius) chart to determine which size blade to use for a specific application. Radius charts can be found in many woodworking books, magazine articles, and on blade boxes. They differ slightly from one another but are good as rough indicators of how tightly a curve can be cut with a particular blade. Each blade saw, and operator is different so it is impossible to make a truly accurate chart. A blade can cut continuously without backtracking any curve that has a radius as much as or more than is shown on the chart. For example: a 3/16" blade will cut a circle with a 5/16" radius or a 5/8" diameter. To test if a 3/16" blade would work for a particular curve place a dime, this is roughly 5/8" over the pattern. The 3/16" blade can cut a curve bigger than the dime, but not smaller. You can use everyday items such as coins or a pencil to determine which blade to use. A quarter is the size of the tightest cut that can be made with a 1/4" blade. A dime is the size of the tightest curve that can be cut with a 3/16" blade. A pencil eraser is the size of the tightest turn that you can make with a 1/8" blade. After a while you won't even need an object to size the possible curve of a blade because you will have become familiar with this process. There are options to matching the blade to the smallest curve pattern. If there is only one very tight cut, it may be best to use a turning hole, a relief cut, successive passes, or to change the blade. If you have a lot of cutting to do, you can use a wider blade for the bigger curves and then switch to a narrower blade for the tighter curves. Changing the blades can often save cutting and finish time.
The chart to the right, is only a rough guide and is not to scale, but from the information you can construct your own guide.
 Blade width
3/4"
5/8"
1/2"
3/8"
1/8" 1/4" 3/16"
Cutting rad
5 5/16" Rad
3 3/4Rad
2 1/2" Rad
1 7/16" Rad
5/8" Rad
5/16" Rad
1/8" Rad
Maintenance and troubleshooting
All tools and machines require regular maintenance, and the bandsaw is no exception. This section details the general maintenance and care of your bandsaw. In general, we recommend that you only use a Teflon-based lubricant on the bandsaw. Regular oil attracts dust and dirt and the Teflon tends to dry and has fewer tendencies to accumulate dirt and sawdust on your machine.
Cleanliness and tire maintenance
One of the major concerns is the cleanliness, in particular, how clean the tires are. As the saw cuts, some sawdust lands on the tire of the lower wheel. As the wheel rotates, the sawdust becomes compressed on the tire. This is especially true for woods such as pine. The compressed sawdust could have a negative effect, such as vibration, short blade life and cause the blade to drift.

A brush contacts the lower wheel and helps to prevent buildup. You should inspect the tires regularly to check that buildup is not happening, especially the lower wheel. The tires are made of rubber and wear just like car tires. They wear in the middle, which causes a concavity in the tire. The deformation makes it hard to track the blades, and for this reason it is important to maintain the original shape of the tire.
The best way to clean the tire surface and maintain the original shape is to sand it with sand paper. The old tire surface often hardens and glazes over and should be redressed occasionally. This can be done by sanding the wheel with 100-grit sandpaper. This will take off a little of the rubber and expose new rubber, which is desirable. Rotate the wheels by hand with the blade removed.
Guides
The ceramic side and back guides should be inspected regularly for cracks and chips. If they are damaged, they should be replaced as they could damage your blades and bad guides will detract from the performance of the bandsaw. The guides should be cleaned regularly and any wood gum or dirt removed. Any commercially available solvent can be used, and after cleaning they should be lubricated with Teflon-based lubricant.
Drive belt/s
The drive belt should last for many years [depending on the usage] but needs to be inspected regularly for cracks, cuts and general wear. If damage is found, replace the belt. If your machine is a 2-belt system, then both belts must be replaced at the same time, as they are a matched pair. Never change only one belt as this could cause vibration.
Replacing the drive belt(s)
To replace the belt/s you will have to remove the lower wheel.
- Remove the allen screw that clamps the wheel to the axel.
- Using a gear puller remove the lower wheel. Take care not to damage the clamp screw thread.
- Replace the drive belts.
- Refit the lower wheel and re-clamp with the allen screw.
It is better to replace the drive belt/s early than to have a breakdown during an important job.
Table insert
The table insert [throat plate] is made of plastic and is designed not to damage the blade should they come in contact. If the blade slot becomes too wide or the insert becomes damaged by the blade, it should be replaced. The replacement insert will have to be fitted to the table hole, and you will have to sand the sides. You will also have to cut the blade slot, and this should be done prior to sanding the sides as the insert could spring and change size. The table is provided with 4 jacking screws that can be adjusted so that the insert is level with the top of the table.
Bearings
All bearings are sealed for life and do not require any maintenance. If a bearing becomes faulty, replace it.
Rust
The bandsaw is made from steel and cast iron. All non-painted surfaces will rust if not protected.
It is recommended that the table and fence bar be protected by coating with wax if the machine is not in constant use. All moving non-painted surfaces [guides, rack and pinion, etc.] should be lubricated / protected with a Teflon-based lubricant.
Rack and pinion
The band saw is fitted with a rack and pinion, which rises and lowers the upper guides. It should run smoothly. If there is excessive play or it is too tight, the following adjustment can be made.
- Loosen the 3 allen screws that clamp the vertical adjustment handle to the band saw.
- There is clearance in the holes and the vertical adjustment handle can be adjusted.

Note: the machine comes factory-set, and no adjustment should be required.
Lower wheel tracking
This adjustment is achieved by loosening the shaft clamp screw and moving the shaft with the 4 bolts provided. The two vertical bolts control one axis and the two horizontal bolts control the other axis.
Adjustment procedure
Install a blade, tension and track. Use a 1/4" wide blade. Note the position of the blade on the lower wheel.
Vertical adjustment
Mark the bolts so that you have a reference to their original position. If you get confused, you can go back to the original position.
Correction for fig. A
Loosen the shaft clamp screw that is positioned in the center of the 4 adjusting bolts. Loosen the top vertical bolt 1/4 turn and tighten the bottom bolt.
Do not try to do big adjustments, but rather complete several small adjustments.
Turn the wheel by hand and notice the change in position of the blade on the lower wheel.
Repeat the adjustment procedure if required. Once the adjustment is completed retighten the shaft clamp screw.

Correction for fig. B
The procedure is the same as for Fig. A, but loosen the bottom bolt and tighten the top bolt.

52

Correction for horizontal
If the right-hand side of the wheel needs to come forward. Loosen the shaft clamp screw that is in the center of the 4 adjusting bolts. Loosen the bolt that is directly behind that side of the wheel 1/4 turn and tighten the bolt opposite. Turn the wheel by hand and notice the change in position of the blade on the wheel. Repeat the adjustment procedure if required. Once the adjustment has been completed, tighten the shaft locking screw. If the left-hand side of the wheel needs to come forward, the procedure is the same as above, but loosen the left-hand bolt and tighten the right hand side bolt.

Note: Before connecting the machine to the power, ensure that all bolts and locking nuts are tight, including the shaft clamp screw.
Top guide vertical adjustment shaft
The top guide when moved vertically tracks the blade and comes factory-set. Adjustment is provided should that mechanism become misaligned. There is a plate at the top of the shaft with two bolts. This guides the top of the shaft. If the bolts are loosened the tracking of the guide can be adjusted. This is a tricky operation and should only be attempted if an extreme error has occurred.

Adjustment procedure
- With the guide at its highest position, adjust the side guides so that there is approximately 1/16" clearance on each side.
- Adjust the back guide so that it is 1/16" behind the back of the blade.
- Attach a piece of paper to the table with scotch tape/ masking tape in the area covered by the blade guide.
- Lower the guide and mark its position on the paper. This will give you a reference point to work from.
- Move the guide up and down and note any change in the relationship between the blade and the guide [both side and back].
- Only if adjustment is needed, loosen the two bolts on the guide plate & move the guide back / forward, left / right depending on the adjustment needed.
- Tighten the two bolts on the guide plate, move the guide up, down, noting the relationship between the blade and the side and back guide.
- If the adjustment needs to be refined, repeat the procedure.
Troubleshooting Bandsaw will not start
- Check that the start switch is being turned fully to the right.
- Check that the red stop switch is fully out. Press the switch in and then pull the switch out. You will then hear a click.
- Check that the electrical power cord is plugged into the power outlet.
- Check that the electrical supply is on [reset the breaker].
- Check that both doors are closed.
- Check that the foot brake is fully in the up position.
- With the power disconnected from the machine, check that the wiring in the terminal box is correct. Check that the rubber insulation is stripped enough and is not causing a bad connection. Check that all the screws are tight.
- Test the safety circuit. With the power disconnected from the machine, use a multi-meter / circuit tester, to check that there is continuity
between 5L3 [red wire] and the red wire beside 2T1. To gain access to the terminals, you will have to remove the switch plate from the front of the machine. This circuit is a loop that has the foot brake, stop switch and door switch. It is designed to be fail-safe, and any switch that is not functioning or set correctly will cause the machine not to start. If there is no continuity you will have to trace the switch that is open or faulty and correct the fault.
- Check that you have the correct power 220V not 110V
- Check that the earth wire is wired correctly.
The machine will not stop
This is a very rare occurrence as the machine is designed to be fail-safe. If it should occur and you cannot fix the fault, seek professional assistance. The machine must be disconnected from the power and never run until the fault has been rectified.
- Stop switch faulty. Replace the stop switch.
- Internal breaker faulty. Replace the breaker.
Motor tries to start but will not turn
- With the power disconnected from the machine open the doors and try to turn the wheel by hand. If the wheel is not turning, check the reason for the jamming. Typical reasons are: guides too tight, wood jammed in the wheel.
- Capacitor faulty. Replace the capacitor.
- Motor faulty. Replace the motor.
Motor overheats
The motor is designed to run very hot, but should it overheat it has an internal terminal overload protector that will shut it down until the motor has cooled down and then it will reset automatically. If the motor overheats, wait until it has cooled down and restart. If the motor shuts down constantly, instantly check for the reason. Typical reasons are dull blade, over feeding the wood, motor cooling fan clogged or faulty, motor cooling fins clogged and excessive ambient temperature.
Squeaking noise
- Check that the motor cooling fan is not contacting the fan cover.
- Check the bearings.
- Check the drive belt.
- Check that the guides are adjusted correctly.
Upper guide shaft is tight or loose
- Clean and lubricate.
- Adjust rack and pinion.
- Bent rack. Replace the rack.
Blade slows down during a cut
- Loose drive belt. Re-tension the belt.
- Dull blade. Replace the blade or have it re-sharpened.
- Feeding the wood too fast. Slow down the feed rate.
- Insufficient set on the teeth [wood nipping the blade]. Change blade for a blade with the correct set.
- Oil or dirt on the drive belt. Clean or replace the drive belts.
- Fence not aligned correctly. Align fence.
Blade will not track on fly wheels
- Bad blade. Change the blade.
- Crown on the wheels worn or damaged tire. Dress the tires.
- Wheels not co-planning. Adjust the lower wheel.
The blade kicks
Bad blade. Replace the blade.
The blade makes a clicking noise
Bad weld. Dress the weld or change the blade.
Blade overheats
- Dull blade. Change the blade or re-sharpen the blade.
- Pitch is too small for the depth of cut. Change to a blade with the correct pitch.
- Guides too tight. Adjust the guides.
- Wood too hard for the selected blade. Change the blade.
- Blade too thick for the diameter of the wheels. Change the blade.
Machine vibrates
- Machine not level on the floor. Re-level the machine ensuring that it has no movement.
- Damaged drive belt. Replace the belt.
- Double drive belt system. Only one belt changed and the belts are not balanced. Replace both belts with a matched pair.
Accessories
The following accessories are available from Laguna Tools. Miter gage Mobility kit. Extension tables. Work benches. Tool cabinet [wall mounted]. Tool cabinet [floor standing]. Tool box. Bandsaw blades. Cool blocks. Cast-iron fence. Large Laguna Guides. Power feeder.