Chapter 3 Sewing Utility Stitches
QUICK REFERENCE TABLE
| Pattern | Name of pattern | Type of presser foot | Use | Twin needle possibility |
|---|---|---|---|---|
| 1-01 | Straight stitch (Left) | J | General sewing, gather, pintuck, etc. Reverse stitch is sewn while pressing “Reverse/Reinforcement Stitch” button. | OK (J) |
| 1-02 | Straight stitch (Left) | J | General sewing, gather, pintuck, etc. Reinforcement stitch is sewn while pressing “Reverse/Reinforcement Stitch” button. | OK (J) |
| 1-03 | Straight stitch (Middle) | J | General sewing, gather, pintuck, etc. Reverse stitch is sewn while pressing “Reverse/Reinforcement Stitch” button. | OK (J) |
| 1-04 | Straight stitch (Middle) | J | General sewing, gather, pintuck, etc. Reinforcement stitch is sewn while pressing “Reverse/Reinforcement Stitch” button. | OK (J) |
| 1-05 | Triple stretch stitch | J | General sewing for reinforcement and decorative topstitching | OK (J) |
| 1-06 | Stem stitch | J | Reinforced stitching, sewing and decorative applications | OK (J) |
| 1-07 | Decorative stitch | N | Decorative stitching, top stitching | OK (J) |
| 1-08 | Basting stitch | J | Basting | NO |
| 1-09 | Zigzag stitch | J | For overcasting, mending. Reverse stitch is sewn while pressing “Reverse/Reinforcement Stitch” button. | OK (J) |
| 1-10 | Zigzag stitch | J | For overcasting, mending. Reinforcement stitch is sewn while pressing “Reverse/Reinforcement Stitch” button. | OK (J) |
| 1-11 | Zigzag stitch (right) | J | Start from right needle position, zigzag sew at left. | OK (J) |
| 1-12 | Zigzag stitch (left) | J | Start from left needle position, zigzag sew at right. | OK (J) |
| 1-13 | 2 step elastic zigzag | J | Overcasting (medium weight and stretch fabrics), tape and elastic | OK (J) |
| 1-14 | 3 step elastic zigzag | J | Overcasting (medium, heavyweight and stretch fabrics), tape and elastic | OK (J) |
| 1-15 | Overcasting stitch | G | Reinforcing of light and medium weight fabrics | NO |
Sewing Utility Stitches 3-1
| Pattern | Name of pattern | Type of presser foot | Use | Twin needle possibility |
|---|---|---|---|---|
| 1-16 | Overcasting stitch | G | Reinforcing of heavyweight fabric | NO |
| 1-17 | Overcasting stitch | G | Reinforcing of medium, heavyweight and easily frayable fabrics or decorative stitching. | NO |
| 1-18 | Overcasting stitch | J | Reinforced seaming of stretch fabric | OK (J) |
| 1-19 | Overcasting stitch | J | Reinforcing of medium stretch fabric and heavyweight fabric, decorative stitching | OK (J) |
| 1-20 | Overcasting stitch | J | Reinforcement of stretch fabric or decorative stitching | OK (J) |
| 1-21 | Overcasting stitch | J | Stretch knit seam | NO |
| 1-22 | Single diamond overcast | J | Reinforcement and seaming stretch fabric | OK (J) |
| 1-23 | Single diamond overcast | J | Reinforcement of stretch fabric | OK (J) |
| 1-24 | With side cutter | S | Straight stitch while cutting fabrics | NO |
| 1-25 | With side cutter | S | Zigzag stitch while cutting fabrics | NO |
| 1-26 | With side cutter | S | Overcasting stitch while cutting fabrics | NO |
| 1-27 | With side cutter | S | Overcasting stitch while cutting fabrics | NO |
| 1-28 | With side cutter | S | Overcasting stitch while cutting fabrics | NO |
| 1-29 | Piecing stitch (right) | J | Piecework/patchwork6.5 mm (1/4 inch) right seam allowance | NO |
| 1-30 | Piecing stitch (left) | J | Piecework/patchwork6.5 mm (1/4 inch) left seam allowance | NO |
3-2 Sewing Utility Stitches
\begin{tabular}{|l|l|c|p{5.5cm}|c|} \hline \textbf{Pattern} & \textbf{Name of pattern} & \textbf{Type of presser foot} & \textbf{Use} & \textbf{Twin needle possibility} \ \hline 1-31 & Hand-look quilting & J & Quilting stitch made to look like hand quilting stitch & NO \ \hline 1-32 & Quilting appliqué zigzag stitch & J & Zigzag stitch for quilting and sewing on appliqué quilt pieces & NO \ \hline 1-33 & Quilting appliqué stitch & J & Quilting stitch for invisible appliqué or attaching binding & NO \ \hline 1-34 & Quilting stippling & J & Background quilting & NO \ \hline 2-01 & Blind hem stitch & R & Hemming woven fabrics & NO \ \hline 2-02 & Blind hem stitch stretch & R & Hemming stretch fabric & NO \ \hline 2-03 & Blanket stitch & J & Appliqués, decorative blanket stitch & OK (J) \ \hline 2-04 & Shell tuck edge & J & Shell tuck edge finish on fabrics & OK (J) \ \hline 2-05 & Satin scallop stitch & N & Decorating collar of blouse, edge of handkerchief & OK (J) \ \hline 2-06 & Scallop stitch & N & Decorating collar of blouse, edge of handkerchief & NO \ \hline 2-07 & Patchwork join stitch & J & Patchwork stitches, decorative stitching & OK (J) \ \hline 2-08 & Patchwork double overlock stitch & J & Patchwork stitches, decorative stitching & OK (J) \ \hline 2-09 & Couching stitch & J & Decorative stitching, attaching cord and couching & OK (J) \ \hline 2-10 & Smocking stitch & J & Smocking, decorative stitching & OK (J) \ \hline 2-11 & Feather stitch & J & Fagoting, decorative stitching & OK (J) \ \hline \end{tabular}
Sewing Utility Stitches 3-3
\begin{tabular}{|l|l|c|l|c|} \hline Pattern & Name of pattern & Type of presser foot & Use & Twin needle possibility \ \hline 2-12 & Fagoting cross stitch & J & Fagoting, bridging and decorative stitching & OK (J) \ \hline 2-13 & Tape attaching & J & Attaching tape to seam in stretch fabric & OK (J) \ \hline 2-14 & Ladder stitch & J & Decorative stitching & NO \ \hline 2-15 & Rick-rack stitch & J & Decorative top stitching & OK (J) \ \hline 2-16 & Decorative stitch & J & Decorative stitching & OK (J) \ \hline 2-17 & Serpentine stitch & N & Decorative stitching and attaching elastic & OK (J) \ \hline 2-18 & Decorative stitch & N & Decorative stitching and appliqués & OK (J) \ \hline 2-19 & Decorative stippling stitch & N & Decorative stitching & NO \ \hline 3-01 & Hemstitching & N & Decorative hems, triple straight at left & OK (J) \ \hline 3-02 & Hemstitching & N & Decorative hems, triple straight at center & OK (J) \ \hline 3-03 & Hemstitching zigzag & N & Decorative hems, top stitching & OK (J) \ \hline 3-04 & Hemstitching & N & Decorative hems, lace attaching pin stitch & NO \ \hline 3-05 & Hemstitching & N & Decorative hems & NO \ \hline 3-06 & Hemstitching & N & Decorative hems daisy stitch & NO \ \hline 3-07 & Hemstitching & N & Heirloom, decorative hems & NO \ \hline \end{tabular}
3-4 Sewing Utility Stitches
\begin{tabular}{|l|l|c|l|c|} \hline Pattern & Name of pattern & Type of presser foot & Use & Twin needle possibility \ \hline 3-08 & Hemstitching & N & Heirloom, decorative hems & NO \ \hline 3-09 & Hemstitching & N & Heirloom, decorative hems & OK (J) \ \hline 3-10 & Hemstitching & N & Heirloom, decorative hems & OK (J) \ \hline 3-11 & Hemstitching & N & Heirloom, decorative hems & OK (J) \ \hline 3-12 & Honeycomb stitch & N & Heirloom, decorative hems & OK (J) \ \hline 3-13 & Honeycomb stitch & N & Heirloom, decorative hems & OK (J) \ \hline 3-14 & Hemstitching & N & Heirloom, decorative hems & OK (J) \ \hline 3-15 & Hemstitching & N & Heirloom, decorative hems & NO \ \hline 3-16 & Hemstitching & N & Heirloom, decorative hems & OK (J) \ \hline 3-17 & Hemstitching & N & Heirloom, decorative hems & NO \ \hline 3-18 & Hemstitching & N & Heirloom, decorative hems & OK (J) \ \hline 3-19 & Hemstitching & N & Decorative hems and bridging stitch & OK (J) \ \hline 3-20 & Hemstitching & N & Decorative hems. Fagoting, attaching ribbon & OK (J) \ \hline 3-21 & Hemstitching & N & Decorative hems, smocking & NO \ \hline 3-22 & Hemstitching & N & Decorative hems, smocking & NO \ \hline \end{tabular}
Sewing Utility Stitches \hfill 3-5
\begin{tabular}{|l|p{3.5cm}|c|p{4.5cm}|c|} \hline Pattern & Name of pattern & Type of presser foot & Use & Twin needle possibility \ \hline 4-01 & Narrow rounded buttonhole & A & Buttonhole on light to medium weight fabrics & NO \ \hline 4-02 & Wide round ended button-hole & A & Buttonholes with extra space for larger buttons & NO \ \hline 4-03 & Tapered round ended buttonhole & A & Reinforced waist tapered buttonholes & NO \ \hline 4-04 & Round ended buttonhole & A & Buttonholes with vertical bar tack in heavyweight fabrics & NO \ \hline 4-05 & Round ended buttonhole & A & Buttonholes with bar tack & NO \ \hline 4-06 & Round double ended buttonhole & A & Buttonhole for fine, medium to heavyweight fabrics & NO \ \hline 4-07 & Narrow squared buttonhole & A & Buttonholes for light to medium weight fabrics & NO \ \hline 4-08 & Wide squared buttonhole & A & Buttonholes with extra space for larger decorative buttons & NO \ \hline 4-09 & Squared buttonhole & A & Heavy-duty buttonholes with vertical bar tacks & NO \ \hline 4-10 & Stretch buttonhole & A & Buttonholes for stretch or woven fabrics & NO \ \hline 4-11 & Heirloom buttonhole & A & Buttonholes for heirloom and stretch fabrics & NO \ \hline 4-12 & Bound buttonhole & A & The first step in making bound buttonholes & NO \ \hline 4-13 & Keyhole buttonhole & A & Buttonholes in heavyweight or thick fabrics for larger flat buttons & NO \ \hline 4-14 & Tapered keyhole buttonhole & A & Buttonholes in medium to heavy weight fabrics for larger flat buttons & NO \ \hline 4-15 & Keyhole buttonhole & A & Buttonholes with vertical bar tack for reinforcement in heavyweight or thick fabrics & NO \ \hline \end{tabular}
3-6 Sewing Utility Stitches
\begin{tabular}{|l|l|l|p{4.5cm}|l|} \hline Pattern & Name of pattern & Type of presser foot & Use & Twin needle possibility \ \hline 4-16 & Darning & A & Darning of medium weight fabric & NO \ \hline 4-17 & Darning & A & Darning of heavyweight fabric & NO \ \hline 4-18 & Bar tack & A & Reinforcement at opening of pocket, etc. & NO \ \hline 4-19 & Button sewing & M & Attaching buttons & NO \ \hline 4-20 & Eyelet & N & For making eyelet, holes on belt, etc. & NO \ \hline 5-01 & Diagonally left up (Straight) & N & For attaching appliqué on tubular pieces of fabric and mitering corners & NO \ \hline 5-02 & Reverse (Straight) & N & For attaching appliqué on tubular pieces of fabric and mitering corners & NO \ \hline 5-03 & Diagonally right up (Straight) & N & For attaching appliqué on tubular pieces of fabric and mitering corners & NO \ \hline 5-04 & Sideways to left (Straight) & N & For attaching appliqué on tubular pieces of fabric & NO \ \hline 5-05 & Sideways to right (Straight) & N & For attaching appliqué on tubular pieces of fabric & NO \ \hline 5-06 & Diagonally left down (Straight) & N & For attaching appliqué on tubular pieces of fabric and mitering corners & NO \ \hline 5-07 & Forward (Straight) & N & For attaching appliqué on tubular pieces of fabric and mitering corners & NO \ \hline 5-08 & Diagonally right down (Straight) & N & For attaching appliqué on tubular pieces of fabric and mitering corners & NO \ \hline 5-09 & Sideways to left (Zigzag) & N & For attaching appliqué on tubular pieces of fabric & NO \ \hline 5-10 & Sideways to right (Zigzag) & N & For attaching appliqué on tubular pieces of fabric & NO \ \hline \end{tabular}
Sewing Utility Stitches \hfill 3-7
\begin{tabular}{|l|l|l|l|l|} \hline Pattern & Name of pattern & Type of presser foot & Use & Twin needle possibility \ \hline 5-11 & Forward (Zigzag) & N & For attaching appliqué on tubular pieces of fabric and mitering corners & NO \ \hline 5-12 & Reverse (Zigzag) & N & For attaching appliqué on tubular pieces of fabric and mitering corners & NO \ \hline \end{tabular}
▲ CAUTION Make sure to use the correct presser foot for each stitch pattern. Otherwise, the needle may strike the presser foot and bend or break, causing injury.
3-8 Sewing Utility Stitches
SELECTING UTILITY STITCHES
Selecting a Stitch Pattern

- Turn the main power switch to ON. The screen shown at left is displayed. The often-used “1-01 Straight (left)” stitch pattern is automatically selected.
- Press Utility Stitch to view this screen if another screen displays.
- Use [icons] to find the stitch pattern you want. ① Preview of the selected stitch ② Stitch selection screen
- Touch the key of the stitch pattern you want to sew to select it.
Sewing Utility Stitches 3-9
CONTENTS
1 — 2 — 3 — 4 — 5 — 6 — 7 — 8 — 9 — Index
■ Stitch Selection Screens
Straight/Overcasting/Quilting Stitches

P. 1 P. 2

P. 2 P. 2
Decorative Stitches

Press to go to the next page.
Heirloom Stitches

Buttonholes/Bar tacks

Multi-directional Sewing

3-10 Sewing Utility Stitches
■ Using the Mirror Image Key
Depending on the type of utility stitch you select, you may be able to sew a horizontal mirror image of the stitch pattern.
If [icon] is lit when you select a pattern, it will be possible to make a mirror image of the pattern.
CAUTION
If [icon] is light gray after you select a stitch pattern, you can not create a horizontal mirror image of the selected stitch pattern (this is true of buttonholes, multi-directional sewing, and others).
Press [icon] so it appears as [icon] to create a horizontal mirror image of the selected stitch pattern.

Sewing Utility Stitches 3-11


■ Saving Your Preferred Stitch Settings
The settings for zigzag stitch width, stitch length, thread tension, automatic thread cutting or automatic reinforcement stitching, etc., are preset by the computer for each stitch pattern. If you want to change those settings, input the new settings and press MEMORY for each pattern you want to change. The new settings will replace the computer settings.

Example: You always use a length setting of 2.0 mm (1/16 inch) for a straight stitch
- Select the straight stitch.
- Set the length to 2.0 mm (1/16 inch), and press MEMORY.
- Press OK, and go back to the original screen, or turn off the machine. The next time you select the same straight stitch, the stitch length setting should be 2.0 mm, as you saved it.
CAUTION
-
You can change any of the settings on the
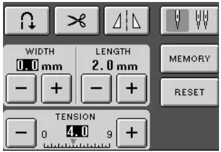 screen in the same manner.
-
If you do not press MEMORY or RESET after saving the new stitch settings, the new stitch settings will be displayed whenever you select that stitch, even after turning off the power.
-
Press RESET to return to the original machine settings. Then press MEMORY to memorize these settings.
 screen in the same manner.
Using the Sewing Type Selection Key
You can also select utility stitches using [icon]. Use this key when you are not sure which stitch to use for your application, or to get advice about sewing particular stitches. For example, if you want to sew overcasting, but you do not know which stitch to use or how to sew the stitch, you can use this screen to get advice. We recommend that beginners use this method to select patterns.
- Press [icon] to view the advice screen.

- Press a key to see advice about that type of stitch or application. Example: Displaying information about overcasting
- Press CLOSE to return to the original screen.

Sewing Utility Stitches 3-13

- The upper part of the screen displays a selection of overcasting stitches with explanations. Read the explanations and select the appropriate stitch.

- The screen displays directions for sewing the selected stitch.

3-14 Sewing Utility Stitches

- Press ▼ to scroll the screen in the direction of arrow selected, and see the next part of the instructions. Press ▲ ▼ to scroll the screen 1 line at a time, in the direction of the arrow selected. Press ▲▼ to scroll a larger section of the screen in the direction of the arrow selected. Follow the directions to sew the stitch.
- Press CLOSE at any time to return to the selection screen.
Sewing Utility Stitches 3-15
SEWING THE STITCHES
Straight Stitches
- Select a stitch pattern. If the stitch which you select has a double mark “||” at the top of the key display, you can sew reverse stitches holding the “Reverse/Reinforcement Stitch” button. If the stitch which you select has a dot mark “•” at the top of the key display, you can sew reinforcement stitches holding the “Reverse/Reinforcement Stitch” button (see page 2-3).
1-01 Straight stitch (left needle position) 1-02 Straight stitch (left needle position) 1-03 Straight stitch (middle needle positio) 1-04 Straight stitch (middle needle position) 1-05 Triple stretch stitch (left needle position) 1-06 Stem stitch for stretch fabrics (middle needle position) 1-07 Decorative straight stitch (left needle position) 1-08 Basting stitch (left needle position)
① Reverse stitch ② Reinforcement stitch
① Left needle position ② Middle needle position
3-16 Sewing Utility Stitches

 2. Attach presser foot “J”. Hold the thread tails and fabric with your left hand, and turn the balance wheel with your right hand to insert the needle into the fabric. This is the sewing start position.
 3. Lower the presser foot, and hold the “Reverse/Reinforcement Stitch” button to sew 3-4 stitches. After the machine sews reverse stitches (or reinforcement stitches), press the “Start/Stop” button to sew forward. The machine will begin sewing slowly.
① 3 - 4 reverse stitches
CAUTION Be sure the needle does not strike a basting pin, or any other objects, during sewing. The thread could tangle or the needle could break, causing injury.
 4. When sewing is completed, hold the “Reverse/Reinforcement Stitch” button to sew 3-4 reverse stitches (or reinforcement stitches) at the end of seam.
 5. After sewing, press the “Thread Cutter” button to trim the threads.
- When the automatic thread cutting and automatic reinforcement stitch keys on the screen are selected, reverse stitches (or reinforcement stitches) will be sewn automatically at the start of sewing when pressing the “Start/Stop” button. Press the “Reverse/Reinforcement Stitch” button to sew reverse stitches (or reinforcement stitches) and trim the thread automatically at the finish of sewing.
Sewing Utility Stitches 3-17
Changing the Needle Position (Left Needle Position Patterns Only)

When you select left needle position stitch patterns, you can use \boxed- and \boxed+ in the Stitch Width display to change the position of the needle. Match the distance from the right edge of the presser foot to the needle with the stitch width, then align the edge of the presser foot with the edge of the fabric during sewing for an attractive finish.
① Stitch width
WIDTH 0.0 mm \leftarrow \rightarrow WIDTH 3.5 mm \leftarrow \rightarrow WIDTH 5.5 mm \leftarrow \rightarrow WIDTH 7.0 mm
J J J J
12.0 mm (1/2 inch) 8.5 mm (11/32 inch) 6.5 mm (1/4 inch) 5.0 mm (3/16 inch)
Needle Plate Markings

For standard 16 mm (5/8 inch) seam allowance, set WIDTH 3.5 mm on LCD.
① 16 mm (5/8 inch)

Basting

-
Select 1-08 .
-
Attach presser foot “J”. Press the “Reverse/ Reinforcement Stitch” button to sew reinforcement stitches, then continue sewing.
Note
- If you do not want to use a reinforcement stitch at the beginning, you should lift the presser foot, rotate the balance wheel, pull up the bobbin thread and pull a length of top and bobbin thread out from the rear of the machine.
- You can set the stitch length between 5 mm (3/16 inch) and 30 mm (1-3/16 inch) ① Between 5mm (3/16 inch) and 30 mm (1-3/16 inch)

- Sew while keeping the fabric pulled tight.
- End the basting with reinforcement stitches.
Sewing Utility Stitches 3-19


Zigzag Stitches
Zigzag stitches are useful for overcasting, appliqué, patchwork, and many other applications.
Select a stitch pattern, and attach presser foot “J”.
If the stitch which you select has a double mark “||” at the top of the key display, you can sew reverse stitches holding the “Reverse/Reinforcement Stitch” button. If the stitch which you select has a dot mark “•” at the top of the key display, you can sew reinforcement stitches holding the “Reverse/Reinforcement Stitch” button (see page 2-3).

1-09 Zigzag stitch pattern To adjust the zigzag width, use the WIDTH key. The size of the width is the same distance on both sides of the center needle position.
1-10 Zigzag stitch pattern To adjust the zigzag width, use the WIDTH key. The size of the width is the same distance on both sides of the center needle position.
1-11 Zigzag stitch pattern To adjust the zigzag width, use the WIDTH key. The RIGHT side of the zigzag is stationary. The width change is from right to left.
1-12 Zigzag stitch pattern To adjust the zigzag width, use the WIDTH key. The LEFT side of the zigzag is stationary. The width change is from left to right.
① Reverse stitch ② Reinforcement stitch
■ Overcasting (Using a Zigzag Stitch)
Sew the overcasting along the edge of the fabric so that the right-hand side needle drop point is over the edge of the fabric.
① Needle drop position
3-20 Sewing Utility Stitches


■ Appliqué (Using a Zigzag Stitch)

Attach the appliqué using a temporary spray adhesive or basting, then sew it.
- Sew a zigzag stitch while positioning the right hand needle drop point just outside the edge of the fabric.
■ Patchwork (for Crazy Quilt)

Turn back the desired width of fabric and position it over the lower fabric, then sew so that the stitch bridges both pieces of fabric.
■ Sewing Curves (Using a Zigzag Stitch)

Shorten the stitch length setting to obtain a fine stitch. Sew slowly, keeping the seams parallel with the fabric edge as you guide the fabric around the curve.
Elastic Zigzag Stitches
Use elastic zigzag stitches for tape attaching, overcasting, darning, or a wide variety of other uses.
- Select a stitch pattern, and attach presser foot “J”.

2 step elastic zigzag 3 step elastic zigzag
■ Tape Attaching

Stretch the tape flat. While stretching the tape flat, sew the tape to the fabric.
① Tape
■ Overcasting

Use this stitch to sew overcasting on the edge of stretch fabrics. Sew the overcasting along the edge of the fabric with the needle dropping off the edge of the fabric at the right.

Overcasting
Use for the beginning and end of seams in skirts or trousers, and the beginning and end of all cuttings. Use presser foot “G”, presser foot “J”, or the side cutter attachment depending on the kind of overcasting stitch you select.
■ Overcasting Using Presser Foot “G”

- Select a stitch pattern.
For sewing light and medium weight fabrics
For sewing heavyweight fabrics
For sewing medium or heavyweight and easily-fray- ble fabric
-
Attach presser foot “G”. Lower the presser foot so that the presser foot guide is exactly against the edge of the fabric.
-
Sew along the presser foot guide.
① Guide

CAUTION
After the stitch width is adjusted, turn the balance wheel toward you by hand and check that the needle does not touch the presser foot. If the needle hits the presser foot the needle may break and cause injury.
① The needle should not touch

Sewing Utility Stitches 3-23

