Key Functions
| Display | Key Name | Explanation | Page |
|---|---|---|---|
| Pattern explanation key | Press this key to see an explanation of the selected pattern. | 1-24 | |
| Operation guide key | Press this key to see explanations for upper threading, winding the bobbin, changing the presser foot, and how to use the machine. | 1-21 | |
| Setting key | Press this key to change the needle stop position, turn the buzzer ON/OFF, adjust the pattern or screen, and change other machine settings. | 1-20 | |
| Utility stitch key | Press this key to select a straight stitch, zigzag stitch, buttonhole, blind hem stitch, or other stitches commonly used in garment construction. | 3-9 | |
| Character/ Decorative stitch key | Press this key to select character or decorative stitch patterns, or use the My Custom Stitch™ function to create your own stitch patterns. | 4-1 | |
| Embroidery key | Attach the embroidery unit and press this key. (Caution: the Embroidery screen will not display if the embroidery unit is not attached.) Press this key to sew embroidery. | 5-8 | |
| Embroidery edit key | Attach the embroidery unit and press this key. (Caution: the Embroidery Edit screen will not display if the embroidery unit is not attached.) Press this key to combine embroidery patterns. With the embroidery edit functions, you can also create original one point patterns or frame patterns. | 6-2 | |
| Screen lock key | Press this key to lock the screen. When the screen is locked, the various settings, such as the stitch width and stitch length, are locked and cannot be changed. Press this key again to unlock the settings. | 2-16 | |
| Sewing type selection key | Press this key when you do not know which stitch pattern to select, and get help selecting the appropriate stitch pattern for the sewing application, and instructions on how to sew the stitch pattern. This key is very useful for beginners. | 3-13 | |
| Stitch selection display | Stitch Pattern Selection Screen Press the key of the pattern you want to sew. Use the to change selection screens. | 3-9 | |
| Automatic reinforcement stitch key | Press this key to use the automatic reinforcement stitching (reverse stitching) setting. If you select this setting before sewing the machine will automatically sew reinforcement stitches at the beginning and end of sewing (depending on the pattern, the machine may sew reverse stitches). | 2-14 | |
| Automatic thread cutting key | Press this key to set the automatic thread cutting function. Set the automatic thread cutting function before sewing to have the machine automatically sew reinforcement stitches at the beginning and end of sewing (depending on the pattern, the machine may sew reverse stitches) and trim the threads after sewing. | 2-15 | |
| Mirror image key | Press this key to create a mirror image of the selected stitch pattern. If the key display is light gray, a mirror image of the selected stitch pattern cannot be sewn. | 3-11 |
1-14 Setting Up

\begin{tabular}{|p{0.15\textwidth}|p{0.2\textwidth}|p{0.4\textwidth}|p{0.05\textwidth}|} \hline \textbf{Display} & \textbf{Key Name} & \textbf{Explanation} & \textbf{Page} \ \hline & Needle mode selection key (single/double) & Press this key to select twin needle sewing mode. The sewing mode changes between single needle mode and twin needle mode each time you press the key. If the key display is light gray, the selected stitch pattern can not be sewn in twin needle mode. & 2-5 \ \hline & Stitch width and stitch length key & Shows the zigzag width and stitch length settings of the currently selected stitch pattern. You can use the plus and minus keys to adjust the zigzag width and stitch length settings. & 2-8 \ \hline & Thread tension key & Shows the thread tension setting of the currently selected stitch pattern. The thread tension is usually set automatically. You can use the plus and minus keys to change the thread tension settings. & 2-13 \ \hline & Manual memory key & Change the stitch pattern settings as you like (zigzag width and stitch length, thread tension, automatic thread cutting or automatic reinforcement stitching, etc.), then save them by pressing this key. & 3-12 \ \hline & Reset key & Press this key to return the selected stitch pattern's saved settings to the original settings. & 3-12 \ \hline \end{tabular}
Setting Up 1-15
Using the LCD Display

Press a key with your finger to select the stitch pattern, or to select a machine function, or operation indicated on the key.
CAUTION Only touch the screen with your finger or the included touch pen. Do not use a sharp pencil, screwdriver, or other hard or sharp object. It is not necessary to press hard on the screen. Pressing too hard or using a sharp object may damage the screen.
Adjusting Screen Brightness
CAUTION
- All or part of the screen may sometimes become darker or lighter because of changes in the air temperature or other changes in the environment around the screen. This is normal and is not a sign of malfunction. Adjust the screen if it is difficult to read.
- The screen may be dark immediately after turning on the power. This is a function of the LCD back light screen, and it is not a sign of malfunction. The screen will return to its normal level of brightness after approximately 10 minutes.
- If you are not directly in front of the machine when you view the LCD, the colors may appear to change or the screen may be difficult to see. This is a characteristic of the LCD, and not a sign of damage or malfunction. For best results operate the screen while sitting in front of the machine.
1-16 Setting Up

-
Press [icon: document with lines] to open the screen at left.
-
Press [icon: hand pointing right] to go to the next screen.

-
On the [image: brightness grid display] BRIGHTNESS OF LCD [151] [-] [+] display, use [+] and [-] to adjust the screen brightness.
- [+] makes the screen darker
- [-] makes the screen lighter
-
Once you have adjusted the screen brightness, press CLOSE.
Setting Up 1-17

Choosing the Display Language
- Press [icon: document] to open the screen at left.
- Press [icon: hand pointing right] to go to the next screen.

- When you see this [icon: globe, ENGLISH, arrows] display, press the arrow keys to choose the display language.
- Choose from the following languages:
- ENGLISH
- GERMAN
- FRENCH
- ITALIAN
- DUTCH
- SPANISH
- DANISH
- NORWEGIAN
- FINNISH
- SWEDISH
- PORTUGUESE
- JAPANESE
① Shows the selected display language
- When the desired language is displayed, press CLOSE.
1-18 Setting Up

Checking the Application
The application can be started up from the floppy disk. If the machine is turned on with the floppy disk inserted, the machine imports the application from the floppy disk, then starts it up.
- Press [icon] to open the screen at left.
- Press [icon] to go to the next screen.
- Press [ON OFF] beside [APPLICATION CHECK icon] until it changes to [ON OFF], and then press [CLOSE].
- Turn off the machine.
- Insert the floppy disk containing the application into the floppy disk drive slot on the right side of the machine, and then turn on the machine.

CAUTION
- Do not insert anything other than floppy disks into the floppy disk drive slot, otherwise the floppy disk drive may be damaged.
- Do not insert a floppy disk containing pattern data other than those saved using our application, data design equipment or a sewing machine, otherwise the sewing machine may malfunction. (Only .pes, .phc and .dst pattern files can be used.)
- After the sewing machine reads the floppy disk, it starts up.
CAUTION Do not turn off the machine or eject the floppy disk while the machine is reading the disk, otherwise the disk may be damaged.
- With your finger, lightly press the opening screen. A screen that allows you to select the sewing machine or the application appears.
- If a floppy disk that does not contain the application is inserted, the Utility Stitch screen appears.
- If Application Check was set to "ON", it may take some time until the machine starts up. If you do not wish to use the application and Application Check is set to "OFF", the length of time for the machine to start up does not change.

Setting Up 1-19

Using the Machine Settings Key
Press [icon] to change the default machine settings (needle stop position, embroidery speed, opening display, etc.)
Note This function will be available in future technology upgrades.

① Select the needle stop position (the needle position when the machine is not operating) to be up or down.
② Select whether to use the sewing speed controller to determine the zigzag width (see page 3-34).
③ Make adjustments to character or decorative stitch patterns (see page 4-12).
④ Select from among 10 displays when using the Embroidery functions (see page 5-45).
⑤ Change the thread color display on the embroidery screen; display the thread number, color name, time to embroider, or one of the two custom thread color numbering sets (see page 5-42).
⑥ When embroidery data containing custom thread colors specified with the PE-Design Ver. 5.0 is saved on a floppy disk, the stored custom thread colors are read as those from the sewing machine if "ON" is selected for this setting.
⑦ Adjust the maximum embroidery speed setting (see page 5-41).
⑧ Program version display
Note Version 3.0, this is the installed software version for your machine. Check with your local authorized Brother dealer or at www.brother.com for notification of an available updates.
Press [icon] to go to the next screen.
① Change the brightness of the LCD (see page 1-16).
② Turn the buzzer ON or OFF.
③ Turn the lamp ON or OFF.
④ Turn the opening screen display ON or OFF.
⑤ Turn application checking ON or OFF (see page 1-19).
⑥ Turn the display of each embroidery color ON or OFF (see page 5-19).
⑦ Change the display language (see page 1-18).

1-20 Setting Up

 Press to go to the next screen.
① Thread color numbers can be customized (see page 5-43).
Using the Machine Operations Key
Press to open the screen shown below. Five categories are displayed at the top of the screen. Press a key to see more information about that category.

① PRINCIPAL PARTS displays information about the main parts of the machine and their functions. This is the first screen displayed when you press .
② BASIC OPERATION displays information about threading the machine, changing presser feet, etc.
③ EMBROIDERY BASIC OPERATION displays information about attaching the embroidery unit, preparing fabric for embroidering, etc.
④ TROUBLESHOOTING displays information about dealing with minor difficulties.
⑤ MAINTENANCE displays information about changing the lamp, cleaning the machine, etc.


Example: Displaying information about upper threading

-
Press [icon of question mark over sewing machine].
-
Press BASIC OPERATION. The lower half of the screen will change.
-
Press [icon of upper threading] (upper threading).
-
This screen shows instructions for threading the machine. Use the arrow keys to scroll downward for more information. [up arrow] [down arrow] = to scroll slowly [double up arrow] [double down arrow] = to scroll quickly If you select bobbin winding, setting the bobbin, or upper threading, [icon of film reels] is displayed. Press [icon of film reels] to see a video of the displayed instructions.
-
Press CLOSE to go back to the original screen.

1-22 Setting Up


Contents of Other Categories

PRINCIPAL PARTS
| Utility Stitch | Character Decorative Stitch | Embroidery | Embroidery Edit |
|---|---|---|---|
| PRINCIPAL PARTS | TROUBLESHOOTING | ||
| BASIC OPERATION | MAINTENANCE | ||
| EMBROIDERY BASIC OPERATION | |||
| CLOSE |

BASIC OPERATION
| Utility Stitch | Character Decorative Stitch | Embroidery | Embroidery Edit |
|---|---|---|---|
| PRINCIPAL PARTS | TROUBLESHOOTING | ||
| BASIC OPERATION | MAINTENANCE | ||
| EMBROIDERY BASIC OPERATION | |||
| CLOSE |

EMBROIDERY BASIC OPERATION
| Utility Stitch | Character Decorative Stitch | Embroidery | Embroidery Edit |
|---|---|---|---|
| PRINCIPAL PARTS | TROUBLESHOOTING | ||
| BASIC OPERATION | MAINTENANCE | ||
| EMBROIDERY BASIC OPERATION | |||
| CLOSE |

TROUBLESHOOTING
| Utility Stitch | Character Decorative Stitch | Embroidery | Embroidery Edit |
|---|---|---|---|
| PRINCIPAL PARTS | TROUBLESHOOTING | ||
| BASIC OPERATION | MAINTENANCE | ||
| EMBROIDERY BASIC OPERATION | |||
| UPPER THREAD BREAKS | BOBBIN THREAD BREAKS | ||
| SKIPPED STITCHES | FABRIC PUCKERS | ||
| HIGH-PITCHED SOUND WHILE SEWING | CAN NOT THREAD THE NEEDLE | ||
| THREAD TENSION IS INCORRECT | CHARACTER PATTERN DOES NOT SEW OUT CORRECTLY | ||
| EMBROIDERY PATTERN DOES NOT SEW OUT CORRECTLY | NEEDLE BREAKS | ||
| FABRIC DOES NOT FEED THROUGH THE MACHINE | THE MACHINE DOES NOT OPERATE | ||
| THE EMBROIDERY UNIT DOES NOT OPERATE | THE LCD DISPLAY IS DIFFICULT TO SEE | ||
| CLOSE |

MAINTENANCE
| Utility Stitch | Character Decorative Stitch | Embroidery | Embroidery Edit |
|---|---|---|---|
| PRINCIPAL PARTS | TROUBLESHOOTING | ||
| BASIC OPERATION | MAINTENANCE | ||
| EMBROIDERY BASIC OPERATION | |||
| CLOSE |
Setting Up 1-23
Using the Pattern Explanation Key
If you want to know more about the uses for a stitch pattern, select the pattern and press [icon] to see an explanation of the stitch selection.

Example: Displaying information about [icon 4-01]
-
Press [icon 4-01]. (If the currently displayed stitch selection screen does not include [icon 4-01] use the screen selection tabs to go to the correct screen).
-
Press [icon].
-
The screen shows information about [icon 4-01].
-
Press CLOSE to return to the original screen.

1-24 Setting Up

Bobbin Winding/Lower Threading
Press [icon] \rightarrow BASIC OPERATION \rightarrow [icon] \rightarrow [icon] in that order to display a video example of bobbin winding on the LCD (see page 1-22). Follow the steps explained below to complete the operation.
CAUTION
Use only bobbins recommended by the manufacturer of this machine (see page 1-8). Using other bobbins may result in damage or injury.

- Turn on the main power switch.
- Align the groove in the bobbin with the spring on the bobbin winder shaft, and set the bobbin on the shaft. ① Groove of the bobbin ② Spring on the shaft
- Pivot the spool pin so that it angles toward the front of the machine. Set the thread spool on the spool pin so that the thread unrolls from the front of the spool.
- Push the spool cap on the spool pin as far as possible, then return the spool pin to its original position. ① Spool pin ② Spool cap ③ Thread spool
CAUTION
- If the thread spool and/or spool cap are set incorrectly, the thread may tangle on the spool pin and cause the needle to break.
- Use the spool cap (large, medium, or small) that is closest in size to the thread spool. If a spool cap smaller than the thread spool is used, the thread may become caught in the slit on the edge the spool and cause the needle to break.
Setting Up 1-25


Note When sewing with fine, cross-wound thread (see the illustration at left), use the small spool cap, and leave a small space between the cap and the thread spool (see the illustration at left).
① Spool cap (small) ② Thread spool (cross-wound thread) ③ Space

- Hold the thread from the spool in both hands, and pass the thread behind the thread guide cover on top of the machine. Use both hands to set the thread around the thread guide plate. ① Thread guide plate


- Pull the thread out as indicated on drawing.
1-26 Setting Up
- Use both hands to set the thread around projection in the thread guides. ① Projection in the thread guides

- Pass the thread around the thread guide shaft and the pretension disk as indicated on drawing. Make sure that thread is correctly inserted inside the pretension disk. ① Thread guide shaft ② Pretension disk

- Wind the thread clockwise around the bobbin 4-5 times (as shown in the illustration).

- Pass the end of the thread through the guide slit in the bobbin winder seat, and pull the thread to the right. The cutter will cut the thread. ① Guide slit ② Bobbin winder seat
CAUTION Be sure to follow the process described. If the thread is not cut with the cutter, and the bobbin is wound, when the thread runs low it may tangle around the bobbin and cause the needle to break.
Setting Up 1-27

11.Set the bobbin holder to the left, until it clicks into place. ① Bobbin holder

12.Press the “Bobbin Winder” button to start winding the bobbin.

13.The bobbin will stop rotating automatically when it is done winding, and the bobbin holder will return to the original position.
14.Remove the bobbin.
CAUTION When removing the bobbin, do not pull on the bobbin winder seat. Doing so could loosen or remove the bobbin winder seat, resulting in damage to the machine.

▲ CAUTION Setting the bobbin improperly may cause the thread tension to loosen, breaking the needle and resulting in injury.
① Wound evenly ② Wound poorly

1-28 Setting Up
■ Winding the Bobbin During Sewing
With this machine, you can wind the bobbin during sewing. It will be convenient to wind the bobbin embroidery thread while sewing embroidery. The threading process is different from the earlier section, so read and follow the instructions carefully.

① Supplemental spool pin
-
Align the groove in the bobbin with the spring on the bobbin winder shaft, and set the bobbin on the shaft. ① Groove of the bobbin ② Spring on the shaft
-
Pull up the supplemental spool pin and set it in the "up" position. ① Supplemental spool pin
-
Place the spool of thread on the supplemental spool pin, so that thread unrolls from the back. Then push a spool cap onto the spool pin as far as possible to secure the thread spool. ① Spool pin ② Spool cap ③ Thread spool
Setting Up 1-29


- With your left hand, hold the thread near the thread spool. With your right hand, hold the end of the thread, and use both hands to set the thread around the thread guides.
① Projection in the thread guides

- Pass the thread around the projection in the thread guides, then pass the thread under the pretension disk. Make sure to set the thread securely under the pretension disk.
① Thread guide shaft ② Pretension disk
- Follow steps 9 - 14 from the previous section (see pages 1-27, 1-28).

CONTENTS 1 — 2 — 3 — 4 — 5 — 6 — 7 — 8 — 9 — Index
1-30 Setting Up
Setting the Bobbin
Press [icon] \rightarrow BASIC OPERATION \rightarrow [icon] \rightarrow [icon] in that order to display a video example of the operation on the LCD (see page 1-22). Follow the steps explained below to complete the operation.
CAUTION
Setting the bobbin improperly may cause the thread tension to loosen, breaking the needle and resulting in injury.
① Wound evenly
② Wound poorly

- Raise the presser foot lever.
- Slide the bobbin cover latch to the right, and remove the bobbin cover.
① Bobbin cover

- Put the bobbin in the shuttle, making sure the thread unrolls as shown.


CAUTION Be sure the bobbin is set so the thread unrolls in the correct direction. If the thread unrolls in the wrong direction, it may cause the thread tension to be incorrect or the needle to break.
-
Guide the thread through the groove, then pull the thread toward you to cut off any excess. ① Cutter

-
Replace the bobbin cover. Place the left tab in place (see arrow 1 at left), then press lightly on the right side (see arrow 2 at left) until the cover clicks into place.
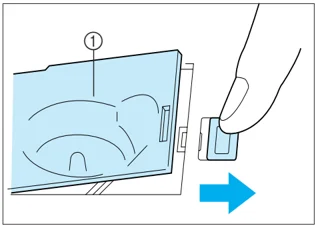

Note You can begin sewing without pulling up the bobbin thread. When you need to pull up the bobbin thread (free motion embroidery) see the illustrated directions on page 1-38.
Setting Up 1-31


Upper Threading
Press [icon] \rightarrow BASIC OPERATION \rightarrow [icon] \rightarrow [icon] in that order to display a video example of the operation on the LCD (see page 1-22). Follow the steps explained below to complete the operation.
CAUTION Be sure to thread the machine properly. Improper threading can cause the thread to tangle and break the needle, leading to injury.

- Raise the presser foot lever.

CAUTION The machine has an upper threading shutter to insure proper threading. The upper threading shutter opens when the presser foot is raised. Upper threading can not take place if the presser foot is not raised.
① Upper threading shutter
- Press the “Needle Position” button to set the needle in the up position. This step moves the thread take-up lever to a position in which it can be threaded. Be sure to do this step before continuing.

1-32 Setting Up

- Pivot the spool pin so that it angles toward the front of the machine. Set the thread spool on the spool pin so that the thread unrolls from the front of the spool.
- Push the spool cap onto the spool pin as far as possible, then return the spool pin to its original position. ① Spool cap
CAUTION
- If the thread spool and/or spool cap are set incorrectly, the thread may tangle on the spool pin and cause the needle to break.
- Use the spool cap (large, medium, or small) that is closest in size to the thread spool. If a spool cap smaller than the thread spool is used, the thread may become caught in the slit on the end of the spool and cause the needle to break.
Note When sewing with fine, cross-wound thread (see the illustration), use the small spool cap, and leave a small space between the cap and the thread spool (see the illustration at left).
① Spool cap (small) ② Thread spool (cross-wound thread) ③ Space
- Hold the thread from the spool in both hands, and pass the thread around the plate in the thread guides. Use both hands to set the thread around the thread guide plate.
① Thread guide plate


Setting Up 1-33

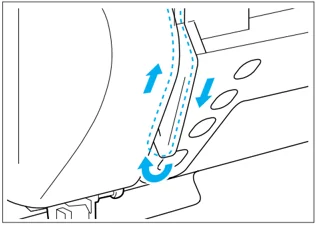
 6. Pass the thread through the groove according to the threading sequence (numbers) indicated on the machine.
-
To thread the take-up lever, pass the thread from the back right side to the front left side. ① Threading the take-up lever
-
Set the thread behind the needle clamp thread guide on the needle bar. To set the thread easily, hold the end of the thread with your left hand, and use your right hand to guide the thread behind the needle clamp thread guide.
1-34 Setting Up


- Set the thread securely into the slit of the disk in the thread guide. Be sure that the thread catches the corner of the thread guide.
① Corner of the thread guide

- Use the thread cutter on the side of the machine to cut the thread.

- Lower the presser foot lever.
CAUTION Be sure to lower the presser foot lever. Continuing without lowering the lever may cause damage to the machine.

- Push down the needle threader lever as far as possible. The hook will rotate and pass through the eye of the needle. Make sure that the hook does not catch the fabric or any other objects near the presser foot.
① Hook

Setting Up 1-35
- Slowly return the needle threader lever to its original position. Check that the hook has pulled the thread through the eye, then release the lever.

- Pull the thread loop toward the back of the machine.
Note Do not pull the thread too strongly, as you may bend the needle.
CAUTION The needle threader lever can only be used with home sewing machine needles size 75/11-100/16. Check the table on page 1-45 for appropriate needle and thread combinations. Note that, if you are using transparent nylon mono-filament thread, only needles in the range of 90/14-100/16 can be used.

- Pass the thread under the presser foot, and pull it about 100 mm (3 inch - 4 inch) toward the back of the machine. ① 100 mm (3 inch - 4 inch)
CAUTION
- If the threading is not successful, raise the presser foot lever and start again from step 8, setting the thread in the needle clamp thread guide.
- There are certain decorative threads that can not be threaded using the needle threader lever. When using these threads, set the thread behind the needle clamp thread guide (step 8), then thread the eye of the needle manually. Make sure the main power switch is OFF when threading the needle manually.

1 — 2 — 3 — 4 — 5 — 6 — 7 — 8 — 9 —
1-36 Setting Up
Using the Spool Net
If using transparent nylon thread, metallic thread, or other strong thread, place the included spool net over the spool before using. If the spool net is too long, fold it once to match it to the spool size before placing it over the spool.

① Spool net ② Thread spool ③ Spool pin ④ Spool cap
V ertical Spool Pin
Use when embroidering with metallic thread.

- Insert the vertical spool pin into the end of the bobbin winder shaft.
- Install the spool felt and the thread spool in that order, and then thread the upper thread. ① Insert the vertical spool pin into the end of the bobbin winder shaft ② Spool felt ③ Thread spool
- When setting the thread spool, set it so that the thread winds off from the front of the spool.
- If using metallic thread, we recommend that you use a 90/14 home sewing machine needle.
Note This method keeps the thread from twisting as it comes off the spool pin.
Pulling Up the Bobbin Thread
There may be some sewing applications when you want to pull up the bobbin thread, for example, when making gathers, darts, free motion quilting or embroidery.

- Guide the bobbin thread through the groove, following the arrow in the illustration. Do not cut the thread.
- Do not replace the bobbin cover.

- While holding the upper thread, press the needle position button to raise the needle.

- Gently pull the upper thread, and a loop of the bobbin thread will come out of the hole in the needle plate.

- Pull up the bobbin thread, then pass it under the presser foot and pull it about 100 mm (3-4 inch) toward the back of the machine, matching the upper thread.
- Replace the bobbin cover. ① Upper thread ② Bobbin thread
1-38 Setting Up
Changing the Presser Foot
CAUTION
- Always turn off the power before changing the presser foot. If the power is on and the “Start/Stop” button or another button is pressed, the machine will start and may cause injury.
- Always use the correct presser foot for the selected stitch pattern. If the wrong presser foot is used, the needle may strike the presser foot and bend or break, and may cause injury.
- Only use presser feet for this machine. Using other presser feet may lead to accident or injury.
■ Removing the Presser Foot

- Press the “Needle Position” button to raise the needle, and then turn off the sewing machine.
- Raise the presser foot lever.

- Press the black button at the back of the presser foot holder. The presser foot comes off. ① Presser foot holder
■ Attaching the Presser Foot

- Place the new presser foot under the holder, aligning the foot pin with the notch in the holder. Lower the presser foot lever so that the presser foot pin snaps into the notch in the holder. ① Notch ② Pin
Setting Up 1-39
■ Attaching the Walking Foot
The walking foot holds the fabric between the presser foot and the upper and lower feed dogs to feed the fabric, this enables you to have better fabric control when sewing difficult fabrics (such as vinyl cloth, leather, or synthetic leather) or fabrics that slip easily (such as quilting or velvet).
- The walking foot can only be used with straight or zigzag stitch patterns. Reverse stitches can not be sewn with the walking foot. Only select straight or zigzag stitch patterns with reinforcement stitches.
1-02 1-04 1-11 1-12 1-13 1-30 P 1-32 Q
- To use the walking foot, you need the low shank adapter and the screw (large) for the walking foot.
Adapter Screw(large)

-
Press the “Needle Position” button to set the needle in the up position, and then turn off the main power switch.
-
Raise the presser foot lever.

- Push the black button on the presser foot holder and remove the presser foot. ① Presser foot holder

- Loosen the screw of the presser foot holder to remove the presser foot holder.
1-40 Setting Up


- Set the low shank adapter for the walking foot that came with your machine on the presser foot shaft, and push it up as far as possible. Tighten the screw securely with the screwdriver.

CAUTION Use the screwdriver to tighten the screw securely. If the screw is loose, the needle may strike the presser foot and cause injury.
- Set the operation lever of the walking foot so that the fork surrounds the needle clamp, and set the walking foot on the presser foot shaft.

- Lower the presser foot lever, insert the screw (large) for the walking foot, and tighten the screw securely with the screwdriver.

CAUTION
- Use the screwdriver to tighten the screw securely. If the screw is loose, the needle may strike the presser foot and cause injury.
- Be sure to turn the balance wheel toward the front of the machine to check that the needle does not strike the presser foot. If the needle strikes the presser foot, injury may result.
CAUTION When sewing with the walking foot, sew at medium to low speeds.
■ Reattaching the Presser Foot Holder

- Push the “Needle Position” button to raise the needle, then turn the main power switch to OFF.
- Raise the presser foot lever.
 3. Loosen the screw with the screwdriver, and remove the walking foot.
 4. Remove the low shank adapter.
1-42 Setting Up
- With the presser foot lever raised, tighten the screw lightly to attach the presser foot holder.
- Place the presser foot “J” under the holder. Lower the presser foot lever and use the screwdriver to tighten the screw firmly.

Note If the presser foot holder is not installed correctly, the thread tension may loosen due to improper presser foot holder height.
CAUTION
- Be careful not to touch the needle during this time, otherwise injury may result.
- Use the screwdriver to tighten the presser foot holder screw securely. If the screw is loose, the needle may strike the presser foot and cause injury.
Changing the Needle
CAUTION
- Turn the main power switch to OFF before changing the needle. If the main power is left on and the Start/Stop button or another operation button is pressed accidentally, the machine will start and injury may result.
- Use only sewing machine needles for home use. Other needles may bend or break and cause injury.
- Never sew with a bent needle. A bent needle will easily break and cause injury.
To Check the Needle Correctly: To check the needle, place the flat side of the needle on a flat surface. Check the needle from the top and the sides. Throw away any bent needles.
① Parallel space ② Level surface (bobbin cover, glass, etc.)

- Place a level surface under the needle
Setting Up 1-43

- Press the “Needle Position” button to raise the needle, then turn the main power switch to OFF.
- Lower the presser foot lever.

- Use the screwdriver to turn the screw toward the front of the machine and loosen the screw, then remove the needle.
CAUTION Do not apply pressure to the needle clamp screw. Doing so may damage the needle or machine.

- With the flat side of the needle facing the back, insert the new needle all the way to the top of the needle stopper (viewing window) in the needle clamp. Use a screwdriver to securely tighten the needle clamp screw.
① Needle stopper ② Hole for setting needle ③ Flat side of needle

⚠ CAUTION Be sure to push in the needle until it touches the stopper, and securely tighten the needle clamp screw with a screwdriver. If the needle is not completely inserted or the needle clamp screw is loose, the needle may break or the machine may be damaged.

■ About the Needle
The sewing machine needle is probably the most important part of the sewing machine. Choosing the proper needle for your sewing project will result in a beautiful finish and fewer problems. Below are some things to keep in mind about needles.
- The smaller the needle number, the smaller the needle. As the numbers increase, the needles get thicker.
- Use fine needles with lightweight fabrics, and thicker needles with heavyweight fabrics.
- To avoid skipped stitches, use ball point needle (golden colored) 90/14 with stretch fabrics.
- To avoid skipped stitches, use ball point needle (golden colored) 90/14 when sewing character or decorative stitches without the embroidery unit.
- Use needle 75/11 for embroidery. Ball point needles (golden colored) 90/14 are not recommended for embroidery, as they may bend or break, causing injury.
- It is recommended that a 90/14 needle should be used when embroidering on heavyweight fabrics or stabilizing products (for example, denim, puffy foam, etc.). 75/11 needle may bend or break, which could result in injury.
- A home sewing machine needle 75/11 is inserted in the sewing machine.
■ Fabric/Thread/Needle Combinations
\begin{tabular}{|l|l|l|c|l|} \hline \multicolumn{2}{|c|}{Fabric} & \multicolumn{2}{c|}{Thread} & Size of needle \ \cline{3-4} \multicolumn{2}{|c|}{} & Type & Size & \ \hline Medium weight fabric & Broadcloth & Cotton & 60 - 80 & 75/11 - 90/14 \ \cline{2-5} & Taffeta & Synthetic mercerized & 60 - 80 & \ \cline{2-5} & Flannel, Gabardine & Silk or silk finished & 50 - 80 & \ \hline Lightweight fabric & Lawn, Batiste & Cotton & 60 - 80 & 65/9 - 75/11 \ \cline{2-5} & Georgette & Synthetic mercerized & 60 - 80 & \ \cline{2-5} & Challis, Satin & Silk & 50 - 80 & \ \hline Heavyweight fabric & Denim & Cotton & 30 - 50 & 90/14 - 100/16 \ \cline{2-5} & Corduroy & Synthetic mercerized & 50 & \ \cline{2-5} & Tweed & Silk & 50 & \ \hline Stretch fabric & Jersey & Thread for knits & 50 - 60 & Ball point needle (golden colored) 75/11 - 90/14 \ \cline{2-5} & Tricot & & & \ \hline For top stitching & & Synthetic mercerized & 30 & 90/14 - 100/16 \ \cline{3-5} & & Silk & 30 & \ \hline \end{tabular}
Note
- For transparent nylon thread, always use needle 90/14 - 100/16.
- The same thread is usually used for the bobbin thread and upper threading.
▲ CAUTION Be sure to follow the needle, thread, and fabric combinations listed in the table. Using an improper combination, especially a heavyweight fabric (i.e., denim) with a small needle (i.e., 65/9 - 75/11), may cause the needle to bend or break, and lead to injury. Also, the seam may be uneven, the fabric may pucker, or the machine may skip stitches.
1-46 Setting Up