INK JET PRINTER
EPSON® STYLUS® PHOTO R2400
User's Guide

Copyright Notice
All rights reserved. No part of this publication may be reproduced, stored in a retrieval system, or transmitted in any form or by any means, electronic, mechanical, photocopying, recording, or otherwise, without the prior written permission of Seiko Epson Corporation. The information contained herein is designed only for use with this Epson printer. Epson is not responsible for any use of this information as applied to other printers.
Neither Seiko Epson Corporation nor its affiliates shall be liable to the purchaser of this product or third parties for damages, losses, costs, or expenses incurred by purchaser or third parties as a result of: accident, misuse, or abuse of this product or unauthorized modifications, repairs, or alterations to this product, or (excluding the U.S.) failure to strictly comply with Seiko Epson Corporation’s operating and maintenance instructions.
Seiko Epson Corporation shall not be liable for any damages or problems arising from the use of any options or any consumable products other than those designated as Original Epson Products or Epson Approved Products by Seiko Epson Corporation.
A Note Concerning Responsible Use of Copyrighted Materials
Epson encourages each user to be responsible and respectful of the copyright laws when using any Epson product. While some countries’ laws permit limited copying or reuse of copyrighted material in certain circumstances, those circumstances may not be as broad as some people assume. Contact your legal advisor for any questions regarding copyright law.
Trademarks
Epson, Epson Stylus, Epson UltraChrome, and Epson UltraChrome Hi-Gloss are registered trademarks, and Epson UltraChrome K3 and Exceed Your Vision are trademarks of Seiko Epson Corporation.
Peizo Pro, BorderFree, RPM, and UltraSmooth are registered trademarks, PhotoEnhance is a trademark, and Epson PhotoCenter and Epson Connection are service marks of Epson America, Inc.
General Notice: Other product names used herein are for identification purposes only and may be trademarks of their respective owners. Epson disclaims any and all rights in those marks.

© 2007 Epson America, Inc. 4/07 CPD-19428R3
Contents
Welcome! About Exif Print 8 About Your Software 8 About Your Documentation 9 Viewing the On-screen Reference Guide 10
Loading Paper Loading Paper in the Sheet Feeder 12 Loading Special Paper in the Sheet Feeder 14 Loading Multiple Sheets of Matte Paper 15 Loading Special Paper in the Single Sheet Guide 17 Loading Roll Paper or Canvas 21 Loading Thick Media in the Front Path 25
Printing From Start to Finish Basic Printing in Windows 28 Selecting the Settings You Use Most Often 30 Customizing Your Windows Print Settings 31 Basic Printing With Mac OS X 33 Customizing Your Macintosh Print Settings 39 Selecting the Correct Paper Type 41
Printing Special Photos Printing on Roll Paper 43 Selecting Roll Paper Print Settings 44 Removing Your Printed Photos 48 Removing and Storing Roll Paper 48
Contents 3
Printing Borderless Cut Sheets 49 Windows 50 Mac OS X 51 Managing Color With Profiles 53 Printing With a Color Profile 53 Solving Color Management Problems 62 Printing a Custom Profile Test Target 62 Creating a Custom Profile 66 Easy Printing With Photoshop Elements 3.0 67 Matching Black Ink to Paper Type 68 Swapping the Black Ink Cartridges 70 Confirming the Swapped Cartridge Settings 71 Advanced Black and White Photo Printing 73 Windows 74 Mac OS X 76
Maintaining Your Printer 79 Cleaning the Print Head 79 Automatically Checking and Cleaning the Print Head 80 Running the Head Cleaning Utility 81 Replacing an Ink Cartridge 82 Checking the Ink Cartridge Status 83 Purchasing Ink Cartridges 83 Ink Cartridge Precautions 84 Removing and Installing Ink Cartridges 84 Aligning the Print Head 86 Automatically Aligning the Print Head 86 Manually Aligning the Print Head 87 Cleaning the Printer 88 Transporting the Printer 89
4 Contents
Solving Problems 91 Printer Parts 92 Printer Buttons 93 Printer Lights 94 Diagnosing Printer Problems 94 Running a Printer Check 96 Problems and Solutions 97 Setup and Software Installation Problems 97 Printer Problems 98 Quality Problems 99 Paper Problems 101 Miscellaneous Problems 104 Uninstalling and Reinstalling Printer Software 105 Where To Get Help 106 Epson Technical Support 106 Technical Support for Other Photo Software 107
Requirements and Notices 109 Windows System Requirements 109 Macintosh System Requirements 109 Important Safety Instructions 110 Ink Cartridge Safety Instructions 111 FCC Compliance Statement 112 Declaration of Conformity 113 Epson America, Inc. Limited Warranty 113
Index 115
Contents 5
6 Contents
Welcome!
Your Epson Stylus® Photo R2400 gives you beautiful archival prints on a wide variety of glossy and matte papers in many sizes.
Your outstanding printouts result from these advanced features:
■ Nine individually replaceable Epson® ink cartridges let you print at up to 5760 × 1440 dpi (dots per inch).
■ Large gamut, pigment-based, Epson UltraChrome K3™ inks and compatible papers deliver brilliant, long-lasting, water-resistant prints.
■ Light Black, Light Light Black, and either Photo Black or Matte Black ink cartridges provide neutrality and tonal scale accuracy for demanding black and white photographs.
■ Advanced printing options give you control over grayscale color tonalities (such as cool, neutral, warm, and sepia).
■ Large format and thick media capabilities let you print panoramics, portraits, and specialty prints up to 13 × 44 inches.
■ Versatile paper handling lets you create BorderFree®, frame-ready prints in popular sizes, including 4 × 6, 5 × 7, 8 × 10, Letter, 11 × 14, 12 × 12, 13 × 19, and others.
■ Roll paper feeder allows continuous printing of multiple photos or panoramics on canvas and photo paper.
■ Automatic print head cleaning and alignment utilities analyze your print quality and improve it quickly and easily.
■ Hi-Speed USB 2.0 and FireWire® (IEEE 1394) ports provide fast connections.
Note: To achieve the highest USB speed, your computer must also have a Hi-Speed USB 2.0 port connected to the printer with a Hi-Speed USB 2.0 cable.
About Exif Print
The Exif (Exchangeable Image File) Print format includes information about your digital camera settings in JPEG/TIFF files so your printer and application can use them to create accurate print settings. Most digital cameras store Exif Print information such as shutter speed, metering, flash, and exposure settings, resolution, and lens use in the JPEG/TIFF image file. Your printer uses the information to ensure the most accurate image reproduction.
About Your Software
Your printer CD-ROM includes all the software you need for printing. See the Start Here sheet for installation instructions.
■ Your printer driver runs your printer and lets you control how your documents look. You can’t print without it.
Tip: It’s a good idea to check Epson’s support website periodically for free updates to your printer driver. Visit http://support.epson.com. Download instructions are posted for your convenience.
■ Your photo software includes these great tools:
Epson EasyPrint Module (for Windows®) works with certain photo printing applications to make printing on your Stylus Photo R2400 fast and easy.
Epson Premium ICC Color Profiles work with Adobe Photoshop and other ICC-aware applications to achieve more accurate color in your prints on various paper types. You can download additional profiles at http://support.epson.com.
Epson PhotoCenter$^{SM}$ is Epson’s free photo-sharing web site where you can store, organize, and share your photos; print high-resolution photos straight from the web; and create free online postcards. Your printer software installer lets you add a link to Epson PhotoCenter on your desktop.
8 Welcome!
About Your Documentation
To set up your printer and install its software, see the Start Here sheet.
This book contains instructions on:
- Loading all types of paper
- Printing with Windows or Mac® OS X
- Maintaining the printer
- Troubleshooting
At the end of the book, you’ll also find the system requirements, important safety information, and the product’s warranty.
Please follow these guidelines throughout:
Warnings must be followed carefully to avoid bodily injury.
Cautions must be observed to avoid damage to your equipment.
Notes contain important information about your printer.
Tips contain hints for better printing.
For more details about your printer, network setup instructions and specifications, see your on-screen Reference Guide, as described in the next section.
Welcome! 9
Viewing the On-screen Reference Guide
Follow the instructions on the Start Here sheet to install the on-screen Reference Guide, if you haven’t already.
Note: You need a browser—such as Microsoft® Internet Explorer 4.0 or later, Safari™ 1.0 or later, Mozilla® Firefox® 1.0 or later, or Netscape® Navigator® 3.0 or later—to view the manual. If you are using a different browser, the pages may not display correctly.
- Double-click the SPR2400 Reference Guide icon on your desktop.
- Click a topic on the left to expand the table of contents.
- Click the topic you want to view.
- If there’s a right arrow ▶, click it to view subtopics, then click on a topic.
- If there’s a down arrow ▼, click it to close a subtopic list.
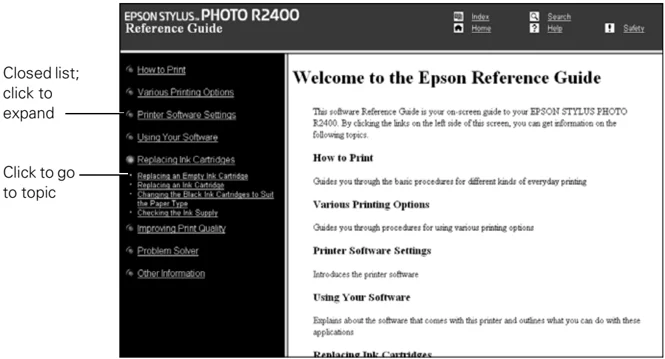
Note: If you see an icon for an unloaded graphic when viewing your Reference Guide in Netscape Navigator, click the Reload button to load the graphic.
10 Welcome!
Loading Paper
You can load a variety of paper types in your printer, as described in these sections:
| Paper/Media | Where to load | See page |
|---|---|---|
| Plain paperEpson Premium Photo Paper GlossyEpson Premium Glossy Photo PaperEpson Ultra Premium Photo Paper LusterEpson Premium Luster Photo PaperEpson Premium Photo Paper Semi-glossEpson Premium Semigloss Photo PaperEpson Presentation Paper MatteEpson Photo Quality Ink Jet PaperEpson Premium Presentation Paper Matte*Epson Matte Paper Heavyweight*Epson Premium Presentation Paper Double-sided*Epson Double-sided Matte Paper*Epson Ultra Premium Presentation Paper Matte*Epson Enhanced Matte Paper*Epson Proofing Paper SemimatteEpson Bright White PaperEpson Premium Bright White PaperEpson Photo Quality Self Adhesive Sheets | Sheet feeder | 12, 14 |
| Epson UltraSmooth® Fine Art PaperPremierArt™ Matte Scrapbook Photo Paper for EpsonEpson Velvet Fine Art PaperEpson Watercolor Paper - Radiant White | Single sheet guide | 17 |
| Roll paper, including PremierArt Water Resistant Canvas and Piezo Pro® Matte Canvas | Roll paper holder | 21 |
|---|---|---|
| Thick media or posterboard (1.0 - 1.3 mm thickness) | Front path | 25 |
- This matte paper requires the matte sheet support when loading multiple sheets larger than letter-size; smaller paper can be loaded without it. See page 15 for instructions.
Loading Paper in the Sheet Feeder
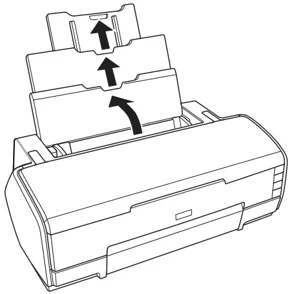
- Open the paper support and pull up the support extensions.
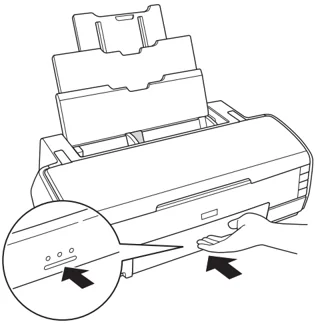
- Push in the bottom of the output tray. The tray opens and moves up.
12 Loading Paper
- Pull out the output tray extension.
- Place your paper in the printer and slide it against the right side of the sheet feeder.
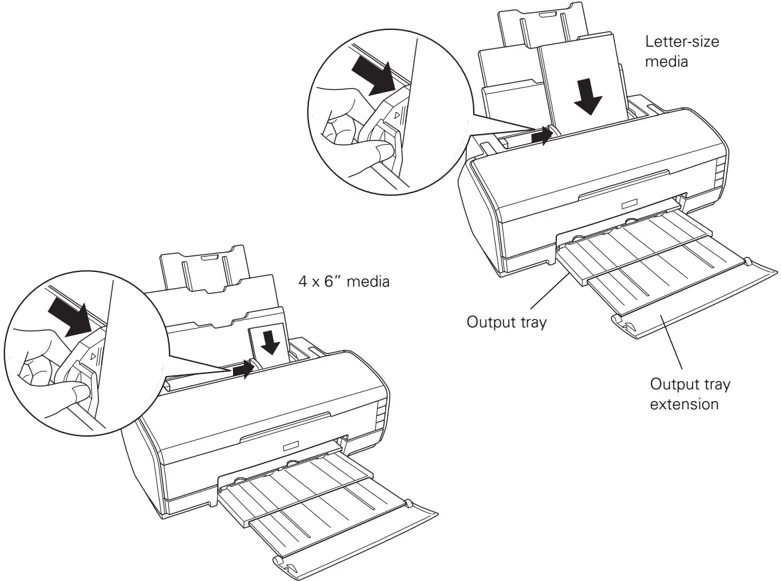
Check the following as you load paper:
■ Always load the short edge first, even for printing landscape-oriented documents.
■ Load the printable side face-up. It’s usually whiter or brighter than the other side.
■ Load letterhead or preprinted paper into the printer top edge first.
■ Don’t load paper above the arrow on the left edge guide.
- Adjust the left edge guide to fit lightly against the paper.
Note: The left edge guide moves slightly during paper handling and printing. Do not adjust the guide during printing.
Loading Special Paper in the Sheet Feeder
You can load these Epson inkjet papers in the sheet feeder as follows:
| Paper type | Loading capacity |
|---|---|
| Epson Premium Photo Paper GlossyEpson Premium Glossy Photo PaperEpson Premium Photo Paper LusterEpson Premium Luster Photo PaperEpson Premium Photo Paper Semi-glossEpson Premium Semigloss Photo PaperEpson Premium Presentation Paper Matte*Epson Matte Paper Heavyweight*Epson Premium Presentation Paper Matte Double-sided*Epson Double-sided Matte Paper*Epson Ultra Premium Presentation Paper Matte*Epson Enhanced Matte Paper* | 20 sheets (10 sheets for A3 or Super B sizes) |
| Epson Presentation Paper MatteEpson Photo Quality Ink Jet Paper | 100 sheets (50 sheets for A3 or Super B sizes) |
| Epson Bright White PaperEpson Premium Bright White Paper | 80 sheets |
| Epson Photo Quality Self Adhesive Sheets | 1 sheet at a time |
- This matte paper requires the matte sheet support when loading multiple sheets larger than letter-size; smaller paper can be loaded without it. See page 15 for instructions.
Check the paper package for additional handling instructions.
Note: Always keep unused paper in the original package and store it flat to prevent curling.
14 Loading Paper
Loading Multiple Sheets of Matte Paper
If you are loading multiple sheets of the following papers in sizes larger than letter (8.5 × 11 inches), attach the matte sheet support to the top of the sheet feeder to help separate the sheets of paper and prevent misfeeds:
■ Epson Ultra Premium Presentation Paper Matte
■ Epson Enhanced Matte Paper
■ Epson Premium Presentation Paper Matte
■ Epson Matte Paper Heavyweight
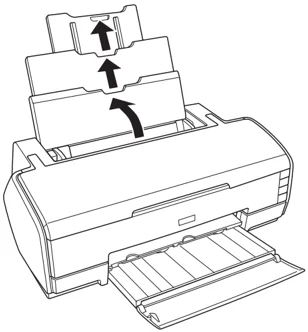
- Open the paper support and pull up its extensions.
Loading Paper 15
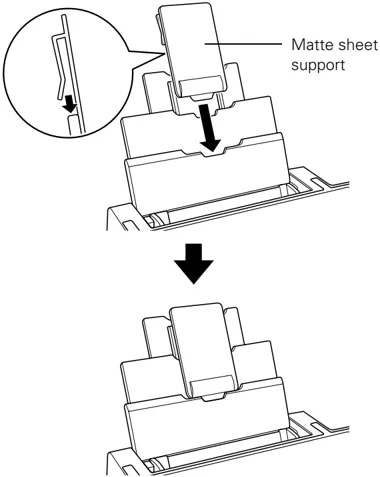
- Place the hook on the back of the matte sheet support over the paper support extension, and hold the top extension with one hand while sliding the matte sheet support all the way down.
Matte sheet support
- Load your paper as described on page 12.
Note: Remove the matte sheet support when you load other types of paper.
16 Loading Paper
Loading Special Paper in the Single Sheet Guide
Load these types of paper in the single sheet guide:
■ Epson Watercolor Paper - Radiant White
■ Epson Velvet Fine Art Paper
■ Epson UltraSmooth Fine Art Paper
■ PremierArt Matte Scrapbook Photo Paper for Epson
-
Remove the roll paper holder if it’s installed (see page 21).
-
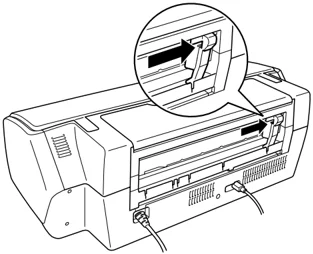
Slide the roll paper edge guide all the way to the right.
Loading Paper 17
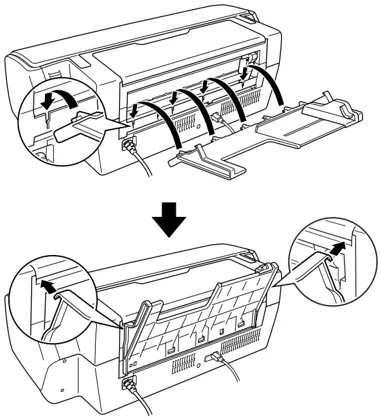
- Line up the notches on the single sheet guide with the slots on the back of the printer and insert them as shown. Then insert the tabs on the top of the guide into the slot beneath the printer cover.
-
Turn on the printer (the printer must be on to load paper in the single sheet guide correctly).
-
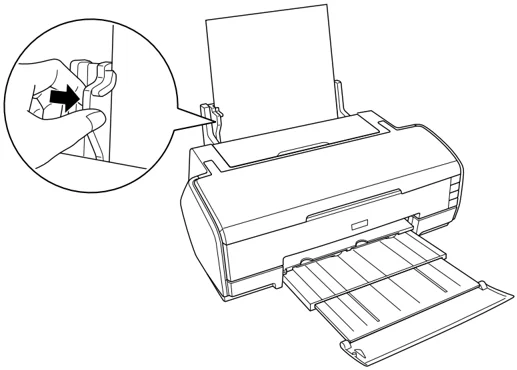
Insert one sheet of paper against the right edge, then slide the left edge guide against the sheet.
18 Loading Paper
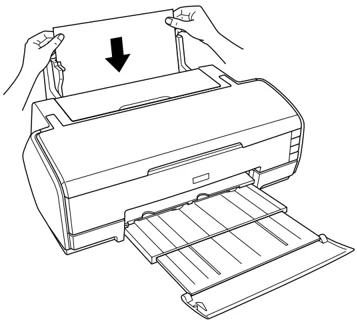
- Guide the paper into the slot and feed it into the printer until the paper meets resistance.
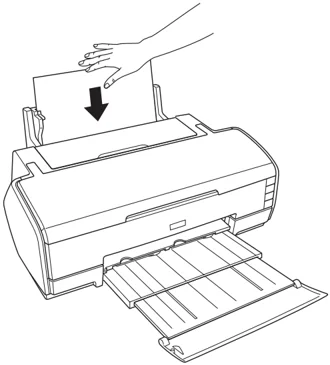
- Maintain constant pressure against the paper until the printer pulls it in slightly. Continue to apply light pressure until the paper begins feeding, then let go of the paper to allow the printer to adjust the paper position.
Loading Paper 19
- Open the printer cover and look down into the printer to make sure the paper is loaded correctly. It should be straight and the leading edge of the paper should not be visible.
 Paper is loaded correctly
If edge is visible, reload paper
If the paper isn’t loaded correctly, press the roll paper button for 3 seconds to back the paper out. Remove the paper, then press the paper button to clear the paper out error. Reload the paper.
- Before printing, select Manual - Roll as the Source setting (Windows) or Manual - Roll as the paper source setting within the Paper Size menu (Macintosh®) in your printer software (see page 28 for Windows or page 33 for Macintosh).
20 Loading Paper
Loading Roll Paper or Canvas
You can load 4-inch, 8.3-inch, or 13-inch wide roll paper or 8.3-inch canvas for printing multiple photos or panoramas, with or without borders.
Note: Instructions apply to both roll paper and canvas unless otherwise noted.
Tip: It’s a good idea to check your ink levels before loading and printing on roll paper (see page 83). If you need to replace a cartridge with roll paper loaded, you should remove the paper or marks may appear in your printout.
- Turn on the printer and remove any paper loaded in the sheet feeder.
- Close the paper support at the top of the printer.
- If the output tray and extension are open, push them in, but leave the flap at the end of the tray down.
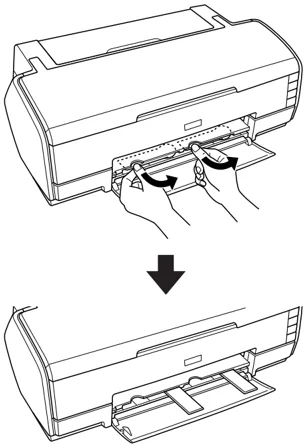
- Swing out the roll paper guides until they are straight.
Tip: Use lint-free, white cotton gloves when handling the media to avoid soiling it with the oils on your fingertips.
Loading Paper 21
- Place the roll paper on the holders as shown, then remove the tape and protective paper from the end of the roll.
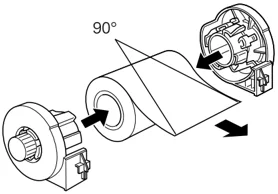
- Make sure the end of the paper is cut straight across, with 90° corners. If the end is cut diagonally, you may have problems feeding the paper. If you’re loading canvas, it is important to cut the edge so it’s straight and even.
- If the paper curls at the end, roll it backwards between a folded sheet of paper to uncurl it.
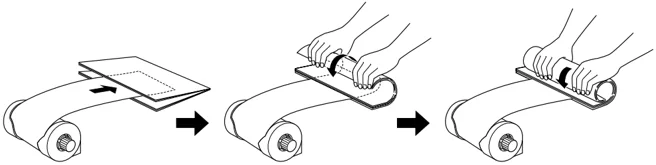
Avoid touching the printable surface of the roll paper with your hands.
22 Loading Paper
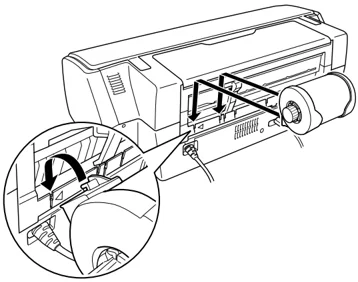
- Insert the left roll paper holder (marked with an orange triangle) into the far left slot (also marked with an orange triangle). Then insert the other holder into the corresponding slot on the right.
- While holding the paper, feed it part of the way into the roll paper feeder (under the white rollers), then slide the right roll paper edge guide to fit lightly against the paper.
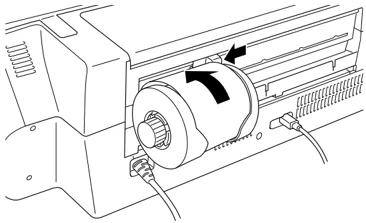
Caution: Don’t load roll paper into the sheet feeder or the slot behind the paper support; make sure it is loaded below the white rollers.
Loading Paper 23
- Push the paper into the feeder until it meets resistance. Maintain pressure on the paper until the printer feeds the paper automatically.
Note: You may need to reload canvas or thicker roll media to ensure accurate paper registration.
When loading canvas, leave ample slack between the roll and the printer to ensure smooth paper feeding. Be sure to maintain slack while printing. If you don’t, your prints may show distortion of shapes, fuzzy text, or banding.
When cutting canvas or other roll paper, it is important to have a straight edge. An uneven or frayed edge may result in misfeeds, misregistration, or unacceptable print quality.
- Open the printer cover and look down into the printer to make sure the paper is loaded correctly. It should be straight and the leading edge of the paper should not be visible.
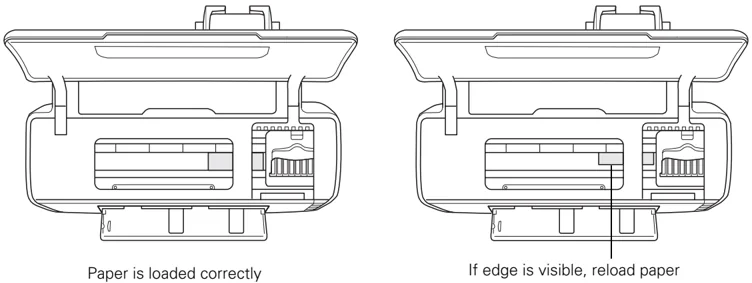
Paper is loaded correctly
If edge is visible, reload paper
If the paper isn’t loaded correctly, press the \text\raisebox-0.5ex\includegraphics[height=1em]fig_icon_roll_paper roll paper button for 3 seconds to back the paper all the way out.
Then turn the roll paper holder knobs to roll up the paper. Press the \text\raisebox-0.5ex\includegraphics[height=1em]fig_icon_paper paper button to clear the paper out error. Repeat steps 7 through 9 to reload the paper.
Follow the instructions on page 43 to print on roll paper.
24 Loading Paper